Cant adjust my timing

Disclaimer: Links on this page pointing to Amazon, eBay and other sites may include affiliate code. If you click them and make a purchase, we may earn a small commission.

OP
OP
89broncodude

89broncodude

New member
Joined
Sep 22, 2017
Messages
30
Reaction score
1
Ilol probably give that a shot. To be honest walmart just opened a gas station up and I've been going there. 

Also i just ran a engine off test and I'm still pulling codes 10 & 34"C". Could the egr seriously be causing all of these issues? I don't see how I could still be pulling codes for this when I've replaced everything that has to deal with the egr except the vacuum tank it's self. 

 
OP
OP
89broncodude

89broncodude

New member
Joined
Sep 22, 2017
Messages
30
Reaction score
1
Only other thing I've noticed is that I can see some exhaust leaking out of the tube  leading to the intake. Does that count as a vacuum leak (sorry about the "noobness")

 
OP
OP
89broncodude

89broncodude

New member
Joined
Sep 22, 2017
Messages
30
Reaction score
1
Here are some pictures of the tube. I assume it's suppose to be 2 pieces right?

1514332280866-1598544564.jpg


miesk5

96 Bronco 5.0
Staff member
Moderator
Joined
Oct 18, 2005
Messages
9,071
Reaction score
1,019
Location
Floating in the Pacific
yo,

The rusted-out EGR Tube won't cause or be part of a vacuum leak.  But a rusted out vacuum tank is common.  Most are roached on bottom side. 

What is the vacuum reading at idle with engine at normal operating temperature? Normal Engine Vacuum at Idle is 15-22 in-Hg for EFI Broncos.  

 Here is a source for the one piece tube, https://www.am-autoparts.com/1989/Ford/BroncoFullSize/egr-tube/AM-3557333220/760482.html?rawFit=760482-1989&gclid=CjwKCAiApo3SBRA4EiwAty8i-qHOoB-6yvhsOrSh0Y2bPL9lKfPH0YhvKaues6IXCgIRPF-UR1nMrxoCOykQAvD_BwE

Also try NAPA, ADV AUTO, etc.

 EGR isn't needed when the engine is cold, only when it is warm and under load. "...Ford EGR systems "...PCM will not operate the EGR valve unless it sees: The engine warmed up to normal operating temperature. TPS at partial throttle. TPS not at Wide Open Throttle (WOT). MAP sensor must be indicating light or moderate load. A certain amount of computer clock time has to be elapsed..."

Test the EVR. Testing & Diagram; "...EVR Testing: vacuum should vent from the green line on a good valve NOT energized. When energized, vacuum should hold from the black to the green. Resistance across the terminals should be 20-70 ohms..."

FYI and for posterity; TSB 92-22-08 EGR TubePublication Date: OCTOBER 21, 1992LIGHT TRUCK: 1988-91 BRONCO, ECONOLINE, F-150, F-250, F-350ISSUE: The EGR tube may break resulting in an exhaust noise. This occurs because of a weakness in the EGR tube design.ACTION: Install a new stronger EGR tube and exhaust manifold connector fitting. Refer to the following procedure for service details.SERVICE PROCEDURE1. Remove the existing EGR tube and exhaust manifold fitting.2. Install a new EGR tube (FOTZ-9D477-A) and new flared exhaust manifold connector fitting (FOTZ-9F485-A).NOTE: BE CERTAIN TO USE THE FOLLOWING TORQUE SPECIFICATIONS.3. Tighten the EGR tube fittings to 25-35 lb-ft (34-47 N-m).4. Tighten the exhaust manifold connector fitting to 40-50 lb-ft (54-68 N-m).5. Secure all vacuum lines away from the EGR tube after replacement.CAUTION: ALL VACUUM LINES MUST BE SECURED AWAY FROM THE EGR TUBE AFTER REPLACEMENT.6. Obtain an Authorized Modifications Decal and list the date, dealer number, and summary of alterations performed. Select a prominent place adjacent to the Vehicle Emission Control Information Decal suitable for installing the Authorized Modifications Decal. Clean the area, install the decal, and cover it with a clear plastic decal shield.PART NUMBER PART NAMEFOTZ-9D477-A EGR TubeFOTZ-9F485-A Exhaust Manifold Connector FittingOTHER APPLICABLE ARTICLES: NONESUPERSEDES: 90-10-11WARRANTY STATUS: Eligible Under Basic And Emissions Warranty Coverage For 1988-1991 Models, Bumper To Bumper And Emissions Warranty Coverage For 1992 Models

 
Last edited by a moderator:
OP
OP
89broncodude

89broncodude

New member
Joined
Sep 22, 2017
Messages
30
Reaction score
1
Ok that makes sense. I ordered a new one online for $20(it was $50-70 in store)

I tested the vacuum canister and it would not hold vacuum. Just ordered another one online as none of the parts stores around me had it in theyre system. Hopefully this will do the trick...

I'm in the process of removing the upper intake so I can replace the egr tube but I think I must not be seeing a bolt somewhere, I've only been able to find 5......either that or I just need to pry the bugger off lol. I'll take a look at my master catalog for a blowup diagram. 

 
OP
OP
89broncodude

89broncodude

New member
Joined
Sep 22, 2017
Messages
30
Reaction score
1
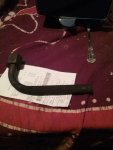
Also I'm pretty sure I figured out why my truck is stalling out and acting out of time.

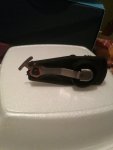
When I bought the new distributor it came with a new tfi,rotor,and cap. I chose not to trust the TFI and i Kept the one I recently purchased. Turns out the contact point on the rotor decided to break and move freely back and forth. I'm about to head to autozone and get a replacement.

1514418678455-1753225081.jpg


Skitter302

Active member
Staff member
Moderator
Joined
Nov 25, 2012
Messages
749
Reaction score
147
Location
WA
Oh, well that ain't gunna work now will it <_<


miesk5

96 Bronco 5.0
Staff member
Moderator
Joined
Oct 18, 2005
Messages
9,071
Reaction score
1,019
Location
Floating in the Pacific
Yo,

While waiting for the new vacuum tank, if you have vacuum tees, hook them up and see how it starts and idles.

Hopefully that pos rotor isn't Motorcraft.  I firmly believe, always, all day, in Motorcraft parts.

 
OP
OP
89broncodude

89broncodude

New member
Joined
Sep 22, 2017
Messages
30
Reaction score
1
Yo,

While waiting for the new vacuum tank, if you have vacuum tees, hook them up and see how it starts and idles.

Hopefully that pos rotor isn't Motorcraft.  I firmly believe, always, all day, in Motorcraft parts.
No its duralast. I go to autozone because they have the best rewards program. You actually get points when renting tools too XD

I would love to stick with motorcraft but I'm just broke at the moment :/

 
OP
OP
89broncodude

89broncodude

New member
Joined
Sep 22, 2017
Messages
30
Reaction score
1
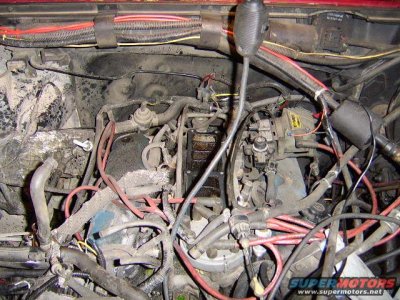
Anyone got any advice for removing the torque bolt on the upper intake?

I can fit in and everything  I just can't get the sob to budge. I've got it soaking in pb blaster and wd 40 atm. I'm worried I'm going to strip it if I keeping trying

 
Last edited by a moderator:

miesk5

96 Bronco 5.0
Staff member
Moderator
Joined
Oct 18, 2005
Messages
9,071
Reaction score
1,019
Location
Floating in the Pacific
Yo

I assume you meant Torx head bolt,

Removal, Upper Intake in an 89 5.0 Source: by Waltman

excerpts;

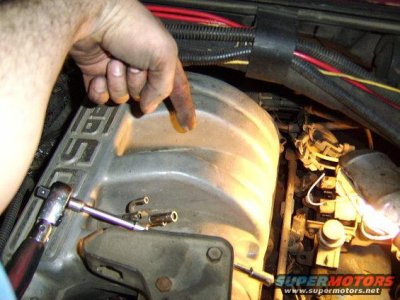
This is the part of removing the plenum which is a hastle. You need a torx bit and a 1/4" drive wrench to remove this, because it is such a tight fit. change-oil-pan-gasket-and-valve-cover-gasket-029.jpgThis is where the torx bit and extansion goeschange-oil-pan-gasket-and-valve-cover-gasket-030.jpgchange-oil-pan-gasket-and-valve-cover-gasket-032.jpgchange-oil-pan-gasket-and-valve-cover-gasket-033.jpgthere was a groung wire secured to one of the studs at the rear of the plenum. Also, don't forget to disconnect the PCV valve on the passenger side rear of the plenumchange-oil-pan-gasket-and-valve-cover-gasket-034.jpgwith the six bolts removed, I am able to lift and remove the plenum. Once I remove the coil which is secured by 2 bolts at the intake manifold and one bolt at the bracket. The coil is attached to those relay doohickys and come off as a unit. I can work on both valve covers.

and

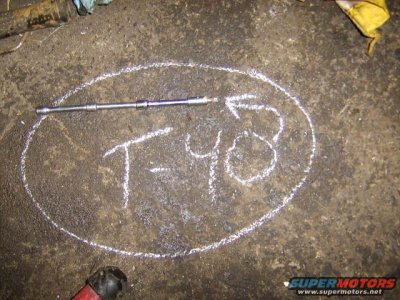
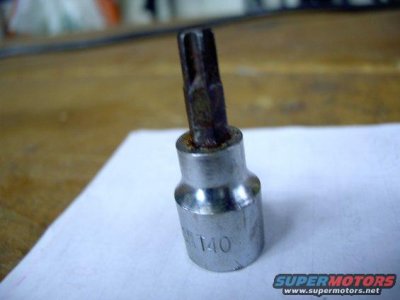
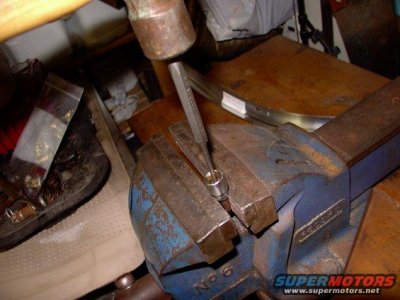
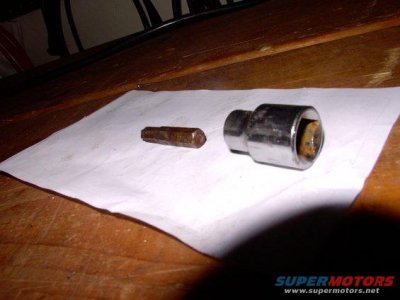
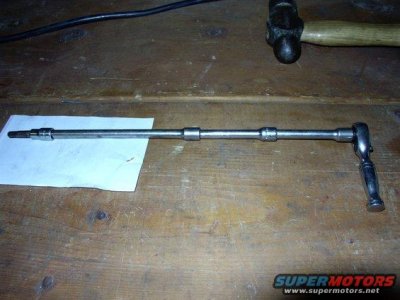
 Removal, Upper Intake Tip & Tool in an 86 5.0; "...This is the Torx T-40 you're going to need to get that pesky inner center ***** out with to remove the EFI's upper intake. Trouble is you'll never get that 3/8" drive socket between the runners, with the space the way it is. I just drift the center part of the T-40 out. It happens to be 1/4" hex. Now it's seperated from it's 3/8" host housing. I use contact cement to glue the T-40 bit into a 1/4" drive 1/4" sized socket and then work with several 1/4" rachet extensions, which pass through the intake runners no trouble at all..." 


img_0117.jpg
IMG_0117.JPG | Hits: 2667 | Size: 26.27 KB | Posted on: 9/12/04 | Link to this image
 

This is the Torx T-40 you're going to need to get that pesky inner center ***** out with to remove the EFI's upper intake. Trouble is you'll never get that 3/8" drive socket between the runners, with the space the way it is. 


Url


Tag


Img


Thumb


img_0119.jpg
IMG_0119.JPG | Hits: 1489 | Size: 52.28 KB | Posted on: 9/12/04 | Link to this image
 

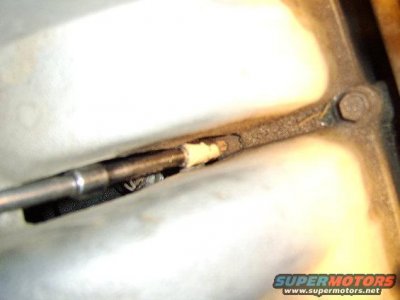
I just drift the center part of the T-40 out. It happens to be 1/4" hex. 


Url


Tag


Img


Thumb


img_0122.jpg
IMG_0122.JPG | Hits: 1745 | Size: 36.72 KB | Posted on: 9/12/04 | Link to this image
 

Now it's seperated from it's 3/8" host housing 


Url


Tag


Img


Thumb


img_0125.jpg
IMG_0125.JPG | Hits: 1553 | Size: 47.95 KB | Posted on: 9/12/04 | Link to this image
 

I use contact cement to glue the T-40 bit into a 1/4" drive 1/4" sized socket and then work with several 1/4" rachet extensions, which pass through the intake runners no trouble at all. 


Source: by Sixlitre (Malcolm H, Eddie Bauer) at SuperMotors.net

 
OP
OP
89broncodude

89broncodude

New member
Joined
Sep 22, 2017
Messages
30
Reaction score
1
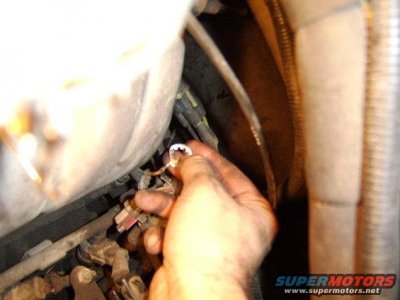
I ended up getting it out. There was a bunch of gunk in the head so I just hammered the t40 bit on it a little and it came out easy. 

But unfortunately I had a ******* moment.... I was just getting ready to put everything back together when I decided to make sure my FPR was on tight enough.Then I dropped my damn Alan wrench down one of the runners in the intake  :((

Now I've got to take my freaking lower intake out. I'm thinking about  just changing out the fuel rail and injectors since I'm going to have to pull it off anyway.

Looks like it's gonna be a few more days before I get it running again.

Do you guys recommend cleaning out the fuel rail/bar or getting a new one?

 
OP
OP
89broncodude

89broncodude

New member
Joined
Sep 22, 2017
Messages
30
Reaction score
1
After looking at the cost of new injectors I have changed my mind lol. Do you guys have any recommendations for which company I should go with for a rebuild kit?


miesk5

96 Bronco 5.0
Staff member
Moderator
Joined
Oct 18, 2005
Messages
9,071
Reaction score
1,019
Location
Floating in the Pacific
Yo,

BOSCH REBUILD KITS ARE USED by many.

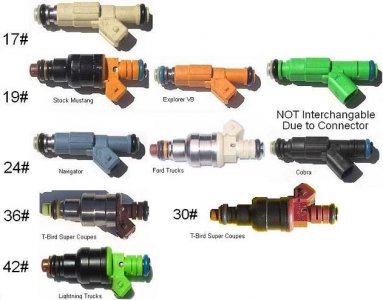
Injector Color & Flow Rate Number Guide & pics; Bronco is Orange @ 19 Lb/Hr 

ford-injector-guide.jpg
ford-injector-guide.jpg | Hits: 1080 | Posted on: 1/14/10 | View original size (44.08 KB)
Ford Fuel Injector Guide  by SeattleFSB (Seattle FSB) 


Pintle Removal; "...I wasn't able to get the pintle caps off this way. I used a razor and put a small slice in the caps and then pulled them off with a small pair of needle-nose pliers..."


Test; "...With eveything connected normally & the key in RUN, pierce the OTHER wire (not the Red one) on any ONE injector & tap it BRIEFLY to ground. Do you hear half the injectors click open & then closed? Put a finger on each one to feel which ones are working. If some of them don't open, repeat the test, holding the ground SLIGHTLY longer each time, but never more than 3 sec continuously...Repeat this for the 2nd bank of injectors (just one with a different color wire)..."

See http://www.fuelinjectedford.com/page82.html


Fuel Rail plenum, lower intake manifold, etc. Removal & Cleaning Info in a 90 5.0 @:Source: by RFR (Mark B)

89-96 5.0 Fuel Rail Bolts are  1/4-20 &  a bit more than 3/4" long.


Dealer Motorcraft Fuel Injector Cleaning System Service Tips TSB 94-8-9 for 87-91 Bronco, Aerostar, Econoline, F Series, Ranger, F 47 & F 53; 91 Explorer and many others @ 

http://www.performanceprobe.com:80/misc/tsb.php?article=94-08-09

Trivia for dealer service department 

 
OP
OP
89broncodude

89broncodude

New member
Joined
Sep 22, 2017
Messages
30
Reaction score
1
So I removed the Alan wrench and changed out my lower intake gasket. It took awhile because the 2 front bolts on the lower intake busted. It looked like whoever worked on this before me filled the the threading located in the heads with some sort of silicone/jb weld. Had to drill and tap. So I got everything put back together and fired her up. 

Immediately smelled gas and found the disconnect line leading to the rail (under the FPR) was leaking a copious amount of gasoline. It's snapped in and secure. It looks like the leak is coming from the back of the stupid disconnect connector thing. I'm about to get a ride to autozone to get some hose clamps and I'll see if that will work for the time being. 

Any idea on how to replace the bugger? The fuel line WILL NOT come off the connecter/thing on the back. Almost feels like there is a spring or something holding the fuel line on....


miesk5

96 Bronco 5.0
Staff member
Moderator
Joined
Oct 18, 2005
Messages
9,071
Reaction score
1,019
Location
Floating in the Pacific
yo,

read this

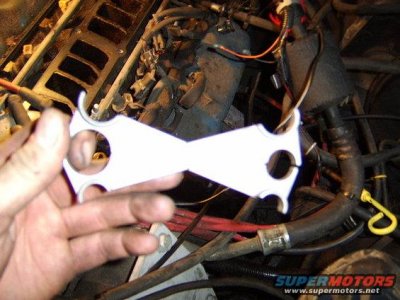
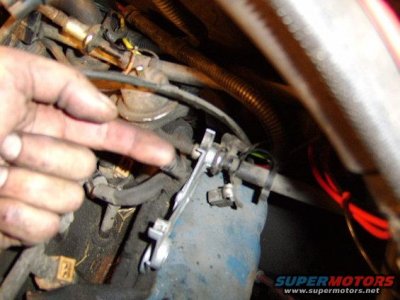
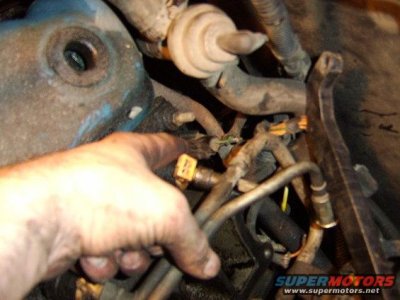
change-oil-pan-gasket-and-valve-cover-gasket-037.jpgto make removal of the wires going to the injectors and all the sensors and such easier, I needed to disconnect the fuel lines using this tool to unlock the connection change-oil-pan-gasket-and-valve-cover-gasket-038.jpgmy finger is pointing in the direction the tool has to go in order to unlock the connection and there is another, larger connection to the left of this onechange-oil-pan-gasket-and-valve-cover-gasket-039.jpg

If I show the wrong location, ask the AZ person for the correct tool.

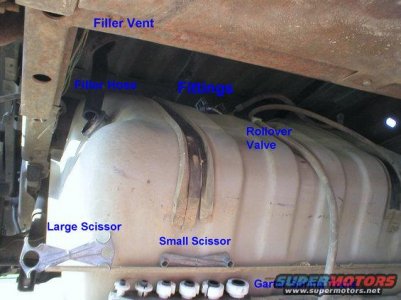
Quick-Disconnect Fittings Overview & Diagrams;


fittings.jpg
Fittings.JPG | Hits: 7412 | Size: 78.22 KB | Posted on: 7/12/03 | Link to this image
 

Fittings : i don't know what is in your 89, so look through this info:
"I prefer the small scissor (5/16" & 3/8"). The large scissor is for the fuel rail fittings, and some A/C quick-connects. Older trucks use a duckbill plastic clip to retain the fittings, so only a flathead screwdriver is needed. "
read and see more pics" @ http://www.supermotors.net/clubs/superford/registry/2742/12737-2


Last edited by a moderator:
OP
OP
89broncodude

89broncodude

New member
Joined
Sep 22, 2017
Messages
30
Reaction score
1
Sorry about the delay. It's been Murphys law working on this truck. 

What I didn't realize in my last post is that there was a nylon fuel line inside of the rubber "fuel line". I got that all patched up and no more leaks.

Truck is still running like shit though. Managed to get the "spark knock" to disappear but advancing the timing to all ost 30 degrees (it's the only way to keep it running) I've also still got a flucuating idle issue.

I just got done reading into one of the vacuum leak troubleshooting guides you linked and I think I have figured out my problem.

My throttlebody is sucking a huge amount of air in idle!  From my understanding the plates shouldn't be letting air through , the IAC should be the only thing getting air right? When I cover the bores the engine stars to slow down and sputter. Maybe I ruined that Teflon coating when I cleaned it? 

I'll take it apart tommorow and see if I can see what's going on with the plates.


Members online

No members online now.

Latest posts

Forum statistics

Threads
22,521
Messages
135,985
Members
25,126
Latest member
Lana Kane
Top