Lift kit install question

Disclaimer: Links on this page pointing to Amazon, eBay and other sites may include affiliate code. If you click them and make a purchase, we may earn a small commission.

OP
OP
ken0275

ken0275

New member
Joined
Dec 28, 2004
Messages
88
Reaction score
2
Location
NW Indiana
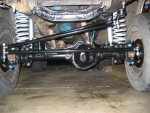
I am 99.99999% sure the bushings are in correct. I do have the 7 degree bushings installed. That is what Bronco Graveyard supplied. Different Bronco places recommend the 4 degree bushings and others say the 7 degree.

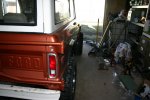
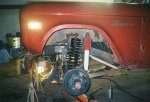
In the pics there are jackstands approx 4 inches behind the radius arm nuts and a floor jack under the axle.

The track bar is also not hooked up at the frame......Waiting on a track bar drop bracket will not be here until next week.

 
Last edited by a moderator:

Bully Bob

TOP GUN
Moderator
Joined
May 23, 2004
Messages
3,844
Reaction score
12
Location
Boulder City, Nevada (Las Vegas area)
Ahhh..., I see the stands...

IMHO you have the jackstand cross bars resting on the weakest point on the cinderblock... :eek: /emoticons/[email protected] 2x" width="20" height="20" />

"The track bar is also not hooked up at the frame......Waiting on a track bar drop bracket"

This can be a struggle to hook up....I used a come-a-long to help align mine.

Sometimes this is easier with the rig back on it paws......

 
OP
OP
ken0275

ken0275

New member
Joined
Dec 28, 2004
Messages
88
Reaction score
2
Location
NW Indiana
So you think with the weight of the motor and the placement of the jack stands, it is causing the frame to droop in the front ????


Bully Bob

TOP GUN
Moderator
Joined
May 23, 2004
Messages
3,844
Reaction score
12
Location
Boulder City, Nevada (Las Vegas area)
Oh no...!

Sorry .., (seperate subject) what I was gett'n at was for safety.....if those blocks were to break.., it's where you have the weight resting on them. It looks like the cross bars on the stands are right across the thin part of the blocks...

Just a "heads-up"


S_bolt19

Member
Joined
Oct 8, 2004
Messages
934
Reaction score
2
Location
Colorado
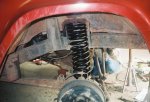
If you were able to get the spring cups on with the 1/8" gap, then you are good. As long as the bolt holes line up, then it is there. Once you get it on the road & it gets a little water in there, it will "rust tight" them suckers for ya :D . The 7* bushings should be fine for a 3.5" lift. Typically, those are reserved for any lift over 3", such as 4" or 5", but they still work with the 3.5". The bowing of your coils isn't a problem, they will do that until you get the weight of the vehicle back on it, see the pix of mine, which are 5.5" coils. As for the pinion angle, it is hard to tell, but like Bob said, you don't necessarily want them pointing directly at the U-joints, which you might not be able to tell until you get that weight on it.

One last thing, and this is my opinion only, but I would rather go with a track bar riser on the axle than the drop bracket on the frame because it causes more stress than needed. The drop bracket puts torque on the frame and can (this is just a possibility, not saying it will) tear the frame. The riser is on the axle tube and has less torque on it and can actually align the track bar better (see the last picture). As for getting that bar re-connected, the easiest way that I found was to put it on as the very last thing, and this is for using both the riser or drop bracket. Put the vehicle back on the ground & get a buddy to rock the front end for you. Don't put the shocks on it yet, but rock that thing back and forth & it will work it's way into place. A do it yourself is the come along method like BB mentioned.

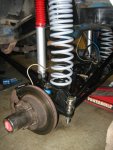
IMG_2495.JPG

IMG_2496.JPG

IMG_2497.JPG

 
OP
OP
ken0275

ken0275

New member
Joined
Dec 28, 2004
Messages
88
Reaction score
2
Location
NW Indiana
The 1/8 of an inch was the difference at the tips of the radius arms. I used 2 blocks and a level on top those. When the driver side touched the level the pass side was only an 1/8" or less above the level.

Where the caps meet the radius arms there was not any gap at all top or bottom.

 
OP
OP
ken0275

ken0275

New member
Joined
Dec 28, 2004
Messages
88
Reaction score
2
Location
NW Indiana
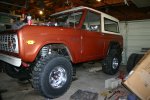
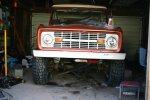
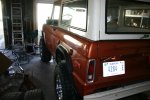
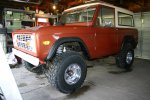
I put the new tires on the front and removed all the jackstands & jacks. With the trucks weight on the front end the coils still have a slight arc to them, but the track bar is still not attached.

With a level across both bumpers the truck sits level on both ends.

There is a slight angle to the front driveshaft, but not much.

I still have to put the front flares on, I will do that later this evening.

I attached a few pics.

Now for some reason I think there is something wrong with it. Because nothing I EVER ......I REPEAT EVER do works out the first or second or even third attempts.

:unsure:

IMG_1237.JPG

IMG_1238.JPG

IMG_1241.JPG

IMG_1242.JPG


Bully Bob

TOP GUN
Moderator
Joined
May 23, 2004
Messages
3,844
Reaction score
12
Location
Boulder City, Nevada (Las Vegas area)
Well.., you may have just ended that curse...!!!

There's really not much to go wrong.....now that you've done it., it's Pretty straight forward.

-------GOOD JOB..! --------

You'll be out stretch'n those springs on a trail pretty soon..... :D /emoticons/[email protected] 2x" width="20" height="20" /> B)

 
Last edited by a moderator:
OP
OP
ken0275

ken0275

New member
Joined
Dec 28, 2004
Messages
88
Reaction score
2
Location
NW Indiana
If you were able to get the spring cups on with the 1/8" gap, then you are good. As long as the bolt holes line up, then it is there. Once you get it on the road & it gets a little water in there, it will "rust tight" them suckers for ya :D . The 7* bushings should be fine for a 3.5" lift. Typically, those are reserved for any lift over 3", such as 4" or 5", but they still work with the 3.5". The bowing of your coils isn't a problem, they will do that until you get the weight of the vehicle back on it, see the pix of mine, which are 5.5" coils. As for the pinion angle, it is hard to tell, but like Bob said, you don't necessarily want them pointing directly at the U-joints, which you might not be able to tell until you get that weight on it.
One last thing, and this is my opinion only, but I would rather go with a track bar riser on the axle than the drop bracket on the frame because it causes more stress than needed. The drop bracket puts torque on the frame and can (this is just a possibility, not saying it will) tear the frame. The riser is on the axle tube and has less torque on it and can actually align the track bar better (see the last picture). As for getting that bar re-connected, the easiest way that I found was to put it on as the very last thing, and this is for using both the riser or drop bracket. Put the vehicle back on the ground & get a buddy to rock the front end for you. Don't put the shocks on it yet, but rock that thing back and forth & it will work it's way into place. A do it yourself is the come along method like BB mentioned.
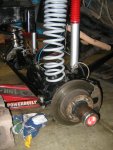
Senor S_bolt....

I can understand what you mean that it could be better to install a track bar riser than a drop bracket. I looked at the stock bracket that is long enough and the drop bracket will add more to it.

I do not plan on doing serious off roading....I am getting too old and brittle.

My concern would be long term effects of the drop bracket on my frame.

How do I install a track bar riser? What were your measurements from the hub backing plate?

My bronco is/was stock.....So I should still have the dana 44

Thanks

I attached a pic of the bronco with the flares on the front......I hate to say this but that truck looks good :rolleyes:

IMG_1245.JPG


Bully Bob

TOP GUN
Moderator
Joined
May 23, 2004
Messages
3,844
Reaction score
12
Location
Boulder City, Nevada (Las Vegas area)
FYI

IMHO Unless you're going to do serious 4x4'n & rock crawl'n .., the drop bracket & frame are in no danger.

The riser does req. welding. Either would do the job for you.

 
Last edited by a moderator:

scrub

New member
Joined
Apr 8, 2004
Messages
70
Reaction score
0
Location
Ponoka, AB
Just a heads up from personal exp. I have a 4" lift in my 76. With this size of lift it's easy to forget about the driveshafts. The splines are prabably in about an inch wich is fine untill u hit a heave in the hwy doin 80 and the rear driveshaft parts. :angry: Had my driveshafts lengthened. Too bad that was just after I got new duals installed! :mad:

 
Last edited by a moderator:

S_bolt19

Member
Joined
Oct 8, 2004
Messages
934
Reaction score
2
Location
Colorado
FYIIMHO Unless you're going to do serious 4x4'n & rock crawl'n .., the drop bracket & frame are in no danger.

The riser does req. welding. Either would do the job for you.
I completely agree with this. I only suggest the riser because I have done some serious modifications & transformations to my front end, as well as spend quite a bit of time on the trail. If you are not planning on doing a lot of 'wheelin, then I wouldn't worry about a riser and would just go with a drop bracket. The drop is easier to install than the riser and it does do the same thing, which is that it locates the track bar parallel (or close to) with the steering linkage. I just like the riser because of the torque issue on the frame, which won't be a problem for a 75/25 (road/offroad) vehicle. The drop bracket should also be welded to the frame to make sure that it doesn't move at all. If you go with the riser, order it from Wild Horses & it comes with directions on installation. It is pretty straight forward, but does require welding. You have to weld a spacer on the back of the plate & then the mounting bolt to the spacer & then the whole unit to your axle tube. It has a hole in the bracket where the old track bar mounting bolt goes through & then you just weld that up too. It took me about 45 minutes of work to get it adjusted to the proper spot & welded together.


TX '73

New member
Joined
Dec 7, 2006
Messages
105
Reaction score
0
Location
Texas
Nice paint color - mine is similar. Check these pics of mine when I installed 3.5" system from wild horses. I've got 7 degree c bushings also.....no lean eventhough my coils look funky too. I think s bolt is right... it should straighten up, mine did at least.

PS take your time putting your flares on. Try to get them as symmetric as you can and evenly space your screws. It will be worth it. Crooked installs look shabby.

ALso kudos on doing this yourself. Anyone can roll up to 4wheen parts stores and write a check. You'll be glad you did this, know more about your bronco and take pride in your rig. Wish you luck. Hope my upload works.

10_20_2006_06.jpg

10_20_2006_09.jpg


MUZZALL

New member
Joined
Mar 13, 2009
Messages
52
Reaction score
0
Location
Ellensburg WA
First off, nice looking rig. I have the same problem with the bow in my coils. A friend mine built some shims to go between his lower bucket and C's. This put his springs nice and straight.

As for the WH riser bracket, I have hit mine on the frame a few times on the frame when wheeling hard. I don't know if I'd recommend it with only 3 1/2 coils.

 
OP
OP
ken0275

ken0275

New member
Joined
Dec 28, 2004
Messages
88
Reaction score
2
Location
NW Indiana
Thanks for all the input.......With all the weight on the tires...coils are still bowed a little. Track bar is not hooked up yet. Tomorrow I will hopefully finish it. Flares went on easy enough......Drivers side front is about 3/16ths lower than the passenger side. To look at it you cannot tell the difference.

I am converting my 76 Y-Steering to the earlier years. I purchased the JBG conversion kit, do I need to ream the knuckles out??? I am NOT doing the top down....Tie rods will go in from the bottom like the factory.

In my research I cannot find anywhere where the knuckles are different on the dana 44's from 75 to 76.


Bully Bob

TOP GUN
Moderator
Joined
May 23, 2004
Messages
3,844
Reaction score
12
Location
Boulder City, Nevada (Las Vegas area)
Thurs. at 2:00 P.M. the UPS truck rolled up with my new 7deg. C-bushings...

By 5:00 P.M. I had'em swapped out & was kick'n back in the garage sipp'n on a brewski...!! :D /emoticons/[email protected] 2x" width="20" height="20" />

Even after stopping to B.S. with my neighbor for 30+ minutes.

------------ <_< Bet ya didn't need to hear that...!! --------------

(long story) B)

"Drivers side front is about 3/16ths lower than the passenger side. To look at it you cannot tell the difference"

Where you measure makes a diff. The frame tips., both front & back is best.

Sheet-metal can vary on these rigs. (A crooked install can cause the rear to lean also.)

"....do I need to ream the knuckles out???"

I believe it's a direct bolt-up.

Prob. need a 66-75 pitman arm. Some folks req. 1/4" spacers on the front wheels., depending on tires, wheels, backspacing, etc.

 
Last edited by a moderator:
OP
OP
ken0275

ken0275

New member
Joined
Dec 28, 2004
Messages
88
Reaction score
2
Location
NW Indiana
The 3/16th" difference is on the front flares.......I measured from the body line down. I have the 66-75 drop pitman arm. I better have the correct one....... I bought the lift kit and conversion kit the same day. I drove up to JBG to pick everything up and reminded them that I needed the different pitman arm.

What is the difference between the 2?

My bronco still sits perfectly level........4ft level stitting across the front bumper and then again on the back bumper.

 
OP
OP
ken0275

ken0275

New member
Joined
Dec 28, 2004
Messages
88
Reaction score
2
Location
NW Indiana
After a 2 month hiatus of not working on my truck, due to being a lazy SOB!!!

I am to the point I am putting the 66 - 75 steering conversion on my truck. Does anyone know the measurement from tie rod knuckle hole to the other side or another measurement I can use. I just want to get it close enough to back it out of the garage and load it on the trailer, then take it straight to the alignment shop.

Well maybe a drive around the block 1st????


Members online

Forum statistics

Threads
22,630
Messages
136,785
Members
25,317
Latest member
drubbz
Top