You are using an out of date browser. It may not display this or other websites correctly.
You should upgrade or use an alternative browser.
You should upgrade or use an alternative browser.
92 Bronco F250 Chassis and 5.9L Cummins Diesel Engine Swap - Documented build thread
- Thread starter Scottburgesscpa
- Start date
Disclaimer: Links on this page pointing to Amazon, eBay and other sites may include affiliate code. If you click them and make a purchase, we may earn a small commission.
Scottburgesscpa
Member
Thanks!Can't wait to see this thing come together. When will you be getting the gauages again? Sorry if you said it and I missed it.
Not sure...waiting on LCD screens from China...probably about 4-6 weeks! Making a few minor changes to the gauges but they're definitely getting close!!
Scottburgesscpa
Member
I am so excited! I picked up the custom aluminum fuel tank from the welding shop! It should hold somewhere between 34-37 gallons. It is designed to fit between the frame rails behind the rear axle. The "wings" on each side will bolt to the frame rails. We used gussets to strengthen the mounting brackets due to the sheer weight! This will definitely help to put some weight in the rear end (270-300 pounds when full). There was one additional baffle installed that has not been pictured. We have 3 (-10AN) ports on the sump because, of course, the first port is the supply line port, but according to the engineers as FAAS, the fuel pump needs a dedicated return and then there needs to be another return from the fuel rail on the engine. I hope y'all like it! Let me know what y'all think!
Attachments
Scottburgesscpa
Member
Scottburgesscpa
Member
Finally got the final instrument cluster design all mocked up...we played with photoshop a little bit to put the picture of the gauges into a picture of the actual F150 dash bezel it's going into!! LMK what ya'll think!
Attachments
Thats gunna look cool!
Scottburgesscpa
Member
Thanks! Appreciate the comment!Thats gunna look cool!
Yo Scott,
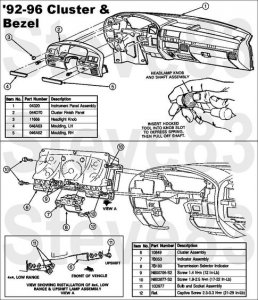
Looks great! Hopefully the bezel won't be prone to damage when removing for repair as the originals suffer..
92-96 Cluster Bezel Repairs
"It's common for the clips across the top snap off their mounting posts, but the posts are hollow, so it's fairly easy to install a *****. The hardest part is getting the final 1/4 turn on the ***** so the clip stays tight.

It's even more common for the ***** holes behind the trim strips to break out, but it's easier to repair them. I used this plumber's strap to hang some hardware for powdercoating, which is why it's black. But since it'll be totally hidden, plain strap is just as good. Even if the holes haven't cracked yet, this mod will prevent them from ever breaking" by Steve
Keep on keeping on Scott.
Looks great! Hopefully the bezel won't be prone to damage when removing for repair as the originals suffer..
92-96 Cluster Bezel Repairs
"It's common for the clips across the top snap off their mounting posts, but the posts are hollow, so it's fairly easy to install a *****. The hardest part is getting the final 1/4 turn on the ***** so the clip stays tight.

It's even more common for the ***** holes behind the trim strips to break out, but it's easier to repair them. I used this plumber's strap to hang some hardware for powdercoating, which is why it's black. But since it'll be totally hidden, plain strap is just as good. Even if the holes haven't cracked yet, this mod will prevent them from ever breaking" by Steve
Keep on keeping on Scott.
Scottburgesscpa
Member
Yo Scott,
Looks great! Hopefully the bezel won't be prone to damage when removing for repair as the originals suffer..
92-96 Cluster Bezel Repairs
"It's common for the clips across the top snap off their mounting posts, but the posts are hollow, so it's fairly easy to install a *****. The hardest part is getting the final 1/4 turn on the ***** so the clip stays tight.
View attachment 21485
It's even more common for the ***** holes behind the trim strips to break out, but it's easier to repair them. I used this plumber's strap to hang some hardware for powdercoating, which is why it's black. But since it'll be totally hidden, plain strap is just as good. Even if the holes haven't cracked yet, this mod will prevent them from ever breaking" by Steve
Keep on keeping on Scott.
Steve,
Thanks! Actually, I'm getting rid of the entire dash from the Bronco and putting in the entire interior from a 2011 F150 Platinum.....seats, console with floor shifter, complete dash....everything!!! That oughtta fix the problem!!
Yo Scott,
Fantastic! It will be One-of-a-kind!
Fantastic! It will be One-of-a-kind!
Scottburgesscpa
Member
So don't know if you will be able to view this video of my working instrument cluster, but here it is! This was just a test run by hooking it up to power to test it. I finally started removing the bronco body from the chassis last weekend and hope to finish this weekend and have some pics for y'all. Also pretty cool...I bought a bronco Remote Controlled truck and I am fixing it up and painting it to be a miniature version of my big one so I can play with colors and designs...I'll post some pics next week! Thanks for everyone's positive comments and feedback so far! Enjoy!
 drive.google.com
Scottb4.mp4
 drive.google.com
The displays look great!
TheDeuce01
New member
Wait...that's it!? Where's the rest of the build?
Scottburgesscpa
Member
It's actually been in a holding pattern for well over a year now. We just restarted it and hope to post some new updates soon.
TheDeuce01
New member
OK, cool! Looks like it's going to be a sweet conversion!
Similar threads
- Replies
- 4
- Views
- 2K


