Coolant Leakage From Radiator Hose

Disclaimer: Links on this page pointing to Amazon, eBay and other sites may include affiliate code. If you click them and make a purchase, we may earn a small commission.

itssvicc

New member
Joined
Nov 18, 2019
Messages
3
Reaction score
0
Hello everyone, this is my first post. I jsut bought my 92' bronco in July. I was told that truck has been sitting for a while. Since I bought I have replaced the alternator, battery, break line and calipers. Windshield washer motor(its all pretty but still doesnt work, I believe the spray nozzles themselves are clogged), the accessory belt and it has been tuned. It still has a hard time around 20-45 mph as if it wants to stall at some point. This is a random event as in I can correlate it with just one thing  but occurs every time I drive, it also could be the cold weather, I don't know.I am just getting into cars and repairs.

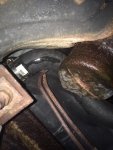
The reason why I am posting is because It seems that I have coolant leak from the lower radiator hose. However, it does appear that there is liquid coming from upper hose as well. I would like this to be my first project that I attempt to do on my truck. I would like to know what you guys think. The leak tends to occur after my truck cools down. I read on another post that this may be an end cap? Let me know what you think. The first picture is looking down on the radiator and the second is from underneath the truck. 
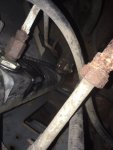
image0.jpeg

image1.jpeg


miesk5

96 Bronco 5.0
Staff member
Moderator
Joined
Oct 18, 2005
Messages
9,078
Reaction score
1,035
Location
Floating in the Pacific
Yo itssvicc,

WELCOME!

My vision is poor, so it it's leaking at the hose to radiator fitting clamps, try slowly tightening them.

Following by Ford, "


Radiator Hoses, Upper and Lower


Removal


  1. NOTE: Radiator hoses should be checked as directed in the applicable Maintenance Schedule. Refer to Section 00-03. Replace whenever hoses become cracked, rotted or have a tendency to collapse.

    Drain the radiator (8005). Refer to the Cooling System Draining, Filling and Bleeding in the Cleaning and Inspection portion of this section.

  1. Slide the hose clamps (8287) onto hose at each end of the hose to be removed. Slide the hose off the radiator connection and the water outlet connection (upper radiator hose (8260)) or the water pump connection (lower radiator hose).

 
Installation

  1. ani_caut.gif CAUTION: Ensure the hose clamps are beyond the bead and placed in the center of the clamping surface of the connections.

    Position the hose clamps at least 3.2mm (1/8 inch) from each end of the hose. Coat the connection areas with an approved water-based lubricant and slide the hose on the connections. Tighten hose clamps."


Try Burping the coolant system; this is by Ford;
"WARNING: DO NOT STAND IN LINE WITH OR NEAR ENGINE COOLING FAN BLADE (8600) WHEN ENGINE (6007) IS RUNNING.

WARNING: NEVER REMOVE THE RADIATOR CAP (8100) UNDER ANY CONDITIONS WHILE THE ENGINE IS OPERATING. FAILURE TO FOLLOW THESE INSTRUCTIONS COULD RESULT IN DAMAGE TO THE COOLING SYSTEM OR ENGINE OR PERSONAL INJURY. TO AVOID HAVING SCALDING HOT COOLANT OR STEAM BLOW OUT OF THE RADIATOR (8005), USE EXTREME CARE WHEN REMOVING THE RADIATOR CAP FROM A HOT RADIATOR. WAIT UNTIL THE ENGINE HAS COOLED, THEN WRAP A THICK CLOTH AROUND THE RADIATOR CAP AND TURN IT SLOWLY TO THE FIRST STOP. STEP BACK WHILE THE PRESSURE IS RELEASED FROM THE COOLING SYSTEM. WHEN YOU ARE SURE ALL THE PRESSURE HAS BEEN RELEASED, PRESS DOWN ON THE RADIATOR CAP (STILL WITH A CLOTH), TURN AND REMOVE IT.
1. Fill the radiator with a 50/50 mixture of the specified engine coolant concentrate and water. Allow several minutes for trapped air to escape (bubble out) and for engine coolant to flow through the radiator.
2. Replace the radiator cap to its fully installed position, then back off to the first stop. This will prevent high pressure from building up in the cooling system during this part of the fill procedure.
3. Start and idle the engine until the thermostat opens and the radiator upper hose becomes warm.
4. Shut off the engine and allow the engine to cool. Cover the radiator cap with a thick cloth and cautiously remove it. Step back while the pressure releases.
5. Finally, check the radiator and add more engine coolant if needed, following the procedures noted above. Reinstall the radiator cap securely, when finished.
6. If more engine coolant is necessary, fill the overflow reservoir to the appropriate level marked on the bottle."

  1. Fill the radiator. Refer to Cooling System Draining, Filling and Bleeding in the Cleaning and Inspection portion of this section.

  1. Start the engine (6007), check the hoses and connections for leaks."

□○□

Free registration for some wiring diagrams (86 through 96) and Technical Service Bulletins, (80 through 96), same as by Ford @ BBB Industries- Premium Alternators, Starters, Power Steering Products | TSB's & Wiring Diagrams

Al


Skitter302

Active member
Staff member
Moderator
Joined
Nov 25, 2012
Messages
749
Reaction score
147
Location
WA
Looks like your leak is caused by improperly installed hose clamps.  Make sure the clamps are on the other side of the ridge of the necks coming out of the radiator tank and do not over tighten.

 
OP
OP
I

itssvicc

New member
Joined
Nov 18, 2019
Messages
3
Reaction score
0
Yo itssvicc,

WELCOME!

My vision is poor, so it it's leaking at the hose to radiator fitting clamps, try slowly tightening them.

Following by Ford, "


Radiator Hoses, Upper and Lower


Removal


  1. NOTE: Radiator hoses should be checked as directed in the applicable Maintenance Schedule. Refer to Section 00-03. Replace whenever hoses become cracked, rotted or have a tendency to collapse.

    Drain the radiator (8005). Refer to the Cooling System Draining, Filling and Bleeding in the Cleaning and Inspection portion of this section.

  1. Slide the hose clamps (8287) onto hose at each end of the hose to be removed. Slide the hose off the radiator connection and the water outlet connection (upper radiator hose (8260)) or the water pump connection (lower radiator hose).

 
Installation

  1. ani_caut.gif CAUTION: Ensure the hose clamps are beyond the bead and placed in the center of the clamping surface of the connections.

    Position the hose clamps at least 3.2mm (1/8 inch) from each end of the hose. Coat the connection areas with an approved water-based lubricant and slide the hose on the connections. Tighten hose clamps."


Try Burping the coolant system; this is by Ford;
"WARNING: DO NOT STAND IN LINE WITH OR NEAR ENGINE COOLING FAN BLADE (8600) WHEN ENGINE (6007) IS RUNNING.

WARNING: NEVER REMOVE THE RADIATOR CAP (8100) UNDER ANY CONDITIONS WHILE THE ENGINE IS OPERATING. FAILURE TO FOLLOW THESE INSTRUCTIONS COULD RESULT IN DAMAGE TO THE COOLING SYSTEM OR ENGINE OR PERSONAL INJURY. TO AVOID HAVING SCALDING HOT COOLANT OR STEAM BLOW OUT OF THE RADIATOR (8005), USE EXTREME CARE WHEN REMOVING THE RADIATOR CAP FROM A HOT RADIATOR. WAIT UNTIL THE ENGINE HAS COOLED, THEN WRAP A THICK CLOTH AROUND THE RADIATOR CAP AND TURN IT SLOWLY TO THE FIRST STOP. STEP BACK WHILE THE PRESSURE IS RELEASED FROM THE COOLING SYSTEM. WHEN YOU ARE SURE ALL THE PRESSURE HAS BEEN RELEASED, PRESS DOWN ON THE RADIATOR CAP (STILL WITH A CLOTH), TURN AND REMOVE IT.
1. Fill the radiator with a 50/50 mixture of the specified engine coolant concentrate and water. Allow several minutes for trapped air to escape (bubble out) and for engine coolant to flow through the radiator.
2. Replace the radiator cap to its fully installed position, then back off to the first stop. This will prevent high pressure from building up in the cooling system during this part of the fill procedure.
3. Start and idle the engine until the thermostat opens and the radiator upper hose becomes warm.
4. Shut off the engine and allow the engine to cool. Cover the radiator cap with a thick cloth and cautiously remove it. Step back while the pressure releases.
5. Finally, check the radiator and add more engine coolant if needed, following the procedures noted above. Reinstall the radiator cap securely, when finished.
6. If more engine coolant is necessary, fill the overflow reservoir to the appropriate level marked on the bottle."

  1. Fill the radiator. Refer to Cooling System Draining, Filling and Bleeding in the Cleaning and Inspection portion of this section.

  1. Start the engine (6007), check the hoses and connections for leaks."

□○□

Free registration for some wiring diagrams (86 through 96) and Technical Service Bulletins, (80 through 96), same as by Ford @ BBB Industries- Premium Alternators, Starters, Power Steering Products | TSB's & Wiring Diagrams

Al
Wow! This was very detailed and I appreciate the thoroughness of each step. I am very exited to fix this issue. 😈 the next project will be a leaky gas line 😫

 
OP
OP
I

itssvicc

New member
Joined
Nov 18, 2019
Messages
3
Reaction score
0
Looks like your leak is caused by improperly installed hose clamps.  Make sure the clamps are on the other side of the ridge of the necks coming out of the radiator tank and do not over tighten.
Thank you !!


ragtop69

Member
Joined
Dec 23, 2019
Messages
57
Reaction score
31
Location
Lincoln, CA
Miesk5, I can't tell you how happy I am to find you here on this forum. I left FSB because of the strange graphics that were superimposed on the posts. Not sure why but I believe it had to do with the site switching software to allow a phone app. Your presence here gives me faith that I can find well researched answers to my mechanical and electrical questions.
 

Members online

No members online now.

Latest posts

Forum statistics

Threads
22,617
Messages
136,650
Members
25,267
Latest member
Broncodad86
Top