Window Motor Fix

Disclaimer: Links on this page pointing to Amazon, eBay and other sites may include affiliate code. If you click them and make a purchase, we may earn a small commission.

stinger

New member
Joined
Jul 31, 2004
Messages
99
Reaction score
0
Location
East TN
gallery_1227_64_1091842225.jpg


Here are instructions to fix the problem common to all ford window motors . These nylon barrells sooner or later all break apart. Clean out all of the broken peices and clean out the motor transmission . Next you need (6) 1/4" nuts . Place 2 nuts stacked flat on each other into each of the three holes (highlighted in the photo) . Put some fresh qualitly wheel bearing grease into the all of the transmission part of the window motor . Then reinstall the drive gear and the cover plate. Reinstall the window motor and enjoy a window that will always run trouble free until either the motor itself frys or the worm gear wears out..

Hope that you all find this little tip handy :D /emoticons/[email protected] 2x" width="20" height="20" />

Soon to come i will do a write up with photos of installing LED underbody lights for those of you that like to go wheeling in the dark. Will be trail tested with some night photos of these lights in use on the trail(maybe a few weeks cause i will be moving on the 20th of Aug).


Ktomek06

New member
Joined
Mar 13, 2004
Messages
520
Reaction score
2
Excellent Write-up!! I have a feeling I'll be using it in a week or two..My window is starting to go up and down real slow! Nice Job..Cant wait to see the write-ups to come!

:)>-


o0oeyeballo0o

New member
Joined
Feb 24, 2007
Messages
6
Reaction score
0
gallery_1227_64_1091842225.jpg

Here are instructions to fix the problem common to all ford window motors . These nylon barrells sooner or later all break apart. Clean out all of the broken peices and clean out the motor transmission . Next you need (6) 1/4" nuts . Place 2 nuts stacked flat on each other into each of the three holes (highlighted in the photo) . Put some fresh qualitly wheel bearing grease into the all of the transmission part of the window motor . Then reinstall the drive gear and the cover plate. Reinstall the window motor and enjoy a window that will always run trouble free until either the motor itself frys or the worm gear wears out..

Hope that you all find this little tip handy :D /emoticons/[email protected] 2x" width="20" height="20" />

Soon to come i will do a write up with photos of installing LED underbody lights for those of you that like to go wheeling in the dark. Will be trail tested with some night photos of these lights in use on the trail(maybe a few weeks cause i will be moving on the 20th of Aug).


WILL THE WINDOWS FROM A 86 FIT A 88?


wtfdissux

New member
Joined
Dec 15, 2004
Messages
451
Reaction score
0
Location
Buffalo, NY
pretty sure the windows are the same but it is easy enough to pull a side window from the door and compare the glass but why not call a local auto glass company or even a scrap yard they should be able to tell you


bobstrat

New member
Joined
Nov 18, 2006
Messages
367
Reaction score
0
Location
beautiful trenton, n.j.
works like a charm. i had to put the nuts in one at a time though, stacked i couldnt get the drive gear aligned. had to put the bottom ones in first and then start the drive gear back on, then slide the second nuts in. do you have a trick for that?


wtfdissux

New member
Joined
Dec 15, 2004
Messages
451
Reaction score
0
Location
Buffalo, NY
I cant really visualise what your saying but try nuts that are a hair thinner did it with my L side last weak and now works smother and faster than when I got it one tip is put some grease not that I said some just enough to make it kinda tacky before the nuts and some one the nuts them selves as it helps them stay in place


bobstrat

New member
Joined
Nov 18, 2006
Messages
367
Reaction score
0
Location
beautiful trenton, n.j.
i guess the broken pieces scuffed up the bottoms of the three holes. when i stacked the nuts up and tried to slide the drive gear back in, the bottom nuts would move, almost like they wanted to stand on end. and i did try using grease to keep them in place. youre right though, now that its back together it works better than it ever did since ive owned the truck.


CraigK

New member
Joined
Feb 16, 2006
Messages
46
Reaction score
0
The driver's side window of my '87 BII just goes thunk-thunk-thunk-thunk, and goes up and down about 1/8". My passenger side window goes up really SLOOOOOOW. What are the symtptoms of having broken bushings in the window gearbox? Thank you.

CraigK


wtfdissux

New member
Joined
Dec 15, 2004
Messages
451
Reaction score
0
Location
Buffalo, NY
the drivers side is guilty the thunking is what happens because the window transmission is slipping when the motor is engaged due to the bushings not keeping the gear "loaded"

the passenger side may be starting to go as well but is more likely just in need of lubrication or has a weak electrical feed as the wires going thr from the body to the door sometimes crack and corrode try checking the current strength at the motor if low correct as needed

if good open the transmision end (after removing the motor from the door ) and cleen out and add grease or use the above described method as PM and grease also aply some grease to the regulator and at the slide where the regulator attaches to the glass and a small spray of silicone along the window slides


CraigK

New member
Joined
Feb 16, 2006
Messages
46
Reaction score
0
wtfdissux

Thanks for your reply. I'll probably try to repair my windows this weekend. Is there any specific silicone product (name/brand/supplier) that you can recommend for the window slides?

CraigRK


CraigK

New member
Joined
Feb 16, 2006
Messages
46
Reaction score
0
Hi All

I've just finished performing the window gear bushing repair procedure on my B2. After years of pulling my window up with a piece of tape, the driver's side window now functions perfectly, at a cost of almost nothing. (GREAT POSTING! - Thank You "stinger")

I thought I'd add to this thread a couple of potentially helpful tips. Removing the old grease full of broken pieces of plastic inside the gear assembly, and inserting the 1/4" nuts as described above was fairly straightforward. The trick is getting the darn motor out!

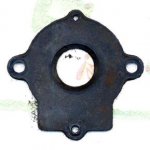
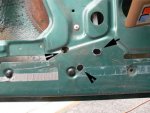
To remove just the window motor rather than disassembling the entire window mechanism (which I think is a MUCH easier approach), I drilled three holes in the inside door panel metal to give me access to the three bolts that hold the motor/gear drive on to the up/down assembly, which is riveted in place. I first marked where I thought the three bolt heads were located, then drilled three 1/4" holes, followed by three 1/2" holes. These half inch holes were big enough for me to use a 1/4" ratchet through, and removal of the motor was easy once the holes were drilled. (Because I sorta missed on one hole, I had to widen the hole somewhat with a grinding tool.) I have included two images here. The first is of the holes in the door panel that I drilled to gain access to the motor bolts. As these were not perfectly aligned with the holes (but close enough to work), I recommend not using their placement on the panel in this image as locators for your own holes. You can porbably do better. To help with this, I've included an image of the gasket from the back of the motor/gear assembly which shows the bolt pattern exactly. If you download and print this image sized at exactly 4" x 4", it can be used as a template for drilling the three holes.

Also, FYI:

The 3 screws that attach the door handle to the door have 7mm heads.

The 3 motor/gear assembly bolts are 8mm.

Remember to tape your window in the full up position before you begin to work on your window assembly.

The replacement procedure is very sensitive to 1/4" nut size. I had one nut that simply wouldn't work. You might want to have an assortment of different brands of nuts available before starting.

Hope this helps anyone who does this repair themselves.

CraigK
DoorHoles4MotorAccessArrows.JPG

WindowMotorBoltPattern.JPG


1994eb

New member
Joined
Jul 20, 2007
Messages
6
Reaction score
0
You Guys Just saved me a lot of time with your quick repair. My Drivers side motor was slipping so I followed the info But used 1/4 rubber fuel line (no 1/4" nutsat home) and it works great. Thanks


r5cents

New member
Joined
Sep 14, 2007
Messages
2
Reaction score
0
gallery_1227_64_1091842225.jpg

Here are instructions to fix the problem common to all ford window motors . These nylon barrells sooner or later all break apart. Clean out all of the broken peices and clean out the motor transmission . Next you need (6) 1/4" nuts . Place 2 nuts stacked flat on each other into each of the three holes (highlighted in the photo) . Put some fresh qualitly wheel bearing grease into the all of the transmission part of the window motor . Then reinstall the drive gear and the cover plate. Reinstall the window motor and enjoy a window that will always run trouble free until either the motor itself frys or the worm gear wears out..

Hope that you all find this little tip handy :D /emoticons/[email protected] 2x" width="20" height="20" />

Soon to come i will do a write up with photos of installing LED underbody lights for those of you that like to go wheeling in the dark. Will be trail tested with some night photos of these lights in use on the trail(maybe a few weeks cause i will be moving on the 20th of Aug).

Napa sells the parts kit cheap. On broncos there are small dimples in the door where you drill 1/2" holes to access the bolts . this makes this job super easy.


hrodriguez112

New member
Joined
Feb 25, 2008
Messages
1
Reaction score
0
gallery_1227_64_1091842225.jpg

Here are instructions to fix the problem common to all ford window motors . These nylon barrells sooner or later all break apart. Clean out all of the broken peices and clean out the motor transmission . Next you need (6) 1/4" nuts . Place 2 nuts stacked flat on each other into each of the three holes (highlighted in the photo) . Put some fresh qualitly wheel bearing grease into the all of the transmission part of the window motor . Then reinstall the drive gear and the cover plate. Reinstall the window motor and enjoy a window that will always run trouble free until either the motor itself frys or the worm gear wears out..

Hope that you all find this little tip handy :D /emoticons/[email protected] 2x" width="20" height="20" />

Soon to come i will do a write up with photos of installing LED underbody lights for those of you that like to go wheeling in the dark. Will be trail tested with some night photos of these lights in use on the trail(maybe a few weeks cause i will be moving on the 20th of Aug).

can you post picutures on removing and installing a driver side window motor for a 1995 for bronco?? thank you.


90BroncoLV

New member
Joined
Aug 30, 2008
Messages
2
Reaction score
0
Location
Las Vegas, NV
90 bronco, rear window won't go up or down, i can hear the motor working but i guess it's not catching. My friend told me to replace the bushing... Wondering if this would be an easy fix??? and is there anything i also might need to check or get???


bobstrat

New member
Joined
Nov 18, 2006
Messages
367
Reaction score
0
Location
beautiful trenton, n.j.
90 bronco, rear window won't go up or down, i can hear the motor working but i guess it's not catching. My friend told me to replace the bushing... Wondering if this would be an easy fix??? and is there anything i also might need to check or get???

as long as you're patient it's pretty simple. it's much easier if you bypass the the safety switch so you can open the tailgate and then put the window up. just have to support the window while you do the repair.

 
OP
OP
S

stinger

New member
Joined
Jul 31, 2004
Messages
99
Reaction score
0
Location
East TN
I am glad you all have found this helpful. I did the repair of my rear window motor. my rear gate is bent a little as so are the window tracks which caused it to destroy the trans fast. The nut trick that i shared is one that i learned working for Ford. we used it when motors were not yet available on warranty repairs and never have i had to repair them again.


mbaldwin0@

New member
Joined
May 13, 2010
Messages
1
Reaction score
0
really thankful for all of your posts.... i just bought a 91EB that would be in mint condition if it wasn't for the rear window and a broke piece of trim on the drivers side all the way in the back next to that rear window. I'm totally excited to dig into that rear window... motor works just fine, i have to help it up and down... i'm guessing it's due to those broken barrels you're talking about... if you have any more tips for me, please post... i also checked on the graveyard, but couldn't find a piece of the trim that's broke... if you know where i might be able to find one, please let me know... i'm stationed at Ft. Carson incase you live or know the area... Thanks to all you guys again.


Turdpeterson

New member
Joined
Nov 18, 2011
Messages
1
Reaction score
0
This Guide was great, i was able to fix all 3 of my broken windows in a few hours, front and rear. i thought i would add some tips though and some new photos to help other people.

The front windows where very easy i drilled out the dimples where the bolts are located with a 1/2 bit and then simply remove the motor and rebuilt it, had both front windows done in about hour. the rear window was far more complex. i had to remove the entire mechanism off track to get to the motor. to get it back together i lightly threaded 3 bolts and let the motor hang, i was then able to work the thing back into the tracks, once it was all bolted back down i tighten the motor up and it was done

I am very excited, i can go threw a drive threw again my windows have been broken for about 6 years

here is what the motor looks like when u first open it.

fordwindowmotor1.jpg


and this is what it should look like after you install the 1/4 nuts, i added grease afterwards so you can see how the nuts sit

fordwindowmotor2.jpg


Last edited by a moderator:

Members online

Forum statistics

Threads
22,648
Messages
136,855
Members
25,351
Latest member
Motormouth2025
Top