Help-replacing radius arm bushings

Disclaimer: Links on this page pointing to Amazon, eBay and other sites may include affiliate code. If you click them and make a purchase, we may earn a small commission.

MrFixit4692

New member
Joined
Mar 3, 2010
Messages
9
Reaction score
0
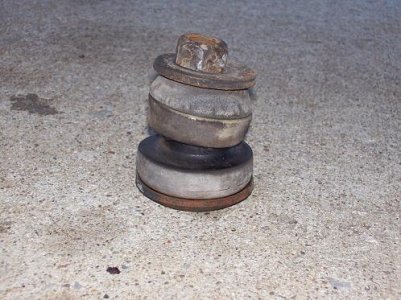
Just received a kit from Bronco Graveyard to replace my radius arm bushings and they look NOTHING like my old ones, didn't come with any instructions. Any ideas in what order they should be placed on the radius arm??? The kit came with 2 flat and 2 concave washers, 2 large bushings which match the 2 old ones on the truck, 2 smaller bushings which have 12 raised bumps around the circumference, and 2 white plastic spacers.

Bronco Radius Arm Bushings 006.JPG


50joe

New member
Joined
Jul 15, 2009
Messages
363
Reaction score
0
Location
Trenton NJ
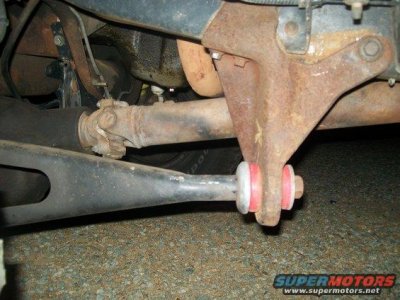
in order from front to rear, flat bushing, small bushing, Bracket, big bushing, curved spacer, curved washer. I'm goin off not lookin, but pretty sure thats the way.


Justshootme84

Rest in Peace Friend! Never forgotten..
Moderator
Joined
Feb 20, 2004
Messages
4,209
Reaction score
11
Location
Palacios, TX
There is a write-up on how to change out those bushings in the Tech Articles forum section. It should be one of the pinned topics on page 1 or 2. Or, if you use the search function, use the " marks before and after your key words, like in "radius arm bushings". JSM84


shift1313

Member
Joined
Mar 16, 2008
Messages
647
Reaction score
1
Location
VA
2wd-4wd-27.jpg

If you have your radius arm sitting there you will have a metal cup, the large bushing(this one will go into the radius arm bracket), then on the other side you will have that plastic ring, the smaller bushing then the washer/nut.

project-bronco-current-huge-radius-braket.jpg

 
OP
OP
M

MrFixit4692

New member
Joined
Mar 3, 2010
Messages
9
Reaction score
0
Thanks for the help, the tech dept. at Bronco Graveyard didn't know what to tell me. Looks like the old bushings are on backwards, the concave washer and large bushing are on the side with the nut. What should the nut be torqued to? I've read 180 lb/ft?


Justshootme84

Rest in Peace Friend! Never forgotten..
Moderator
Joined
Feb 20, 2004
Messages
4,209
Reaction score
11
Location
Palacios, TX
Haynes says 80-120 ft-lbs, but I usually go to 120 as long as it doesn't crush the rear bushing too much. JSM84

 
OP
OP
M

MrFixit4692

New member
Joined
Mar 3, 2010
Messages
9
Reaction score
0
There is a write-up on how to change out those bushings in the Tech Articles forum section. It should be one of the pinned topics on page 1 or 2. Or, if you use the search function, use the " marks before and after your key words, like in "radius arm bushings". JSM84
I can't find the articles you mentioned. I tried to search, but only found articles referring to the bushings as causes to other problems. What is necessary to remove, the tires, shocks, springs? Obviously the drive shaft, and calipers to prevent strain on the hoses.


Justshootme84

Rest in Peace Friend! Never forgotten..
Moderator
Joined
Feb 20, 2004
Messages
4,209
Reaction score
11
Location
Palacios, TX
I found the threead on "Worn Radius Arm Bushings", don't know why it doesn't show up on a search. i pinned it and moved it to page one of the Tech Articles forum. I'm unable to post a link to the thread at the moment, but here is an online Chilton's manual from Miesk5's Homepage of Bronco Links:

http://www.broncocity.com/66_81_manual.htm

 
OP
OP
M

MrFixit4692

New member
Joined
Mar 3, 2010
Messages
9
Reaction score
0
I found the threead on "Worn Radius Arm Bushings", don't know why it doesn't show up on a search. i pinned it and moved it to page one of the Tech Articles forum. I'm unable to post a link to the thread at the moment, but here is an online Chilton's manual from Miesk5's Homepage of Bronco Links:

http://www.broncocity.com/66_81_manual.htm

Thank you sir, that's a big help!

 
OP
OP
M

MrFixit4692

New member
Joined
Mar 3, 2010
Messages
9
Reaction score
0
Thank you sir, that's a big help!
I noticed that on the Bronco Graveyard website it mentions that the bushing kit replaces the "welded on washer". The only thing I noticed on my truck is a spacer welded on the back side of the bracket which is about 1/4" thick. The plastic spacer was placed backwards so the hollow portion of the plastic spacer fit over the welded on spacer, then the flat side of the plastic spacer faced the smaller bushing, the flat washer and then the nut. Am I supposed to grind the welded on spacer off of the bracket and place the white plastic spacer with the flat side against the bracket???


Justshootme84

Rest in Peace Friend! Never forgotten..
Moderator
Joined
Feb 20, 2004
Messages
4,209
Reaction score
11
Location
Palacios, TX
I would not grind off that lip or raised area on the back of the frame bracket, since that helps to keep the rear bushing centered. If you have the old nylon/ plstic spacer you can re-use it. You may want to post a link to the specif BG part, too.

 
OP
OP
M

MrFixit4692

New member
Joined
Mar 3, 2010
Messages
9
Reaction score
0
I would not grind off that lip or raised area on the back of the frame bracket, since that helps to keep the rear bushing centered. If you have the old nylon/ plstic spacer you can re-use it. You may want to post a link to the specif BG part, too.
Finished the job but noticed the nuts bottomed out at the end of the threads on the radius arms. Doesn't look like the smaller bushing compressed much. Think it should be ok??? Also noticed the pinion seal is leaking, but no other problems with the rear end, is this hard to change?


Justshootme84

Rest in Peace Friend! Never forgotten..
Moderator
Joined
Feb 20, 2004
Messages
4,209
Reaction score
11
Location
Palacios, TX
Looking over at BG, it appears to me that the "welded-on washer" part they mention is the cupped waasher in front of the forward, big bushing. If you get the sequence right (cupped washer, big bushing, bracket, spacer, small bushing, flat washer & nut) there should be about 3/8"-1/2" of thread exposed on the end of the radius arm. If you can't get that arm to pull back far enough, and the nut is flush with the end of the arm, you may either have the sequence incorrect or something is not properly seated. It's often helpful to use a come-along to pull the frontend to the rear so it gives you the right mounting of the bushings. When you go to get a new frontend alignment, you can have the shop check these out for you, and check the torque on the rear nut. The arm may even move rearward slightly when you first drive the bronco, and it's a good idea to check the tightness or torque a few times until it settles in.

As for the rear pinion seal leak, it depends on what axle you have (9" or 8.8") as to ease of replacement. Might put the year model and specs of your bronco in your signature, JSM84

 
OP
OP
M

MrFixit4692

New member
Joined
Mar 3, 2010
Messages
9
Reaction score
0
Looking over at BG, it appears to me that the "welded-on washer" part they mention is the cupped waasher in front of the forward, big bushing. If you get the sequence right (cupped washer, big bushing, bracket, spacer, small bushing, flat washer & nut) there should be about 3/8"-1/2" of thread exposed on the end of the radius arm. If you can't get that arm to pull back far enough, and the nut is flush with the end of the arm, you may either have the sequence incorrect or something is not properly seated. It's often helpful to use a come-along to pull the frontend to the rear so it gives you the right mounting of the bushings. When you go to get a new frontend alignment, you can have the shop check these out for you, and check the torque on the rear nut. The arm may even move rearward slightly when you first drive the bronco, and it's a good idea to check the tightness or torque a few times until it settles in.

As for the rear pinion seal leak, it depends on what axle you have (9" or 8.8") as to ease of replacement. Might put the year model and specs of your bronco in your signature, JSM84
From front-cupped washer, large bushing, bracket, plastic spacer, small bushing, flat washer, nut. There is about 1/2" of thread exposed at the end of the arm. It seems like the nut ran down all the way to the end(or beginning) of the threads where the shaft goes smooth. Doesn't look like the small bushing compressed very much.

The rear end is 9".

 
Last edited by a moderator:

Justshootme84

Rest in Peace Friend! Never forgotten..
Moderator
Joined
Feb 20, 2004
Messages
4,209
Reaction score
11
Location
Palacios, TX
From front-cupped washer, large bushing, bracket, plastic spacer, small bushing, flat washer, nut. There is about 1/2" of thread exposed at the end of the arm. It seems like the nut ran down all the way to the end(or beginning) of the threads where the shaft goes smooth. Doesn't look like the small bushing compressed very much.

The rear end is 9".
That sounds right. You don't want the rear bushing compressed too much, just as long as it doesn't spin or wobble around. If that is an issue, you might need another flat washer behind the nut.

There is some tech info on reparing the 9" rear in the Tech Articles forum, including a couple of videos on you tube.


miesk5

96 Bronco 5.0
Staff member
Moderator
Joined
Oct 18, 2005
Messages
9,078
Reaction score
1,037
Location
Floating in the Pacific
yo!

For some reason, I never saw this thread until now; my home PC is messed up again due to da LOUSY COMCAST CABLE service; never works in wet weather; oor snow/blizzards or a sunny day...lol

Here are some LINKs;

Bushing Replacement in an 84 Source: by Justshootme84 (Randy Z, Casual Mudder) at Ford Bronco Zone Forums

more in my Site at http://www.broncolinks.com/index.php?index=342

See the TSBs as well

----

9" Rebuild & Gear Setup GREAT ARTICLE! (This is Copy of what OX1 Wrote in fte) Source: by OX1 (OX, Jim, James O) at fnc.ch

more 9" Links @ http://www.broncolinks.com/index.php?index=98


Members online

Forum statistics

Threads
22,646
Messages
136,845
Members
25,342
Latest member
undr60
Top