Intro and Advice?

Disclaimer: Links on this page pointing to Amazon, eBay and other sites may include affiliate code. If you click them and make a purchase, we may earn a small commission.

OP
OP
H

harbinger

New member
Joined
Jun 20, 2014
Messages
49
Reaction score
0
I feel like I have too many questions... I am learning a lot though. I am searching while asking, so I hope I'm not being a ****. I'm just looking for some extra clarification.

I didn't really think about it before, but I guess I should be checking and replacing the rod bearings as well?

With the plastigauge method, do I measure again after installing new bearings?

I'm answering and deleting my own questions as I type them in, so thanks again for putting up with a noob.

 
OP
OP
H

harbinger

New member
Joined
Jun 20, 2014
Messages
49
Reaction score
0
http://www.diesel-dave.com/vehic/manual/stj/stj30021.htm#cep300

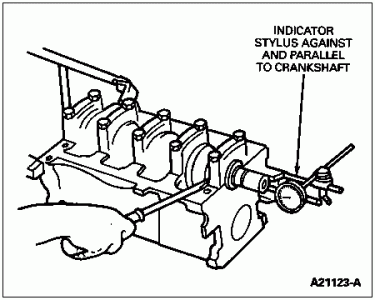
Crankshaft End Play 

After a ****** bearing is replaced, it must be aligned as follows. If not replaced, go to Step 5.

  1. Seat the bearings by torquing main caps to specification. Refer to Section 03-01A (4.9L SFI), Section 03-01B (5.0L and 5.8L MFI), Section 03-01C (7.5L MFI) or Section 03-01D (7.3L diesel) for engine main bearing cap torque specifications.
  1. Loosen ****** bearing cap fasteners to relieve clamp load, but do not disengage cap and fasteners.
  1. Firmly pound rear of crank forward with a plastic hammer to push ****** flanges forward.
  1. Retorque ****** bearing cap fasteners to specifications. Refer to appropriate engine section.
  1. Force crankshaft to rear of engine (6007) as shown.
  1. Install Dial Indicator with Bracketry TOOL-4201-C or equivalent so contact point rests against crankshaft ****** and indicator axis is parallel to crankshaft axis.

    a21123a.gif
  1. Zero dial indicator. Push crankshaft (6303) forward and note reading on dial.
  1. If the end play exceeds the wear limit listed in the specific engine section, replace the ****** bearing. Inspect the crankshaft for damage to the ****** face before installing the new bearing. If the end play is less than the minimum limit, inspect the ****** bearing faces for scratches, burrs, nicks, or dirt. If the ****** faces are not damaged or dirty, they probably were not aligned properly. Lubricate and install the ****** bearing and align the faces, following Main Bearing Replacement procedure in the appropriate engine section. Check the crankshaft end play.


  1. Firmly pound rear of crank forward with a plastic hammer to push ****** flanges forward.
                    Can I do this with engine still in vehicle?

Can I check crankshaft end play while engine still in vehicle?
 

miesk5

96 Bronco 5.0
Staff member
Moderator
Joined
Oct 18, 2005
Messages
9,078
Reaction score
1,037
Location
Floating in the Pacific
yo H,

I missed this page 2 last night, I believe.

I did find the "jack" info tho later last night;

http://www.diesel-dave.com/vehic/manual/stj/stj30029.htm

Ask as much as you need to; we all had to ask as well as I do now for other things I never did or saw done.

Now, I think the engine should come out. Some may have done this w/engine in, but may as well pull it and check everything else. Such as;

"Main Bearing Bore Alignment

Main bearing bore misalignment may be suspected in cases of premature bearing wear if one bearing wears considerably more than the others or bearings wear cone-shaped.

...NOTE: Bearings are not available with oversize outside diameters to allow line boring. Inspect bearings. Blue dye should be deposited evenly on all bearings. If dye appears on only one side or bottom of bearing or not at all, cylinder block is distorted and should be replaced..."

http://www.diesel-dave.com/vehic/manual/stj/stj30025.htm#extract_349

Sorry, did not foresee other issues that may pop-up and especially your determination to do this work and keep at it until you are satisfied. And that is VERY GOOD~

This is by Chilton; "

Crankshaft Endplay/Connecting Rod Side Play

Handle the crankshaft carefully to avoid damage to the finish surfaces.

1.Clean the crankshaft with solvent and blow out all oil passages with compressed air. On the 4.9L engine, clean the oil seal contact surface at the rear of the crankshaft with solvent to remove any corrosion, sludge or varnish deposits.

2.Use crocus cloth to remove any sharp edges, burrs or other imperfections which might damage the oil seal during installation or cause premature seal wear.

Do not use crocus cloth to polish the seal surfaces. A finely polished surface may produce poor sealing or cause premature seal wear.

3.Inspect the main and connecting rod journals for cracks, scratches, grooves or scores

4.Measure the diameter of each journal at least four places to determine out-of-round, taper or undersize condition.

5.On an engine with a manual transmission, check the fit of the clutch pilot bearing i the bore of the crankshaft. A needle roller bearing and adapter assembly is used as a clutch pilot bearing. It is inserted directly into the engine crank shaft. The bearing and adapter assembly cannot be serviced separately. A new bearing must be installed whenever a bearing is removed.

6.Inspect the pilot bearing, when used, for roughness, evidence of overheating or loss of lubricant. Replace if any of these conditions are found."

Here are some crankshaft counterweight pics; for a 351M but sim.

"More Crankshaft Casting Marks

1. (and 3.) Machined and drilled parts of the rear crankshaft counterweight. These are adjustments to balance the crankshaft at the factory.
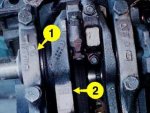
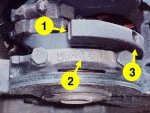
351M_crank_01S.jpg

351M Crankshaft Casting.jpg

2. Cleveland Foundry (CF) mark on #5 main bearing cap. The #5 main bearing cap is usually not marked because it is unique, wider than the other main bearing caps, with a groove for the rear main seal. Note that the main bearing cap in this D7TE engine is the original 400 design from 1971 (D1AE-AA).

http://grantorinosport.org/BubbaF250/parts/pics02.html

 
Last edited by a moderator:
OP
OP
H

harbinger

New member
Joined
Jun 20, 2014
Messages
49
Reaction score
0
Thanks, M. I missed the second page too, this morning when I was checking for a reply. 

Would I be a dummy for pulling the engine and not getting the top end worked on?  I talked to a buddy the other day who rebuilt the 350 in his jeep and he recommended pulling it... but said that if I pull it, I might as well rebuild it.

I'm not trying to spend that kind of money if I don't have to.

I guess the more I take off the more I have to replace. I guess I'll check those bearings and see what it looks like.

As far as the jack on the counterweight issue, I knew what the counterweight was, just not how to get a jack onto it. Do I rotate the crank until the biggest part of the counterweight is pointing down and then rig up some wood on a floor jack?


miesk5

96 Bronco 5.0
Staff member
Moderator
Joined
Oct 18, 2005
Messages
9,078
Reaction score
1,037
Location
Floating in the Pacific
yo H,

ok, inspect bearings; go the that 96 Workshop Manual link and I believe it has a depiction of a bad bearing and what to do with it.

as NELBUR Advised "If you do remove the engine, replace all the bearings."

I have to re-read all the engine issues again; so try to figure how much $ you'll need for special tools and parts for these and other inspections and replacement parts.

$ is a big issue for many, so think about the cost/benefit aspect and then decide how far to go with it now. Worse case is a rebuild, but you'll want to pull intake manifold anyway, upper & lower to clear out carbon and replace gaskets, etc or engine swap with that rebuilt one you wrote about for $200.00(?)

try to do this on that $200.00 engine;

http://www.powerblocktv.com/two-minute-tech/2min-95/test-a-junkyard-motor

The Cash for Clunkers seems to have dried-up Many engines in yards; Hollanders shows 89 (86-96) Bronco; Van & F series 5.8 engine for average $500.00

some yards Grade the engine;

Very Good (A grade)

or

Not Specified and if in or removed from engine

Fair (C grade)

This cost may help you decide on rebuilding your engine or trying that $200.00 engine if bearings are bad or a worse condition pops-up.

 
OP
OP
H

harbinger

New member
Joined
Jun 20, 2014
Messages
49
Reaction score
0
Thanks again. To get to that next step, though, my hold up is still the jack on the counterweight. it seems like an easy answer, but I don't want o mess things up further. Would you recommend rigging up some wood to go on my floor jack? I imagine it wouldn't need much pressure, basically the weight of the crankshaft plus any torsion from the belt? 

 
OP
OP
H

harbinger

New member
Joined
Jun 20, 2014
Messages
49
Reaction score
0
Also, I went and checked out the rebuilt motor... junk. 


miesk5

96 Bronco 5.0
Staff member
Moderator
Joined
Oct 18, 2005
Messages
9,078
Reaction score
1,037
Location
Floating in the Pacific
yo H,

yes, use clean wood between jack & counterweight;

yes, it is just there to support crankshaft weight.

When crank is in position to use jack, place something underneath to use a reference (some use a dial indictor to measure) to see how far crank is being raised;

See what position the jack should be in before jacking slowly, so that jack handle doesn't be in a bad position.

Too bad about the other engine.

 
OP
OP
H

harbinger

New member
Joined
Jun 20, 2014
Messages
49
Reaction score
0
Thanks. I'll check it out next time I have a few minutes... probably next weekend

 
OP
OP
H

harbinger

New member
Joined
Jun 20, 2014
Messages
49
Reaction score
0
This is what I got from the #4 bearing cap. Having never seen one of these, I figured I would ask. It looks like the bearing came off with the cap? Then there's another on the upper side of the crankshaft that I'm not sure yet how to get off. 

Frustrated because I finally get two days off work in a row and all I have time to do in the daylight is pull one of the caps off. Now it's back to work for another 120 hrs for the next two weeks with one day off in between. 

Anyway, let me quit crying like a bi@#$ for a minute. From a visual inspection standpoint, how does that bearing look?  There is some scouring, but it doesn't look severe. I guess I didn't really feel the crankshaft, so I'll do that and report.

IMG_20141020_181326_780.jpg

IMG_20141020_181335_553.jpg

IMG_20141020_181345_591.jpg

IMG_20141020_181419_260.jpg

 
OP
OP
H

harbinger

New member
Joined
Jun 20, 2014
Messages
49
Reaction score
0
The crankshaft isn't super smooth. so it will need attention. 

There is some buildup on the bearing journal where I guess the oil flows into it. I am thinking, since I need to do some work to my daily driver, I could probably just clean everything up and get a few more miles out of this motor while I rebuild a junkyard motor and at the least, get back and forth to work while I do the work on my DD.

Am I on the crazy train? I know it's only one bearing pulled so far, but does it look like I could get away with driving it for a while with thicker oil?

 
OP
OP
H

harbinger

New member
Joined
Jun 20, 2014
Messages
49
Reaction score
0
Here are some pics of the gunk, and after a little cleaning. Do you think this is a waste of time if I'm not changing the bearings? (Assuming I'm not changing the bearings because the crankshaft needs attention and I think it would just be a waste of money)  Could I harm more than I help?

IMG_20141020_203008_301.jpg

IMG_20141020_203032_067.jpg

IMG_20141020_203104_593.jpg

IMG_20141020_204204_150.jpg

IMG_20141020_204305_642.jpg

 
Last edited by a moderator:

miesk5

96 Bronco 5.0
Staff member
Moderator
Joined
Oct 18, 2005
Messages
9,078
Reaction score
1,037
Location
Floating in the Pacific
yo H,

Sorry, have been travelling around recently, mostly to Doc offices.

Saw the pics Monday, but just was at Optometrist and eyes were still blurry from tests, but in good condition.

Still, diff to see the conditions, but they appear normal wear.

I see that you have reached your go-no go decision point; I'd go with it until you can save enough $ to finish off a complete rebuild.

 
OP
OP
H

harbinger

New member
Joined
Jun 20, 2014
Messages
49
Reaction score
0
Thanks. Would I be helping anything by cleaning out the gunk from the grooves?

It seems like that may help get more oil flow, but may reduce oil pressure even further.


Seabronc

New member
Joined
May 22, 2004
Messages
7,315
Reaction score
35
Location
North of NYC
If you can't afford to fix it, then clean out the junk and run the engine with 20W50 and a quart or two of Lukas.  Install a wet pressure gauge so you can see the actual pressure, (Ford gauge is crap).

Be sure to pre-**** the surfaces and torque the bolts to spec.  

Install a high quality oil filter, not a Fram (they ****), like a Baldwin truck oil filter.  Just to make it easy to find a Baldwin here is a link to them http://catalog.baldwinfilter.com/

You can find others, like Purolator,  Amsoil,  KN, etc.

Good luck,

:)>-

 
Last edited by a moderator:
OP
OP
H

harbinger

New member
Joined
Jun 20, 2014
Messages
49
Reaction score
0
Thanks, that's awesome. I'll be back on the road in no time. There are a bunch of broke folks down here so I see broncos and 351s on craigslist for cheap all the time so I'll be able to find a spare engine to rebuild while I wait for this one to slowly eat itself.

 
OP
OP
H

harbinger

New member
Joined
Jun 20, 2014
Messages
49
Reaction score
0
Also, M., I hope everything is good with the Docs and the eyeballs.

 
OP
OP
H

harbinger

New member
Joined
Jun 20, 2014
Messages
49
Reaction score
0
So I got the oil pump back on, not as much fun as I was imagining. I guess there isn't really a good way to ensure the rear "U" section of the seal went on the right way until you fill it up, fire it up, and look for leaks.  I saw on another post while doing research that the hole for the oil pressure gauge can get clogged. After seeing the gunk buildup, I can see how that may happen.do you guys think it would be ok to try and poke something in there to maybe open it up? I've never seen what the inside of that area looks like, but it seems like it would be ok. 


Members online

No members online now.

Forum statistics

Threads
22,647
Messages
136,846
Members
25,348
Latest member
guilhermeknob
Top