You are using an out of date browser. It may not display this or other websites correctly.
You should upgrade or use an alternative browser.
You should upgrade or use an alternative browser.
Doors and Top
- Thread starter owarner40
- Start date
Disclaimer: Links on this page pointing to Amazon, eBay and other sites may include affiliate code. If you click them and make a purchase, we may earn a small commission.
Yo owarner40,
Welcome!
Door:
Most Fabricate tube doors such as;
Fabrication & Installation (using an external spare tire carrier) in a 92
Source: by jimmy d (the bronc, jrdbronco) at http://www.fullsizebronco.com/forum/showthread.php?t=136320
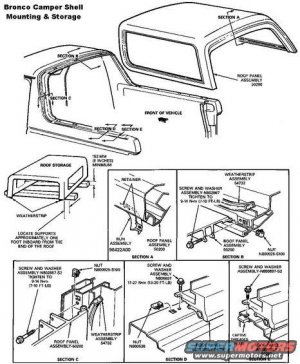
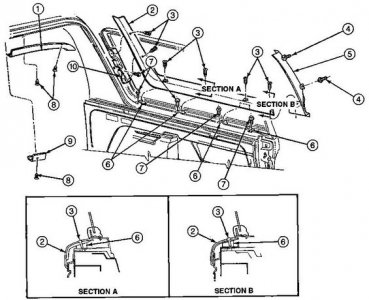
Rear Roof:
See some tips in Removal w/Tool List, & Security Torx® bolt replacement w/Metric sized bolts (5 8x70mm 1.5 Pitch Metric Bolts & 12 8x45mm 1.5 Pitch Metric Bolts) 92 - 96
Source: by Froggmann
One tip is "get some edge molding for the rather sharp edge the top of the cab has. This stuff is avalible at most Industrial hardware stores."
"If you also want to change out the bolts here is what you will have to look for:
5 8x70mm 1.5 Pitch Metric Bolts
12 8x45mm 1.5 Pitch Metric Bolts"
Lots faster thsn using the torx bit!
●
ASAP, find out if speed control recall work, if equipped was completed. If you still have concerns about Recalls, please contact the Ford Customer Relationship Center:
US: 800-392-3673 | CA: 800-565-3673
Note: 3673 spells "FORD" on phone keys
For the hearing- or speech-impaired: Please contact the Telecommunication Relay Service by dialing 71
"Summary: ON CERTAIN PICKUP TRUCKS, PASSENGER VEHICLES, SPORT UTILITY VEHICLES, AND MOTOR HOMES CHASSIS, THE SPEED CONTROL DEACTIVATION SWITCH MAY, UNDER CERTAIN CONDITIONS, LEAK INTERNALLY AND THEN OVERHEAT, SMOKE, OR BURN. THIS COULD RESULT IN AN UNDERHOOD FIRE."
1995 Bronco Dealer Brochure @ 1995 Ford Bronco
1995 Bronco Drivetrain, Powertrain Service Manual - Google Drive
&
1995 Bronco Chassis, Service Manual - Google Drive
To switch between folder list & grid views, click the button to the right of the "DOWNLOAD ALL" button in the upper right corner of the window) by HawkDriver
Haynes Red Manual for 80-95 Bronco & F Series @ Hanes guide 80-96 bko f series.pdf via BroncMom
Al
chrlsful
Active member
many havea garage rafter or tree limb to string some line (urs is lighter than my steel '70 one) from and hang till wanted again. Also aftr mrkt 1/2 hinges to slip a door on/off a lill easier than re-alighning (not easy) those heavy doors for accurate close. Some make a stand w/2 by, casters and sheetrock screws. Last there R soft tops'm doors. I saw 1 co. made their rag top like a fast back.
shawnkelly1970
New member
Problems reinstalling fiberglass top with bronco graveyard kit. I can’t get the front two drop in. New weatherstrip that goes on bronco was to tall so had to reinstall old one and it still won’t lineup. Any thoughts?
Yo Shawn,Problems reinstalling fiberglass top with bronco graveyard kit. I can’t get the front two drop in. New weatherstrip that goes on bronco was to tall so had to reinstall old one and it still won’t lineup. Any thoughts?
Welcome!
Which year do you have?
See
shawnkelly1970
New member
It’s a 91 Custom with a 5.0 and 5 speed. I kept messing with it into the wee hours and finally got it to line up. It has 150k on it and it was so sloppy from wear it fell into place and I slapped the bolts in and 20 minutes later I was down the road ready for winter. Now it takes a lot more finesse! I did learn a few things about the rear window rubber and rear gate alignment because of this. Now the rear window rolls up very easy. Unfortunately when it was all said and done I grabbed a hot shower before bed and noticed that I gave myself a hernia.
Now I’m quarantined to my room after being diagnosed with Covid. (Pretty sure that’s why I had so many problems with the top. I was already feeling crummy.)That and my wife was not impressed with the colorful language I was using. When my temper reaches a certain point my old oilfield words sneak out! lol
PS I’ve been reading old posts and have gleaned a lot of info thanks a million. When wife lets me back in the garage I have several things to check.
Yo Shawn,
Hope you recover from both soon!
Here is some read material for your whike you recover;
1990 F Series/Bronco Pre-Delivery Shop & Electrical & Vacuum Troubleshooting Manuals (EVTM), Partial by member Kingfish999 in Google Drive (similar to your 91) @ 1990 Ford Truck service manuals - Google Drive
Slow scrolling for my slow Comcast Highest Cost Blast Internet..
Suggest you download the docs for faster scrolling and to use the page index.
1991 Bronco Dealer Brochure by Ford via via Dezo's Garage @
https://www.xr793.com/wp-content/uploads/2020/07/1991-Ford-Bronco.pdf
Haynes Red Manual for 80-95 Bronco & F Series @ Hanes guide 80-96 bko f series.pdf via BroncMom
Yo owarner40,
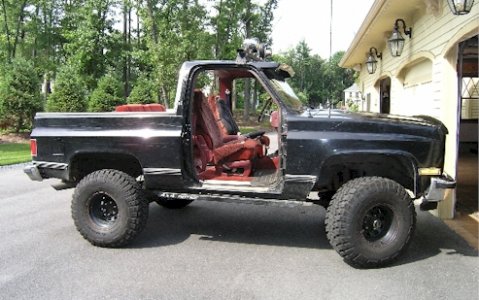
Consider this door removal by Chevie owner Nick Reynolds, AKA B_To_C
Article/photo's courtesy of Nick Reynolds, AKA B_To_C
Quick Release Door Hinge Pins
Phase 1 - Making the pin:
If you have ever wanted to take the doors off of your Full-size Chevy / GMC Truck or Blazer, Read on. This article will show you how to create quick release door hinge pins, so you can get those doors off and back on within a matter of minutes. This is an extremely easy modification. It should take you no more than one afternoon to complete both phases, assuming that you have all the needed parts and tools on hand.
Parts Needed:
1. Universal Door Hinge repair kit. These can be found in any auto parts store in the "Help" section. Remember you will need two of these for each door.
2. A Mini Hitch Pin. The shaft should be small enough to fit through a 5/64" hole. You can find these at any hardware store. You will need two per door.
3. You may also need some washers. These would need to have roughly the same Inside Diameter as the Outside Diameter of the Hinge Pin.
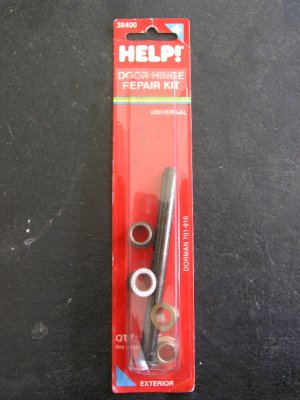
Door Hinge repair kit
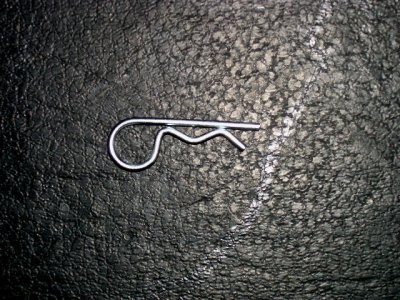
Mini Hitch Pin
Tools Needed:
1. Angle grinder
2. Drill or Drill Press
3. Vise or Vise Grips
4. Safety glasses
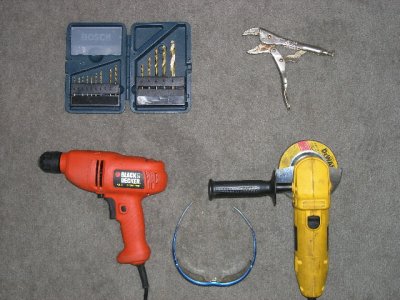
Tools Needed
The setup I used is shown above. It would have been nice to have an actual vise to secure the pin in while I worked on it. But the Vise Grips got the job done, with minimal hassle.
-The Dirty Work-
Step 1: Grind off the splines on the top of the hinge. These are used to keep the hinge from popping out. But because we want our hinges to pop out, we have to grind these off. Shown below is the hinge before and after grinding.
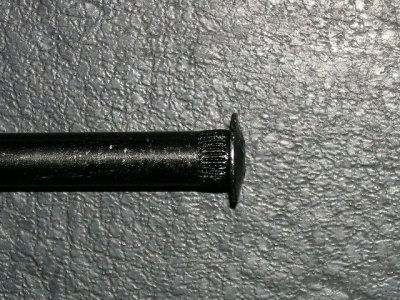
Before
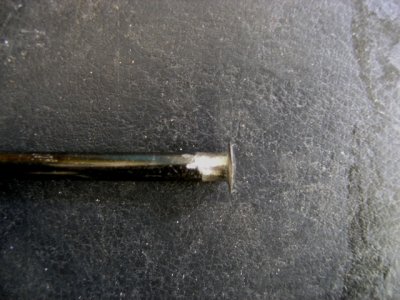
After
Step 2: Drill a hole through the bottom of the hinge pin. The hole needs to be drilled through the part of the hinge pin that is sloping, because this is the only part of the hinge that sticks out of the hinge assembly. I did this by holding the pin with the Vise Grips in one hand and the drill in the other. It would have been much easier with either a Drill Press or a Table Vise, but this method worked fine for me. I used a 5/64" drill bit, and it seemed to be the perfect size. Below is a picture of the hole.
Step 3: Make sure your mini hitch pin fits, and you have yourself a quick release door hinge. Simply repeat these 3 steps for however many pins you need.
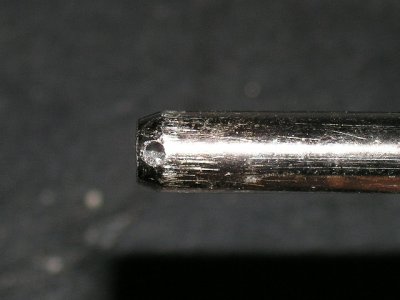
Hole Drilled in Pin
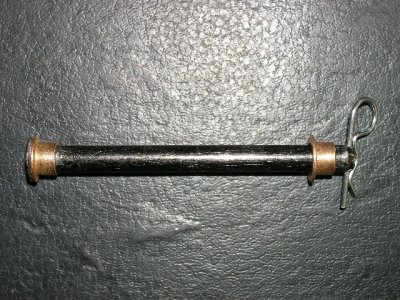
Quick Release Door Hinge
Phase 2 - Installing the pin:
Now that you have made your pins, you will need to install them on your truck. This is the most challenging part of the process, though it is still very easy to do.
Parts Needed:
1. The quick release door hinge pins you made in Phase 1.
-If you have power doors-
2. Electrical connectors (which you can plug and unplug) for 14-16 gauge wire.
Tools Needed:
1. A ratchet with a 9/16" socket.
2. An open or boxed end 9/16" wrench.
3. Angle grinder or Sawzall.
4. Hammer and flat head ***** driver
5. Safety Glasses.
-If you have power doors-
6. Wire cutter / Crimper
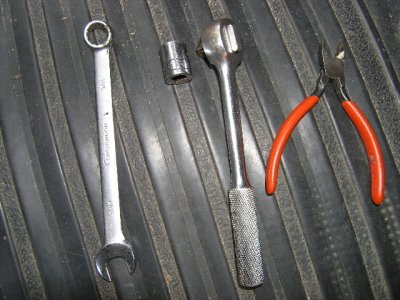
Tools Needed
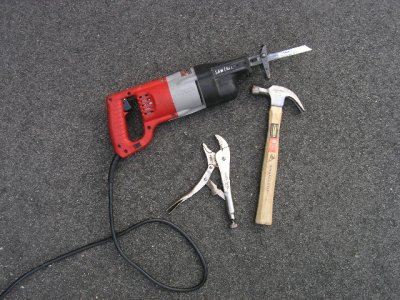
Tools Needed
-The Dirty Work-
Pre- Door Removal: It is probably a good idea to roll the window down, this way the glass inside the door is less likely to be broken while the door is off.
Step 1: Cut the wires. If you have power windows / door locks / mirrors you have to cut the wires before you take the door off for the first time. Simply cut the outer sheath, and cut all of the wires. NOTE: MAKE SURE EXPOSED WIRES ARE NOT TOUCHING! RISK OF ELECTRICAL FIRE! (if battery is not disconnected).
Step 2: Make alignment marks on the door and hinge assembly (Shown below). These are critical to maintaining correct alignment when you bolt part of the hinge assembly back onto the door.
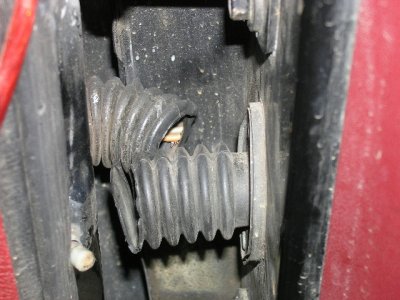
Cut Wires
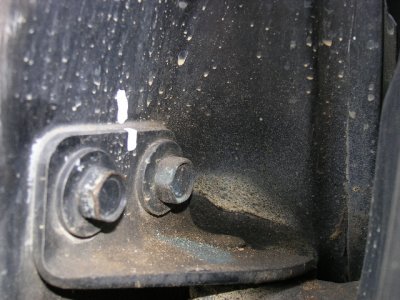
Alignment Mark
Step 3: Unbolt the door from the hinge. CAUTION: Once you unbolt these bolts your door will no longer be attached to the truck. These doors are heavy and awkward, so be prepared. I was lucky and had a trash barrel that was the perfect height to support the door.
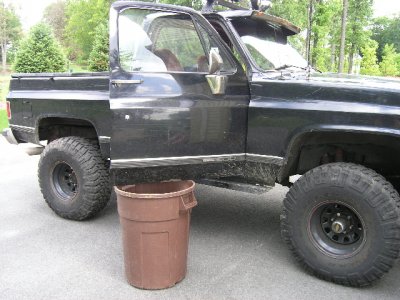
Door Supported
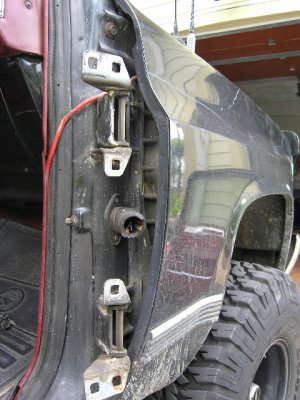
Door Removed
Step 4: Remove the old pins and bushings. I used a Sawzall to cut the Pin in half then pushed the lower cut portion out of the bottom and the top out of the top. You should also note how the bushings are positioned, so you can put the new ones in the same way.
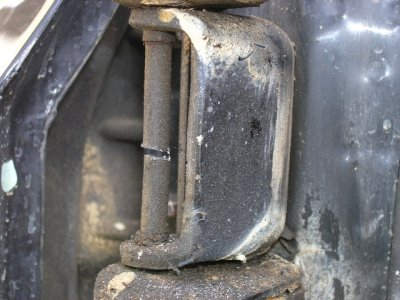
Cut Pin
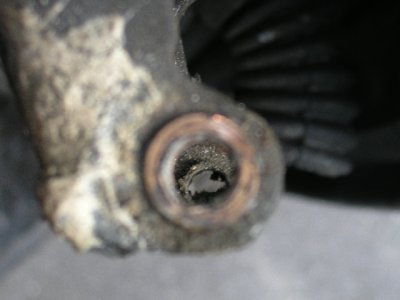
Bushing
Step 5: Bolt the part of the hinge assembly that attaches to the door, back onto the door. You will be using the alignment marks you made earlier.
Step 6: If you have power doors, attach your connectors to both sets of wires now.
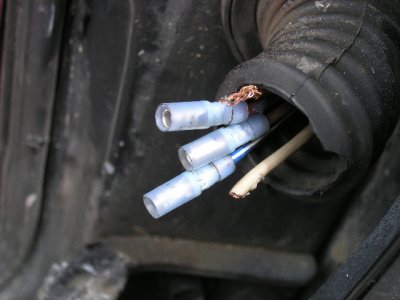
Female Connectors
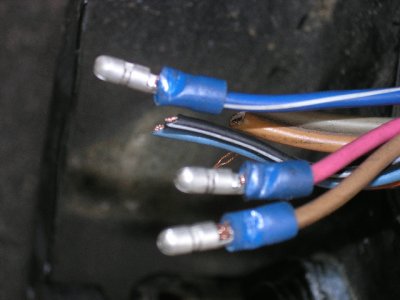
Male Connectors
Step 7: Install the new bushings in the hinge assembly.
Step 8: Get the door in position and install your quick release pins. NOTE: the bottom pin goes in like normal, but the top pin needs to go in UPSIDE DOWN.
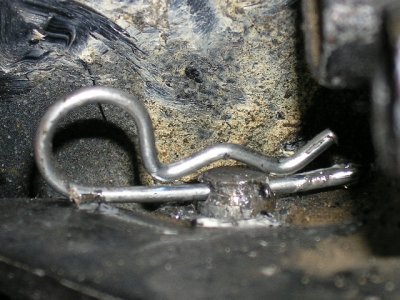
Close Up
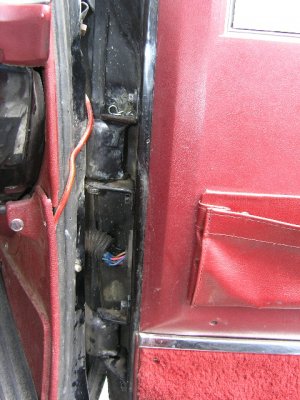
Quick Release Installed
●Continued Due to POS NUMBER OF IMAGES RESTRICTION
Consider this door removal by Chevie owner Nick Reynolds, AKA B_To_C
Quick Release Door Hinge Pins
- AuthorB_to_C
- Creation date Feb 2, 2016
Article/photo's courtesy of Nick Reynolds, AKA B_To_C

Quick Release Door Hinge Pins
Phase 1 - Making the pin:
If you have ever wanted to take the doors off of your Full-size Chevy / GMC Truck or Blazer, Read on. This article will show you how to create quick release door hinge pins, so you can get those doors off and back on within a matter of minutes. This is an extremely easy modification. It should take you no more than one afternoon to complete both phases, assuming that you have all the needed parts and tools on hand.
Parts Needed:
1. Universal Door Hinge repair kit. These can be found in any auto parts store in the "Help" section. Remember you will need two of these for each door.
2. A Mini Hitch Pin. The shaft should be small enough to fit through a 5/64" hole. You can find these at any hardware store. You will need two per door.
3. You may also need some washers. These would need to have roughly the same Inside Diameter as the Outside Diameter of the Hinge Pin.

Door Hinge repair kit

Mini Hitch Pin
Tools Needed:
1. Angle grinder
2. Drill or Drill Press
3. Vise or Vise Grips
4. Safety glasses

Tools Needed
The setup I used is shown above. It would have been nice to have an actual vise to secure the pin in while I worked on it. But the Vise Grips got the job done, with minimal hassle.
-The Dirty Work-
Step 1: Grind off the splines on the top of the hinge. These are used to keep the hinge from popping out. But because we want our hinges to pop out, we have to grind these off. Shown below is the hinge before and after grinding.

Before

After
Step 2: Drill a hole through the bottom of the hinge pin. The hole needs to be drilled through the part of the hinge pin that is sloping, because this is the only part of the hinge that sticks out of the hinge assembly. I did this by holding the pin with the Vise Grips in one hand and the drill in the other. It would have been much easier with either a Drill Press or a Table Vise, but this method worked fine for me. I used a 5/64" drill bit, and it seemed to be the perfect size. Below is a picture of the hole.
Step 3: Make sure your mini hitch pin fits, and you have yourself a quick release door hinge. Simply repeat these 3 steps for however many pins you need.

Hole Drilled in Pin

Quick Release Door Hinge
Phase 2 - Installing the pin:
Now that you have made your pins, you will need to install them on your truck. This is the most challenging part of the process, though it is still very easy to do.
Parts Needed:
1. The quick release door hinge pins you made in Phase 1.
-If you have power doors-
2. Electrical connectors (which you can plug and unplug) for 14-16 gauge wire.
Tools Needed:
1. A ratchet with a 9/16" socket.
2. An open or boxed end 9/16" wrench.
3. Angle grinder or Sawzall.
4. Hammer and flat head ***** driver
5. Safety Glasses.
-If you have power doors-
6. Wire cutter / Crimper

Tools Needed

Tools Needed
-The Dirty Work-
Pre- Door Removal: It is probably a good idea to roll the window down, this way the glass inside the door is less likely to be broken while the door is off.
Step 1: Cut the wires. If you have power windows / door locks / mirrors you have to cut the wires before you take the door off for the first time. Simply cut the outer sheath, and cut all of the wires. NOTE: MAKE SURE EXPOSED WIRES ARE NOT TOUCHING! RISK OF ELECTRICAL FIRE! (if battery is not disconnected).
Step 2: Make alignment marks on the door and hinge assembly (Shown below). These are critical to maintaining correct alignment when you bolt part of the hinge assembly back onto the door.

Cut Wires

Alignment Mark
Step 3: Unbolt the door from the hinge. CAUTION: Once you unbolt these bolts your door will no longer be attached to the truck. These doors are heavy and awkward, so be prepared. I was lucky and had a trash barrel that was the perfect height to support the door.

Door Supported

Door Removed
Step 4: Remove the old pins and bushings. I used a Sawzall to cut the Pin in half then pushed the lower cut portion out of the bottom and the top out of the top. You should also note how the bushings are positioned, so you can put the new ones in the same way.

Cut Pin

Bushing
Step 5: Bolt the part of the hinge assembly that attaches to the door, back onto the door. You will be using the alignment marks you made earlier.
Step 6: If you have power doors, attach your connectors to both sets of wires now.

Female Connectors

Male Connectors
Step 7: Install the new bushings in the hinge assembly.
Step 8: Get the door in position and install your quick release pins. NOTE: the bottom pin goes in like normal, but the top pin needs to go in UPSIDE DOWN.

Close Up

Quick Release Installed
●Continued Due to POS NUMBER OF IMAGES RESTRICTION
Attachments
Yo Part,
Step 9: Make sure everything lines up correctly, and congratulate yourself on a job well-done.
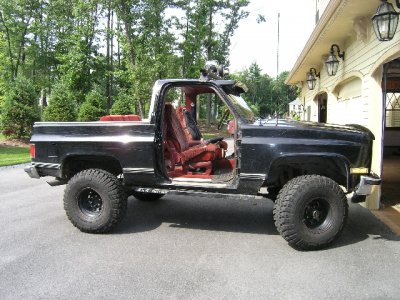
Doorless
Post- Installation: Remember to periodically check your mini hitch pins to make sure they are still intact. If they break your quick release pins may work themselves loose, and serious damage to your door may result."
●
Or Consider:
Half Door Fabrication & Installation, Pinned, Cut-out, & Skinned in a 92;
View attachment 28699
"...new connections robbed from a junkyard car wiring harnesses in 4 connectors to hook up all 19 wires. i will need to remove the door panel to remove the door, but thats easy..."
@ https://www.supermotors.net/registry/1549/8967-2
by Zach K (BurnedB, BurnedBronco, Badassbronco
●
Half Door Fabrication & Installation pics in a 91@ https://www.supermotors.net/registry/16287/57680-2
View attachment 28698
by CaliforniaMonkey
Step 9: Make sure everything lines up correctly, and congratulate yourself on a job well-done.

Doorless
Post- Installation: Remember to periodically check your mini hitch pins to make sure they are still intact. If they break your quick release pins may work themselves loose, and serious damage to your door may result."
●
Or Consider:
Half Door Fabrication & Installation, Pinned, Cut-out, & Skinned in a 92;
View attachment 28699
"...new connections robbed from a junkyard car wiring harnesses in 4 connectors to hook up all 19 wires. i will need to remove the door panel to remove the door, but thats easy..."
@ https://www.supermotors.net/registry/1549/8967-2
by Zach K (BurnedB, BurnedBronco, Badassbronco
●
Half Door Fabrication & Installation pics in a 91@ https://www.supermotors.net/registry/16287/57680-2
View attachment 28698
by CaliforniaMonkey
ablediver
Member
Hate to be the wet blanket on yer' party there, but before you spend the weekend and the case of adult beverages removing your doors with attached mirrors, you may want to check your RMV vehicle code for necessity of doors / mirrors r/t FACTORY installed parts. Just sayin'.....And if it's legal to remove, dang, go ahead and do so. Then post it on YouTube, so we can all enjoy it
shawnkelly1970
New member
Thank you. I’ve already started reading some of it. I’ve been fighting a high idle ever since the power wash of the engine bay. When I put the code reader on it I get 10, 11 and 15. The first two look great but then I’m guessing 15 is not establishing communication so 10 and 11 are not accurate?Yo Shawn,
Hope you recover from both soon!
Here is some read material for your whike you recover;
1990 F Series/Bronco Pre-Delivery Shop & Electrical & Vacuum Troubleshooting Manuals (EVTM), Partial by member Kingfish999 in Google Drive (similar to your 91) @ 1990 Ford Truck service manuals - Google Drive
Slow scrolling for my slow Comcast Highest Cost Blast Internet..
Suggest you download the docs for faster scrolling and to use the page index.
1991 Bronco Dealer Brochure by Ford via via Dezo's Garage @
https://www.xr793.com/wp-content/uploads/2020/07/1991-Ford-Bronco.pdf
Haynes Red Manual for 80-95 Bronco & F Series @ Hanes guide 80-96 bko f series.pdf via BroncMom
shawnkelly1970
New member
P.S. I have got it all the smog and extra 10 miles a vacuum lines. I went with a plug-in EGR module. I also found the correct throttle cable for this engine. I did have to heavily modify my gas pedal but now I have full Control of my throttle and I am amazed at the difference it made.Thank you. I’ve already started reading some of it. I’ve been fighting a high idle ever since the power wash of the engine bay. When I put the code reader on it I get 10, 11 and 15. The first two look great but then I’m guessing 15 is not establishing communication so 10 and 11 are not accurate?
Attachments
Yo Shawn,
Was the EEC, AKA PCM or Computer swapped?
Ford went from two-digit to three-digit EEC IV Self-Test codes in 1991 to service the increasing number of service codes required to support various government On-Board Diagnostic (OBD) regulations. The phase-in from two-digit to three-digit codes started in the 1991 model year.
See my Vacuum leak test in post #11 includes jowens1126 HVAC Control Panel info & Mikey350's High Idle Tests @ https://www.fullsizebronco.com/threads/help-with-dtc-codes-and-idle.206824/
Last edited:
Hate to be the wet blanket on yer' party there, but before you spend the weekend and the case of adult beverages removing your doors with attached mirrors, you may want to check your RMV vehicle code for necessity of doors / mirrors r/t FACTORY installed parts. Just sayin'.....And if it's legal to remove, dang, go ahead and do so. Then post it on YouTube, so we can all en
Last edited:
ablediver
Member
Yo, If the party displaying their vehicle had explained it that way, the response stated would not have been given. Yo know ?
Yo owarner40,
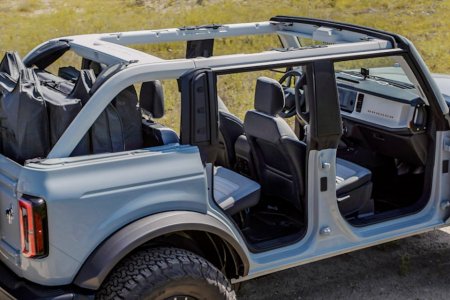
Available in both two- and four-door body styles, the new 2021 Bronco hits all the marks that make for a purpose-built off-roader: body on frame construction, removable doors, a soft-top and hardtop options with removable panels, a choice of two engines and transmissions and optional 35-inch tires.
Regardless of top choice, all Broncos get fully removable frameless doors. While driving with no doors a universally fun experience, storing them is almost always a hassle. To ease the pain, the four-door Bronco provides a door-stowage system in the cargo area. The rear-view mirrors are mounted on the cowl, so they remain in place when the doors are removed.
The aluminum Bronco doors weigh in at 54 pounds for the front and 45 pounds for the rears, which makes them slightly heavier than Wrangler doors.
Enjoy!
ablediver
Member
Well, I'm may be the dumbest guy in the chat room here, but it does appear that the side mounted rear view mirrors are mounted on the A-pillars, not the doors. This is similar to the way that Jeep models have them installed and different from the previously mentioned "permitted vehicles".
96' 5.8 EB
90' 5.0 XLT
96' 5.8 EB
90' 5.0 XLT
Yo Able,
in 96 Bronco,
Mirror, Western Type, Swing-Away
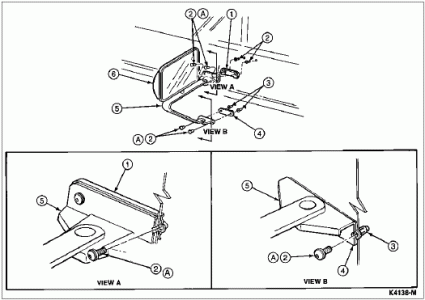
in 96 Bronco,
Mirror, Western Type, Swing-Away

| Item | Part Number | Description |
|---|---|---|
| 1 | 17724 | Outside Rear View Mirror Gasket (Upper) |
| 2 | N806345-S47 | *****(s) |
| 3 | N803763-S36 | Riv-Nuts |
| 4 | 17724 | Outside Rear View Mirror Gasket (Lower) |
| 5 | 17682 | Outside Rear View Mirror |
| 6 | 17723 | Outside Rear View Mirror Head |
| A | — | Tighten to 4-12 Nm (35-106 Lb-In) ● |
installed and different from the previously mentioned "permitted vehicles".
96' 5.8 EB
90' 5.0 XLT
johnnyreb
Well-known member
Welcome to the club Shawn. I hope you have a speedy recover too.Yo Shawn,
Hope you recover from both soon!
Here is some read material for your whike you recover;
1990 F Series/Bronco Pre-Delivery Shop & Electrical & Vacuum Troubleshooting Manuals (EVTM), Partial by member Kingfish999 in Google Drive (similar to your 91) @ 1990 Ford Truck service manuals - Google Drive
Slow scrolling for my slow Comcast Highest Cost Blast Internet..
Suggest you download the docs for faster scrolling and to use the page index.
1991 Bronco Dealer Brochure by Ford via via Dezo's Garage @
https://www.xr793.com/wp-content/uploads/2020/07/1991-Ford-Bronco.pdf
Haynes Red Manual for 80-95 Bronco & F Series @ Hanes guide 80-96 bko f series.pdf via BroncMom
Similar threads
Latest posts
-
-
-
-
3 dangers I found out working on my 78 bronco--and maybe yours too
- Latest: 79' Buckin Bronco
-

