check engine codes, help please

Disclaimer: Links on this page pointing to Amazon, eBay and other sites may include affiliate code. If you click them and make a purchase, we may earn a small commission.

HardMaple

New member
Joined
Jul 3, 2008
Messages
26
Reaction score
0
Location
Emmett, ID
I think that vacuum leak needs to be addressed 1st
Miesk is right, fix the vacuum leak first. This probably isn't the problem, but how stupid will you feel 6 hours from now when you find out it is the cause. Then reset your codes. If they come back, move on in an efficient manner.

Is the Yellow wire just Yellow or Yellow/Lt Blue? Plain yellow wire is unrelated to O2 sensor circuits. Yellow/Lt Blue is the ground wire for sensor #21 (do not try to convince yourself a plain yellow was supposed to actually be yellow/lt blue). If it is the y/lb, check for connectivity to Pin #94 and then to sensor harness. Repair if required.

135, 141, and 155 follow a very similar diagnostic routine. When together, the problem is:

  1. Blown Fuse
    Short to VPWR in Harness or HO2S
    Water in harness connector
    Open VPWR or GRD circuit
    Low Battery Voltage
    Poor Electrical Connection
    Sensor
    PCM


Tripping all 3 means it is likely a common wire, there are 2 and both are shared by other components. The first common wire is Grey/red that serves as a signal return wire for nearly every other sensor. This is supposed to located somewhere near Injector #4. This connects to Pin 91 at the PCM.

The second common wire is the VPWR. This is a Red wire (surprise!). It is fed by Pin 71 and 97 simultaneously. It also feeds the injectors, MAF, Evap Canister Purge Valve, and the Transmission Controls.

So my suggestion is this:

1) Find the easiest O2 sensor to access (probably #11);

2) using an Ohm meter, check for continuity between red wire at sensor connector and pins 71 and 97 and between Grey/red wire and Pink 91;

3) If an interruption is found, trace and repair any broken connections;

4) If no open circuit is found, disconnect negative battery cable and then disconnect wiring harness from PCM. Using Ohm meter, check for continuity between red wire at sensor connector and ground (but not the - battery post since you just disconnected the battery). Also check between grey/red wire at the sensor and ground. If either of these show continuity, repair short to ground.

5) Reconnect all connections.

If no open or short to ground circuit is discovered, let me know and we will enter a more detailed diagnostic.

 
OP
OP
bergs

bergs

New member
Joined
Jul 17, 2008
Messages
16
Reaction score
0
Location
Little Falls, NJ
Miesk is right, fix the vacuum leak first. This probably isn't the problem, but how stupid will you feel 6 hours from now when you find out it is the cause. Then reset your codes. If they come back, move on in an efficient manner.
Is the Yellow wire just Yellow or Yellow/Lt Blue? Plain yellow wire is unrelated to O2 sensor circuits. Yellow/Lt Blue is the ground wire for sensor #21 (do not try to convince yourself a plain yellow was supposed to actually be yellow/lt blue). If it is the y/lb, check for connectivity to Pin #94 and then to sensor harness. Repair if required.

135, 141, and 155 follow a very similar diagnostic routine. When together, the problem is:

  1. Blown Fuse
    Short to VPWR in Harness or HO2S
    Water in harness connector
    Open VPWR or GRD circuit
    Low Battery Voltage
    Poor Electrical Connection
    Sensor
    PCM


Tripping all 3 means it is likely a common wire, there are 2 and both are shared by other components. The first common wire is Grey/red that serves as a signal return wire for nearly every other sensor. This is supposed to located somewhere near Injector #4. This connects to Pin 91 at the PCM.

The second common wire is the VPWR. This is a Red wire (surprise!). It is fed by Pin 71 and 97 simultaneously. It also feeds the injectors, MAF, Evap Canister Purge Valve, and the Transmission Controls.

So my suggestion is this:

1) Find the easiest O2 sensor to access (probably #11);

2) using an Ohm meter, check for continuity between red wire at sensor connector and pins 71 and 97 and between Grey/red wire and Pink 91;

3) If an interruption is found, trace and repair any broken connections;

4) If no open circuit is found, disconnect negative battery cable and then disconnect wiring harness from PCM. Using Ohm meter, check for continuity between red wire at sensor connector and ground (but not the - battery post since you just disconnected the battery). Also check between grey/red wire at the sensor and ground. If either of these show continuity, repair short to ground.

5) Reconnect all connections.

If no open or short to ground circuit is discovered, let me know and we will enter a more detailed diagnostic.
which fuse should i check? and where is the pcm? and how do i identify the pins?

thanks


HardMaple

New member
Joined
Jul 3, 2008
Messages
26
Reaction score
0
Location
Emmett, ID
which fuse should i check? and where is the pcm? and how do i identify the pins?
thanks
Engine Compartment Fuse Box - Fuse #5, 15A

The PCM is under the Brake Master Cylinder. I would send a photo, but mine is in the shop getting some exhaust welding done right now.

WARNING: If you need to unbolt the PCM wiring harness, disconnect the battery first. You may fry the computer if you plug in or unplug the harness with the battery connected.

PCM_harness.gif

PCM_Harness_ID.gif


miesk5

96 Bronco 5.0
Staff member
Moderator
Joined
Oct 18, 2005
Messages
9,078
Reaction score
1,035
Location
Floating in the Pacific
bergs,

Did you find & repair a vacuum leak? We can guide you thru a few procedures if you want.

Why are you working on the PCM? That may cause all kinds of new problems for you.

 
OP
OP
bergs

bergs

New member
Joined
Jul 17, 2008
Messages
16
Reaction score
0
Location
Little Falls, NJ
bergs,Did you find & repair a vacuum leak? We can guide you thru a few procedures if you want.

Why are you working on the PCM? That may cause all kinds of new problems for you.
the vacume leak is in the plastic manifold right behind the ac **** where all the vacume tubes come in. if i squeeze the black tube the noise stops. its definatly coming from the plastic part where all of the tubes come in to the back of the ****. i dont think its a huge deal. I'm really a novice when it comes to chasing down wiring and testing wiring and such. I'm more of a nuts and bolts kind of guy. I feel in over my head with these codes.


miesk5

96 Bronco 5.0
Staff member
Moderator
Joined
Oct 18, 2005
Messages
9,078
Reaction score
1,035
Location
Floating in the Pacific
the vacume leak is in the plastic manifold right behind the ac **** where all the vacume tubes come in. if i squeeze the black tube the noise stops. its definatly coming from the plastic part where all of the tubes come in to the back of the ****. i dont think its a huge deal. I'm really a novice when it comes to chasing down wiring and testing wiring and such. I'm more of a nuts and bolts kind of guy. I feel in over my head with these codes.

OK, I capice; I have been tracking down a 4WABS wiring problem and have gone thru 34 pin-point tests; had to re-do some because my 12v DC test light buld decided to burn-out without telling me.

And theSelfttest in Chilton is incorrect or is it?...I think I need a good Frod ABS scan to get it down right and begin tests again.

Let's fix that vacuum leak first.


miesk5

96 Bronco 5.0
Staff member
Moderator
Joined
Oct 18, 2005
Messages
9,078
Reaction score
1,035
Location
Floating in the Pacific
ok, try a local yard for it; F series and prob all cars have it; I think the change is later 80's; so look for 90-96

Air Conditioning Control Diagrams for '92-96

Source: by Steve83

"...The solid black hose goes to the vacuum supply through a tee-shaped A/C vacuum check valve (19A563), which attaches the A/C vacuum reservoir tank and bracket (19A566) and engine source. The white hose actuates the OUTSIDE/RECIRC. air door two-position vacuum control motor. The blue hose actuates the FLOOR/PANEL air door two-position vacuum control motor. The red and yellow hoses actuate the FLOOR/DEFROST three-position air vacuum control motor. Each end of each hose slides onto the ****** of the vacuum port to which it attaches..."

or is it a VACUUM TREE

do you see it here?

Air Conditioning Parts Catalog, Bronco & all Fords w/Ford Part Numbers & Illustrations 108MB PDF

Source: by fordinstallersupport.com

YG-312

E9OY-19A563A

VACUUM CHECK VALVE

PASSENGER CARS

FORD.......................................................1995-90

LINCOLN .................................................1994-91

MERCURY ................................................1995-90

that vac leak is #1 fix.

One thAng at a time - others here also go w/basic/most likely (& then by time/cost factors)

stay with it, save $!

 
OP
OP
bergs

bergs

New member
Joined
Jul 17, 2008
Messages
16
Reaction score
0
Location
Little Falls, NJ
so i had my friend test all the sensors. he says that they are all functioning properly and the wiring is all good. he says the pcm is probably bad and that the "driver" that turns on the o2 heater is not working. he says that it throws one code instantly and then a while later the other codes come up. where can i get a pcm? whats the cheapest place to get one? do you think i need to replace it?

 
OP
OP
bergs

bergs

New member
Joined
Jul 17, 2008
Messages
16
Reaction score
0
Location
Little Falls, NJ
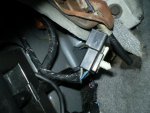
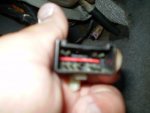
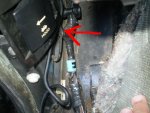
I found this plug that is not plugged into anything. I cant figure out where it plugs in. take a look. It comes out of the wire loom where the red arrow is.

plug1.JPG

plug2.JPG

plug4.JPG

 
OP
OP
bergs

bergs

New member
Joined
Jul 17, 2008
Messages
16
Reaction score
0
Location
Little Falls, NJ
well we replaced the pcm and its all good. also we replaced the fuel filter, it was pretty clogged and may have been causing the lean code. anyway thanks for your replies, the bronco is all inspected and ready to go.


miesk5

96 Bronco 5.0
Staff member
Moderator
Joined
Oct 18, 2005
Messages
9,078
Reaction score
1,035
Location
Floating in the Pacific
yo Bergs!

Good that all is ok now...

The PCM was last thAng I listed... mainly because it is most $ and LESS likely reason in the trobleshooting scheme... figures it would happen, huh? And it happened to me for the ABS Controller (Computer)... it was lst thing I "hoped" was wrong..spent 2 weeks ts each connector, wire, terminal, ground and sensor, PSOM. etc. and finally figured it was da computer for the 4WABS,,, Ford does Not give out any info on how to TS the controller itself...other than to state "a driver may be toasted", in so many words

I have no idea of what that connector is for.... exc to guess.. is your parking brake switch connector in? it is held in-place by one small bolt high on the parking brake frame- the rusty piece in one of your pics...


Members online

No members online now.

Forum statistics

Threads
22,622
Messages
136,706
Members
25,282
Latest member
79' Buckin Bronco
Top