Bronco Not Starting (Firing)

Disclaimer: Links on this page pointing to Amazon, eBay and other sites may include affiliate code. If you click them and make a purchase, we may earn a small commission.

lynchsg

Member
Joined
Oct 14, 2014
Messages
79
Reaction score
71
Location
Fort Mohave, AZ
If the distributor rotor turns once for every 2 crank turns (what Tuha is referring to), you are OK as far as timing gearing. It may be just playing with a little distributor movement as long as the carb isn't still dumping gas, viewed as Motech said. As Tiha stated, #1 on the distributor can be anywhere. The numbering just has to be in correct order with #1 on TDC at the crank pointer.
 

Motech

Well-known member
Joined
Jun 21, 2021
Messages
494
Reaction score
585
Location
Santa Cruz, CA:
If it starts with starting fluid, it should start with gasoline from the carburetor. Unclamp that fuel line, crank it to fill the bowl and then peek inside. Look for fuel prersence without opening throttle. If no, open throttle a few times and look for pump discharge nozzle squirt. If it's squirting, crank it again. FIRE HER UP MAN!
 

wyo58

Member
Joined
Jan 9, 2022
Messages
77
Reaction score
63
Location
Laramie WY
@lynchsg

Ok. Dug into this a bit more and found some wierdness. First, I pulled this firing order diagram for reference for the 400:

View attachment 30976
Couple things right off the bat: the wires are in the correct order but my number one starts at the number eight position as per the above diagram. I recognize that this is not the correct position, however this is how the truck has been running.

I then popped it into neutral and pulled it up to TDC. I pulled the cap off and checked the rotor position and it was sitting around the 6th cylinder per the diagram above. Then I rotated the crank another 360 and the rotor is lining up with my number one cylinder (even though in wrong position).

Couple things here:

1) The rotor didn’t rotate 180, more like 270.

2) While I was manually cranking the crank bolt, the passenger side of the engine would audibly pop (soft) after I’d cranked the it.
I would guess that someone installed your distriutor one tooth off a long time ago. Will it run? if you make the 1 where the 8 is and all the rest in the correct spot. The ignition dosen't care where the wires are as long as they are in the correct order. That being said it makes it a little tough to try and figure out what is going on like what you are going through now. so I'd leave that alone for now and get it running first before you change the distributor to the correct spot.
 

wyo58

Member
Joined
Jan 9, 2022
Messages
77
Reaction score
63
Location
Laramie WY
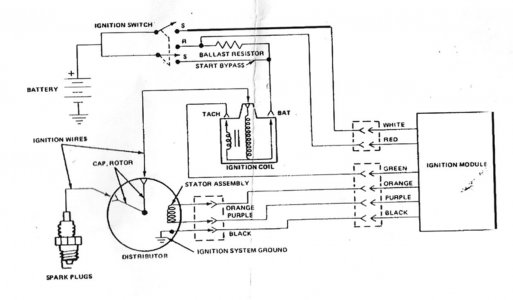
With the key is in the Run position, the positive side of the coil needs to see as close to battery voltage (12.5V) as possible. Mine drops to 11.6V. Which would be the same on the negative side of the coil. A resistor in the ignition prevents a large voltage drop to the coil from the starter voltage draw during cranking. When the key returns to Run, that resistor circuit is removed.
As far as the voltage across the coil, I am not sure what it should be. I don't have a remote starter, am by myself and can't see my voltmeter from the cab when cranking.
Someone else know???
In the run position of the ignition key the coil receives 12 volts. When it goes back to the run position there is a ballast resistor the lowers voltage probably down around half that depending on the resistor value. Which does make me wonder if maybe that ballast resistor maybe open? So make sure you have some voltage at the positive terminal in the run position.
 

lynchsg

Member
Joined
Oct 14, 2014
Messages
79
Reaction score
71
Location
Fort Mohave, AZ
Yup, I had the resistor wrong in my post. wyo58 nailed that with the wiring diagram. I have 12V always going to my ACCEL Super Coil with a MSD distributor. No more Dura Spark.
 
OP
OP
lucky7_1080

lucky7_1080

New member
Joined
Apr 23, 2022
Messages
28
Reaction score
22
Location
California
Thanks all. Regarding the coil - I'll do my best to redescribe what's happening, as I'm not sure it was clear.

(In the run position, and...) When both the positive and negative leads are attached to the coil, and i measure voltage from point to point on the coil I only read 5.6v (across the coil). (It remained 5.6v when engine cranked as well.) When i detach the positive (battery) lead from the coil and measure from the lead to the battery or block I read the same voltage as the battery. In essence the coil is dropping voltage by 50%. Is this what is supposed to be happening?

I also tested the resistance of the existing coil and it's at ~1.2 ohms. As a test, i went and picked up a new coil and it measures the exact same way in all settings.

Now, on to the end of the day. Since I was able to get it to fire earlier today with starting fluid, I went ahead and reconnected fuel to carb and removed the crimp from the line pre-pump. I was able to reproduce the issue that I outlined in my OP. Not only can I get it to fire, but I can get it to (barely) run with my foot buried. Eventually, it dies however. (And it will die immediately if I let off of the pedal at any point.) I took a couple of (YouTube) videos of this for reference:

Cold Start 1

Cold Start 2

I ran out of daylight so didn't get a chance to further investigate the rotor relative to crank, will do this tomorrow. Would love everyone's further thoughts here!!!

Thanks all for the big help.
 
Last edited:

L\Bronco

Well-known member
Joined
Feb 28, 2022
Messages
805
Reaction score
858
Location
A.B. Canada
Thanks all. Regarding the coil - I'll do my best to redescribe what's happening, as I'm not sure it was clear.

(In the run position, and...) When both the positive and negative leads are attached to the coil, and i measure voltage from point to point on the coil I only read 5.6v (across the coil). (It remained 5.6v when engine cranked as well.) When i detach the positive (battery) lead from the coil and measure from the lead to the battery or block I read the same voltage as the battery. In essence the coil is dropping voltage by 50%. Is this what is supposed to be happening?

I also tested the resistance of the existing coil and it's at ~1.2 ohms. As a test, i went and picked up a new coil and it measures the exact same way in all settings.

Now, on to the end of the day. Since I was able to get it to fire earlier today with starting fluid, I went ahead and reconnected fuel to carb and removed the crimp from the line pre-pump. I was able to reproduce the issue that I outlined in my OP. Not only can I get it to fire, but I can get it to (barely) run with my foot buried. Eventually, it dies however. (And it will die immediately if I let off of the pedal at any point.) I took a couple of (YouTube) videos of this for reference:

Cold Start 1

Cold Start 2

I ran out of daylight so didn't get a chance to further investigate the rotor relative to crank, will do this tomorrow. Would love everyone's further thoughts here!!!

Thanks all for the big help.
Hi Lucky,
The 79's use a resistor wire between the ign switch and coil in the run position, it is bypassed in the crank position to feed full battery while cranking. Your voltage measurements sound pretty close to normal.
Listening to your startups, it sounds like its still flooding. I'm with Motech, I'm leary of your float adjustment. (Too high) In one post, I thought I read that the float level was almost level with the top of the bowl. Typically it should be about 1\4 " from the gasket surface. (The measurement should be on the sheet in the carb kit.)
If the float level is ok, Make sure the power valve gasket is on square and the valve is tight, its a weirdly shaped gasket and if it leaks, you introduce a lot of fuel to a vacuum port in the bottom of the carb.
I think Motechs idea of looking down the carb with the choke held open to see the source of the fuel is excellent. Then you can see where the fuel is coming in. (Or if)
Good luck
Hope that helps
Cheers
 

lynchsg

Member
Joined
Oct 14, 2014
Messages
79
Reaction score
71
Location
Fort Mohave, AZ
Rebuilding a carb can be simple or difficult. All passages must be clear of old gas film/varnish. Jets should be removed and cleaned out. The jetting passages should be squirted with carb cleaner using the spray tube supplied (I like soaking a completely disassembled carb in a gallon of Chem Dip first). Putting the jets back in the original position is critical!
Diaphragms and gasket must seal.
The point is, an old carb needs a lot of attention to detail when rebuilding.
Sometimes purchasing another is easier but costs more.
If you continue to have flooding issues, you might think about another carb...
 

Tiha

Well-known member
Staff member
Moderator
Joined
Jul 22, 2020
Messages
1,086
Reaction score
1,113
Location
Midwest
Ok, so you can forget all that checking coil and spark stuff.

Your videos prove it runs and fires.

Could be the ignition timing is off, but at least it is certainly firing.

Back to fuel supply/carb or igniton timing off. Which would be weird unless the timing chain jumped like only one or two teeth.
 

lynchsg

Member
Joined
Oct 14, 2014
Messages
79
Reaction score
71
Location
Fort Mohave, AZ
Finally was able to view your videos.
The fact that it fires without backfiring through the carb tells me timing is OK.
Sounds like a fuel delivery issue, and from all the excessive fuel you have had, I think it's the carb.
 

wyo58

Member
Joined
Jan 9, 2022
Messages
77
Reaction score
63
Location
Laramie WY
Like I said earlier and a few others have said, you really need to see down the carb when its running to see where all the fuel is coming from. Listening to it running the way it is I agree spark timing is okay it is doing what it is supposed to do. It's obviously dumping fuel in from somewhere.
 
OP
OP
lucky7_1080

lucky7_1080

New member
Joined
Apr 23, 2022
Messages
28
Reaction score
22
Location
California
Ok, thanks all for the direction. I spent quite a bit of time today turning the engine over and watching the carb. It appears that everything is working as it should. I did not witness an excessive amount of fuel feeding to the intake. There's no longer any standing fuel inside the intake so I don't believe that I'm flooding out. At initial crank (and no pedal depress) the engine would fire, but will not keep running. I can get the engine to attempt to keep running only if I'm burying the pedal as previously noted. When the pedal is depressed I saw gas squirting through the top jets over the venturis and only during the initial press. While the pedal is buried gas is flowing through the middle of the venturis. I didn't see gas coming in from anywhere else.

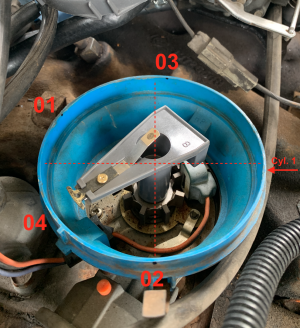
Now, on to the additional timing research. I popped the distributor cap off and rotated the crank (360) from TDC several times to see where I'm landing and as you'll note below - this seems more likely to be the culprit:

Screen Shot 2023-02-18 at 3.45.08 PM.png

I've added numbers here for every 360 degree rotation of the crank from TDC, starting with "01" where I set it at TDC for the first time.

Rotation 01 - 02: 110 degrees
Rotation 02 - 03: 170 degrees
Rotation 03 - 04: 130 degrees

An earlier post noted that I should see a 180 degree rotation of the rotor every time the crank is rotating 360 degrees. Obviously, this is isn't happening. Not only that, but I'm not lining up with Cylinder 1, or 5 after any rotation of the crank. I have a video of the rotor turning but I didn't witness any "jumping". However, during my final pull on the crank prior to resetting my socket the rotor wouldn't spin at all. I can post that video if helpful.

Based on this, I believe there's a timing issue or potentially the distributor is not riding properly on the cam? Or any way this could be a vaccum related illness? Would love further thoughts here based on this photo / diagram.

Thanks all.
 
Last edited:

lynchsg

Member
Joined
Oct 14, 2014
Messages
79
Reaction score
71
Location
Fort Mohave, AZ
With those rotation descrepancies it shouldn't run at all??
Time to pull the distributor noting where the rotor points so you can put it back in the same place.
Inspect the gear on the end of the distributor.
With a flashlight, look down the distributor hole and inspect the cam gear that drives the distributor. If you don't see any signs of damaged gear teeth, then it might be the front timing gears and chain.
Note: When inspecting the cam distributor drive gear through the distributor hole, you will probably need to rotate the crank a few degrees at a time to see the cam gear teeth, making sure to go around twice to get back where you started.
 

wyo58

Member
Joined
Jan 9, 2022
Messages
77
Reaction score
63
Location
Laramie WY
I would find top dead center number 1 cylinder before I pulled it out. After it is out take a close look at the distributor gear on the bottom. I have seen this shear the pin between the gear and the distributor shaft. If it has you will have to replace that pin. On rare occasion I have seen the teeth on the gear broken or missing, usually even if they are the cam gears are okay(distributor gears are softer than cam gears). I'm leaning on the pin though.
 

L\Bronco

Well-known member
Joined
Feb 28, 2022
Messages
805
Reaction score
858
Location
A.B. Canada
Ok, thanks all for the direction. I spent quite a bit of time today turning the engine over and watching the carb. It appears that everything is working as it should. I did not witness an excessive amount of fuel feeding to the intake. There's no longer any standing fuel inside the intake so I don't believe that I'm flooding out. At initial crank (and no pedal depress) the engine would fire, but will not keep running. I can get the engine to attempt to keep running only if I'm burying the pedal as previously noted. When the pedal is depressed I saw gas squirting through the top jets over the venturis and only during the initial press. While the pedal is buried gas is flowing through the middle of the venturis. I didn't see gas coming in from anywhere else.
Not to sound like "that guy", but what you are saying here doesn't quite jive. How are you turning the crankshaft ? What is your reference point? If its really that inconsistent, then you might have an extremely loose timing chain that's jumping on the gears. I don't believe that is the fact here based on the fact that it runs at all.
You mentioned earlier that fuel is coming from the venturis at WOT (I assume while cranking) If that is a fact, then your float level is way too high as no fuel should be seen there until high rpm.
Id go back to the float level until that is proven correct.
You can check the timing chain wear by lining up the 0 deg mark on the crankshaft damper with the pointer, (The rotor should point at 1 or 6 depending on which rotation you are on. (It takes 2 crank rotations to compete the 4 stroke cycle)0.
Next move the crank back and forth with a ratchet and 15\16' socket on a 6" extension. Note how far you have to rotate the crank each way before the rotor starts to move.
This is called timing chain deflection and shouldn't be more than 8 to 12 deg. (its marked on the damper there, so easy to read. Plus if your back and forth measurement is consistent, the chain and dist drive gears are not jumping.

All that being said, I'd still stay on that float level until you are positive it is correct. It makes the most sense based on the information we have.
It can look suspicious though as you've been through the carb and the symptom appears to be the same. I believe your initial failure was a bad float or needle and seat and , if the float is set too high, the problem is the same.
Hope that helps.
Good luck
Cheers
 

goodO1boydws

Active member
Joined
Apr 22, 2022
Messages
161
Reaction score
149
Location
East Tennessee
View attachment 30933

View attachment 30934

View attachment 30935

View attachment 30936

View attachment 30937

Obviously, I'll need to replace this gasket. All of the aftermarket EGR to manifold gaskets look similar to this, without the special cut-out:
View attachment 30938
Will this "closed off" gasket still function properly? Assume so since EGR plate connectivity will go "over the top" of the gasket.


L7
About the gasket.,
Just cut the new one to match.
Do have a drill-for making a starting hole?
If so, the simplest way would be by using a Dremel tool. If not that using a fine blade in a coping saw frame or hand jigsaw frame. Or even using sharp chisels-with a block of wood under the gasket.

About the heat riser tube.
From the photo it looks like a single tube and the hole in the removeable plate is where it used to connect.

If so, you can remove the plate and (after finding suitable diameter replacement copper tubing, or cutting the end off cleanly and rebending it), drill out the remaining piece of tube, insert the replacement tubing and peen the end to flare it out. If you happen to have a flaring tool, so much the better. Then you have a choice of soldering the tube in place or to seal it, or by using a heat resistant silicone or something like JB Weld to make a good seal.

About the cracked brass tube.
Are you sure its cracked?-that long opening looks extremely even.
It may be that the tube was simply squeezed shut. OR it may have been designed to be open like that.
IF it is a crack, it can be squeezed shut and (while clamped shut or not) after being cleaned (buffed, polished, wire brushed, sanded or...)the brass tube can be soldered.

Does someone have a carb like this one to double check what their tube looks like?
 

Tiha

Well-known member
Staff member
Moderator
Joined
Jul 22, 2020
Messages
1,086
Reaction score
1,113
Location
Midwest
Running in the video it sounds like the timing is ********.

Do you have a timing light? You can try to time it while it is turning over and see if it is even close.

Also wondering is a broken roll pin on the distributor gear could have caused this?

I would agree with the inconsistent reading you are getting when turning it over by hand that timing should be far enough off to not run at all by now.
But still seems weird that it isn't more consistent.
 

Motech

Well-known member
Joined
Jun 21, 2021
Messages
494
Reaction score
585
Location
Santa Cruz, CA:
I doubt roll pin breakage. I've only seen that when an inferior quality pin is installed, and then the gear just spins on the shaft with no-start and no rotor rotation at all.
 

Members online

No members online now.

Latest posts

Forum statistics

Threads
22,626
Messages
136,732
Members
25,290
Latest member
Gasman80
Top