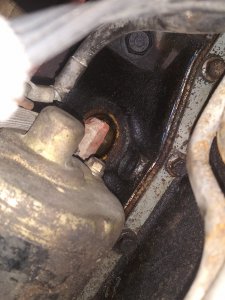
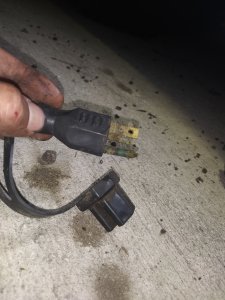
I have a 1989 Ford Bronco with a 302 in it. I've been having issues with my battery draining and it is a brand new battery. My negative battery cable coming off the battery is highly corroded I think that may be the issue. But I found this cable running from underwear the battery sits all the way to the block of the engine right behind the starter. If anybody knows what this wire is and what it does if it is the cause of my battery drain please let me know
You are using an out of date browser. It may not display this or other websites correctly.
You should upgrade or use an alternative browser.
You should upgrade or use an alternative browser.
1989 Ford Bronco battery draining random extension cord
- Thread starter jacoboj64
- Start date
Disclaimer: Links on this page pointing to Amazon, eBay and other sites may include affiliate code. If you click them and make a purchase, we may earn a small commission.
Block heater, for extremely cold temps.
You southerners have no idea. LOL
Battery drain. How fast does it go dead?
You can unhook a cable and do you see sparks?
I usually hook a test light between the terminal, doesn't matter which one. But pull one cable off. Hook one end of the test light to the cable and touch the other end to the battery terminal.
If the light lights up then you have a drain.
First most common place is the radio memory. But start pulling fuses until the light goes out and that will tell you what circuit it is on.
Another one that often gets overlooked is the alternator. A bad diode will cause a battery drain. You test it much the same way. take the big power cable off the alternator and hook the test light in series between the power cable and the power stud on the alternator.
Yo Jaco,
Battery Drainer Suspects;
Battery isn’t charging while you drive.
Underhood lamp is always on, if equipped.
Headlight Switch. CORROSION;
Switch Fires, Part Number SW-2103: "...Over the past two years, this office has experienced fires caused by another potential problem in Ford vehicles. The problem exists within the dimmer portion of the headlight switch in Ford vehicles. The light switch involved is a Model SW-2103. These are the pull out type headlight switches usually located in the lower left corner of the front dash of Ford vehicles. The headlight portion of the switch has two pullout positions, the first for parking lights only, and fully out for headlights and parking lights. The shaft of this pull-out light switch can be turned clockwise and counterclockwise which activates a dimmer switch, lowering and raising the intensity of the lighting in the instrument panels respectively. Fully rotating the shaft counterclockwise past a notch activates the interior lights within the vehicles. The potential problem exists within the dimmer portion of this switch. The dimmer mechanism consists of a metallic resistive coil set inside a ceramic disc positioned over the shaft of the switch. The coil is exposed on its front side away from the passenger compartment. The front side of the coil passes across a contact permitting a current to flow through a certain portion of the coil when the switch is pulled our in its first or second positions. The greater amount of coil through which the current is permitted to pass (clockwise most position) creates the greatest resistance and therefore dims the dash lighting to its lowest intensity. The opposite position provides greatest intensity. Through our investigations, we have found that the coil can fail owing to wear and/or possible material defects or damage. A fractured coil can maneuver itself free of the ceramic disc permitting it to come in contact with the metal bracket which mounts and grounds the switch to the vehicle. When this occurs, a current can flow through a portion of the coil creating high temperatures melting the metal material of the coil and possibly igniting surrounding combustibles. This mechanism has been observed in three separate incidents by this office. Two of these resulted in a fire. The mechanism is precipitated by wear and/or defect in the coil mechanism. If the former is true, we expect there will be an increase in fires caused through this mechanism given an increase in service time. To this date the problem appears to be somewhat limited. However, this particular light switch has been utilized in numerous Ford vehicles. Therefore, a small increase in failure rate owing to age and wear could result in a significant increase in fire losses. The SW-2103 Light Switch Assembly discussed above is reportedly installed in the following Ford vehicles: 1986 -1997 F100, F150, F300; 1990-1994 Explorer; 1987-1994 Ranger; 1987-1990 Bronco II; 1992-1997 Aerostar..." Miesk5 NOTE: No Bronco Listed, but this may be the result of typos or incomplete research by the company.
Source: by waltersforensic.com
See:
Battery Testing Procedure TSB 91-10-10 for 85-91 Bronco, Aerostar, Econoline, F-150-350 Series, Ranger; 85-90 Bronco II; 89-91 F Super Duty, F47, F-53, F-59; 91 Explorer, etc.
Source: by Ford @
Loose or Weak Contact at Generator Harness Connector TSB 96-21-4 for 86-93 Bronco
Source: by Ford
"ISSUE: When a generator fails, there are a few failure modes that may cause heat to be produced at the wiring harness-to-generator connector. This excess heat may damage the female terminals on the wiring harness, resulting in increased resistance. The increased resistance produces more heat. When the generator is replaced, the resistance produced by a damaged connector may damage the new generator and could result in a repeat repair, including installation of another generator. High resistance (caused by a damaged connector) will not go away until the damaged connector is replaced.
ACTION: Visually inspect the harness-to-generator connector for damage (heat, corrosion, distortion and cracking) before installing a new generator. Install the Generator Wiring Harness Connector Kit (E5AZ-14305-AA) if the harness-to-generator connector is damaged.
The Generator Wiring Harness Connector Kit (E5AZ-14305-AA) contains the following:
One (1) Red Wire Butt Connector
Two (2) Yellow Wire Butt Connectors
One (1) Wire Connector Assembly
One (1) Instruction Sheet (I.S. 6849)
PART NUMBER PART NAME
E5AZ-14305-AA Generator Wiring Harness Connector Kit
OTHER APPLICABLE ARTICLES: NONE
SUPERSEDES: 95-25-04"
Parasitic Current Drain Test; "...you should be able to trace the "parasitic draw" on the battery in the normal way. Pull the (-) cable off & put an ammeter inline set to the 10A range (or higher if possible) to see how much current is being pulled out of the battery with the key OFF, the doors SHUT, & the hood light bulb REMOVED. Make sure absolutely NOTHING is turned on anywhere on the truck. If it registers 0 or below the meter's next range, switch it down a range until it shows some useful numbers. If it ends up being below 0.5A (500mA), then replace the battery. If it's above that, start by disconnecting all the alternator wires & see if the reading drops under 0.5A. Then move to the fuse block & pull them 1 at a time until there's a significant drop in the reading. That's the circuit that's draining the battery. Follow it to find the problem..."
BATTERY DOES NOT HOLD A CHARGE
L1 CHECK BATTERY CONNECTIONS
L2 CHECK DRIVE BELT TENSION
L3 LOOSE BATTERY POST
L4 CRACKED BATTERY COVER
L5 CHECK BATTERY
L6 CHECK FOR KEY-OFF DRAIN
Battery Drainer Suspects;
Battery isn’t charging while you drive.
Underhood lamp is always on, if equipped.
Headlight Switch. CORROSION;
Switch Fires, Part Number SW-2103: "...Over the past two years, this office has experienced fires caused by another potential problem in Ford vehicles. The problem exists within the dimmer portion of the headlight switch in Ford vehicles. The light switch involved is a Model SW-2103. These are the pull out type headlight switches usually located in the lower left corner of the front dash of Ford vehicles. The headlight portion of the switch has two pullout positions, the first for parking lights only, and fully out for headlights and parking lights. The shaft of this pull-out light switch can be turned clockwise and counterclockwise which activates a dimmer switch, lowering and raising the intensity of the lighting in the instrument panels respectively. Fully rotating the shaft counterclockwise past a notch activates the interior lights within the vehicles. The potential problem exists within the dimmer portion of this switch. The dimmer mechanism consists of a metallic resistive coil set inside a ceramic disc positioned over the shaft of the switch. The coil is exposed on its front side away from the passenger compartment. The front side of the coil passes across a contact permitting a current to flow through a certain portion of the coil when the switch is pulled our in its first or second positions. The greater amount of coil through which the current is permitted to pass (clockwise most position) creates the greatest resistance and therefore dims the dash lighting to its lowest intensity. The opposite position provides greatest intensity. Through our investigations, we have found that the coil can fail owing to wear and/or possible material defects or damage. A fractured coil can maneuver itself free of the ceramic disc permitting it to come in contact with the metal bracket which mounts and grounds the switch to the vehicle. When this occurs, a current can flow through a portion of the coil creating high temperatures melting the metal material of the coil and possibly igniting surrounding combustibles. This mechanism has been observed in three separate incidents by this office. Two of these resulted in a fire. The mechanism is precipitated by wear and/or defect in the coil mechanism. If the former is true, we expect there will be an increase in fires caused through this mechanism given an increase in service time. To this date the problem appears to be somewhat limited. However, this particular light switch has been utilized in numerous Ford vehicles. Therefore, a small increase in failure rate owing to age and wear could result in a significant increase in fire losses. The SW-2103 Light Switch Assembly discussed above is reportedly installed in the following Ford vehicles: 1986 -1997 F100, F150, F300; 1990-1994 Explorer; 1987-1994 Ranger; 1987-1990 Bronco II; 1992-1997 Aerostar..." Miesk5 NOTE: No Bronco Listed, but this may be the result of typos or incomplete research by the company.
Source: by waltersforensic.com
See:
Battery Testing Procedure TSB 91-10-10 for 85-91 Bronco, Aerostar, Econoline, F-150-350 Series, Ranger; 85-90 Bronco II; 89-91 F Super Duty, F47, F-53, F-59; 91 Explorer, etc.
Source: by Ford @
Loose or Weak Contact at Generator Harness Connector TSB 96-21-4 for 86-93 Bronco
Source: by Ford
"ISSUE: When a generator fails, there are a few failure modes that may cause heat to be produced at the wiring harness-to-generator connector. This excess heat may damage the female terminals on the wiring harness, resulting in increased resistance. The increased resistance produces more heat. When the generator is replaced, the resistance produced by a damaged connector may damage the new generator and could result in a repeat repair, including installation of another generator. High resistance (caused by a damaged connector) will not go away until the damaged connector is replaced.
ACTION: Visually inspect the harness-to-generator connector for damage (heat, corrosion, distortion and cracking) before installing a new generator. Install the Generator Wiring Harness Connector Kit (E5AZ-14305-AA) if the harness-to-generator connector is damaged.
The Generator Wiring Harness Connector Kit (E5AZ-14305-AA) contains the following:
One (1) Red Wire Butt Connector
Two (2) Yellow Wire Butt Connectors
One (1) Wire Connector Assembly
One (1) Instruction Sheet (I.S. 6849)
PART NUMBER PART NAME
E5AZ-14305-AA Generator Wiring Harness Connector Kit
OTHER APPLICABLE ARTICLES: NONE
SUPERSEDES: 95-25-04"
Parasitic Current Drain Test; "...you should be able to trace the "parasitic draw" on the battery in the normal way. Pull the (-) cable off & put an ammeter inline set to the 10A range (or higher if possible) to see how much current is being pulled out of the battery with the key OFF, the doors SHUT, & the hood light bulb REMOVED. Make sure absolutely NOTHING is turned on anywhere on the truck. If it registers 0 or below the meter's next range, switch it down a range until it shows some useful numbers. If it ends up being below 0.5A (500mA), then replace the battery. If it's above that, start by disconnecting all the alternator wires & see if the reading drops under 0.5A. Then move to the fuse block & pull them 1 at a time until there's a significant drop in the reading. That's the circuit that's draining the battery. Follow it to find the problem..."
BATTERY DOES NOT HOLD A CHARGE
L1 CHECK BATTERY CONNECTIONS
- Inspect the battery cables for loose or corroded connections, especially those negative cable grounds.
| Yes | No |
|---|---|
| GO to L2. | CLEAN AND TIGHTEN the battery cables. |
- Tight?
| Yes | No |
|---|---|
| GO to L3. | ADJUST or REPLACE the drive belt. |
- Check for loose battery posts.
| Yes | No |
|---|---|
| GO to L4. | REPLACE battery. |
- Remove battery hold down clamps and shields.
- Check for broken/cracked case or battery cover.
| Yes | No |
|---|---|
| GO to L5. | REPLACE battery. |
- Perform the battery capacity test at local parts store.
| Yes | No |
|---|---|
| GO to L6. | REPLACE the battery. |
- Have parts store perform battery drain test.
| Yes | No |
|---|---|
| Battery is ok! | Find the cause of key-off battery drain. |
Is that something that i can remove, or should i leave it alone my truck is a southern truck now and will never see see temperatures under 30°Block heater, for extremely cold temps.
You southerners have no idea. LOL
Battery drain. How fast does it go dead?
You can unhook a cable and do you see sparks?
I usually hook a test light between the terminal, doesn't matter which one. But pull one cable off. Hook one end of the test light to the cable and touch the other end to the battery terminal.
If the light lights up then you have a drain.
First most common place is the radio memory. But start pulling fuses until the light goes out and that will tell you what circuit it is on.
Another one that often gets overlooked is the alternator. A bad diode will cause a battery drain. You test it much the same way. take the big power cable off the alternator and hook the test light in series between the power cable and the power stud on the alternator.
Thank you so much I'm going to start off by replacing the corroded battery cables and maybe a new starter solenoid. I'm hoping that resolved my issue but if not I'm going to work my way down your list. Thank youYo Jaco,
Battery Drainer Suspects;
Battery isn’t charging while you drive.
Underhood lamp is always on, if equipped.
Headlight Switch. CORROSION;
Switch Fires, Part Number SW-2103: "...Over the past two years, this office has experienced fires caused by another potential problem in Ford vehicles. The problem exists within the dimmer portion of the headlight switch in Ford vehicles. The light switch involved is a Model SW-2103. These are the pull out type headlight switches usually located in the lower left corner of the front dash of Ford vehicles. The headlight portion of the switch has two pullout positions, the first for parking lights only, and fully out for headlights and parking lights. The shaft of this pull-out light switch can be turned clockwise and counterclockwise which activates a dimmer switch, lowering and raising the intensity of the lighting in the instrument panels respectively. Fully rotating the shaft counterclockwise past a notch activates the interior lights within the vehicles. The potential problem exists within the dimmer portion of this switch. The dimmer mechanism consists of a metallic resistive coil set inside a ceramic disc positioned over the shaft of the switch. The coil is exposed on its front side away from the passenger compartment. The front side of the coil passes across a contact permitting a current to flow through a certain portion of the coil when the switch is pulled our in its first or second positions. The greater amount of coil through which the current is permitted to pass (clockwise most position) creates the greatest resistance and therefore dims the dash lighting to its lowest intensity. The opposite position provides greatest intensity. Through our investigations, we have found that the coil can fail owing to wear and/or possible material defects or damage. A fractured coil can maneuver itself free of the ceramic disc permitting it to come in contact with the metal bracket which mounts and grounds the switch to the vehicle. When this occurs, a current can flow through a portion of the coil creating high temperatures melting the metal material of the coil and possibly igniting surrounding combustibles. This mechanism has been observed in three separate incidents by this office. Two of these resulted in a fire. The mechanism is precipitated by wear and/or defect in the coil mechanism. If the former is true, we expect there will be an increase in fires caused through this mechanism given an increase in service time. To this date the problem appears to be somewhat limited. However, this particular light switch has been utilized in numerous Ford vehicles. Therefore, a small increase in failure rate owing to age and wear could result in a significant increase in fire losses. The SW-2103 Light Switch Assembly discussed above is reportedly installed in the following Ford vehicles: 1986 -1997 F100, F150, F300; 1990-1994 Explorer; 1987-1994 Ranger; 1987-1990 Bronco II; 1992-1997 Aerostar..." Miesk5 NOTE: No Bronco Listed, but this may be the result of typos or incomplete research by the company.
Source: by waltersforensic.com
See:
Battery Testing Procedure TSB 91-10-10 for 85-91 Bronco, Aerostar, Econoline, F-150-350 Series, Ranger; 85-90 Bronco II; 89-91 F Super Duty, F47, F-53, F-59; 91 Explorer, etc.
Source: by Ford @
Loose or Weak Contact at Generator Harness Connector TSB 96-21-4 for 86-93 Bronco
Source: by Ford
"ISSUE: When a generator fails, there are a few failure modes that may cause heat to be produced at the wiring harness-to-generator connector. This excess heat may damage the female terminals on the wiring harness, resulting in increased resistance. The increased resistance produces more heat. When the generator is replaced, the resistance produced by a damaged connector may damage the new generator and could result in a repeat repair, including installation of another generator. High resistance (caused by a damaged connector) will not go away until the damaged connector is replaced.
ACTION: Visually inspect the harness-to-generator connector for damage (heat, corrosion, distortion and cracking) before installing a new generator. Install the Generator Wiring Harness Connector Kit (E5AZ-14305-AA) if the harness-to-generator connector is damaged.
The Generator Wiring Harness Connector Kit (E5AZ-14305-AA) contains the following:
One (1) Red Wire Butt Connector
Two (2) Yellow Wire Butt Connectors
One (1) Wire Connector Assembly
One (1) Instruction Sheet (I.S. 6849)
PART NUMBER PART NAME
E5AZ-14305-AA Generator Wiring Harness Connector Kit
OTHER APPLICABLE ARTICLES: NONE
SUPERSEDES: 95-25-04"
Parasitic Current Drain Test; "...you should be able to trace the "parasitic draw" on the battery in the normal way. Pull the (-) cable off & put an ammeter inline set to the 10A range (or higher if possible) to see how much current is being pulled out of the battery with the key OFF, the doors SHUT, & the hood light bulb REMOVED. Make sure absolutely NOTHING is turned on anywhere on the truck. If it registers 0 or below the meter's next range, switch it down a range until it shows some useful numbers. If it ends up being below 0.5A (500mA), then replace the battery. If it's above that, start by disconnecting all the alternator wires & see if the reading drops under 0.5A. Then move to the fuse block & pull them 1 at a time until there's a significant drop in the reading. That's the circuit that's draining the battery. Follow it to find the problem..."
BATTERY DOES NOT HOLD A CHARGE
L1 CHECK BATTERY CONNECTIONS
Are the battery cables clean and tight?
- Inspect the battery cables for loose or corroded connections, especially those negative cable grounds.
L2 CHECK DRIVE BELT TENSION
Yes No GO to L2. CLEAN AND TIGHTEN the battery cables.
- Tight?
L3 LOOSE BATTERY POST
Yes No GO to L3. ADJUST or REPLACE the drive belt.
Are posts OK?
- Check for loose battery posts.
L4 CRACKED BATTERY COVER
Yes No GO to L4. REPLACE battery.
Are case and cover OK?
- Remove battery hold down clamps and shields.
- Check for broken/cracked case or battery cover.
L5 CHECK BATTERY
Yes No GO to L5. REPLACE battery.
Is battery OK?
- Perform the battery capacity test at local parts store.
L6 CHECK FOR KEY-OFF DRAIN
Yes No GO to L6. REPLACE the battery.
Is correct drain less than 50 Ma (or test lamp off)?
- Have parts store perform battery drain test.
Yes No Battery is ok! Find the cause of key-off battery drain.
Is that something that i can remove, or should i leave it alone my truck is a southern truck now and will never see see temperatures under 30°
You can cut the cord off or unplug it, if you pull it out of the block it will drain all the antifreeze and you will need to replace it with a new freeze plug.
richard729
New member
- Joined
- Aug 6, 2012
- Messages
- 4
- Reaction score
- 5
It has snowed a couple of times here in Havana, FL in years gone by! I've worked snow/ice storms south of Atlanta, GA also.Is that something that i can remove, or should i leave it alone my truck is a southern truck now and will never see see temperatures under 30°
Broncoj932
New member
I recently had the same issue with my 89 Bronco 5.0. After doing all the various tests and diagnostics, I could not find a problem in my wiring. I tested my alternator. The internal regulator must face failed. It was not charging the battery and was rapidly draining the battery while not in use. Replaced alternator and no longer have a battery drain.I have a 1989 Ford Bronco with a 302 in it. I've been having issues with my battery draining and it is a brand new battery. My negative battery cable coming off the battery is highly corroded I think that may be the issue. But I found this cable running from underwear the battery sits all the way to the block of the engine right behind the starter. If anybody knows what this wire is and what it does if it is the cause of my battery drain please let me know
chrlsful
Active member
don't start throwing prts at a problem. That can go on 4 ever. Learn to diagnose it. U have some 'theory' to learn.
If only 1 car U will get up to speed very quickly & B able to cont easily (on that 1 car, transfer to others eventually). Grounds on older vehicles R usually the culprit. Here, 1 of abt 4 (of some 'main grnds' - is the battery to frame 1) the "neg batree cable". U may wish to pull the altern if having no multimeter & take it to the Orlando AutoZone, PepBoys, etc for a bench test. They will "spin it at road speed" (test) to C if it is a problem. If bad U have some partial knowledge. That's a good thing. In this case replace, but U still don't know abt the rest of the "CHARGING system" (just one part of the whole ele system - there's starting & other ele systems making the whole). As usual miesk has provided other pieces to the puzzle. A Chiltions or Haynes (4th gen Bronco) is a good purchase & affordable, better is an expensive ford shop manual: '86/91 Ford Truck.
"Cut" that 1 block heater and U leave an open grnd to discharge the system constantly as is being done now. I'd wrap it up in a sm package and tape the whole up & out of the way. No contact, no drain. Best would B a removal and replace w/a ford block plate (whatever they have oem for that). Least effective would B the 'cut' or chop-off at slightly above the fitting and the pourable hi temp insulation goop used to make ***** drivers safe arounf electrical panels. 8^0
Jasgeer
New member
It is a good idea to check the voltage at the battery with the engine running. If the voltage is >13.5VDC then the alternator and internal regulator are probably good. If you measure 12.5-12.6 then the battery is not being charged. You can get a cheapo multimeter at an auto parts store, Harbor Freight, Ebay or even Home Depot. Try to avoid cross-your-fingers and replace.I recently had the same issue with my 89 Bronco 5.0. After doing all the various tests and diagnostics, I could not find a problem in my wiring. I tested my alternator. The internal regulator must face failed. It was not charging the battery and was rapidly draining the battery while not in use. Replaced alternator and no longer have a battery drain.
johnnyreb
Well-known member
It looks like a engine block heater. The round part would go in a freeze plug hole and the plug in would plug into a extension cord. That would plug into a electric outlet at home or garage.I have a 1989 Ford Bronco with a 302 in it. I've been having issues with my battery draining and it is a brand new battery. My negative battery cable coming off the battery is highly corroded I think that may be the issue. But I found this cable running from underwear the battery sits all the way to the block of the engine right behind the starter. If anybody knows what this wire is and what it does if it is the cause of my battery drain please let me know
An easy way to narrow down what is draining your battery is to put a meter between the positive terminal and positive cable with the cable removed then start removing fuses one at a time. the meter will show voltage being pulled from the battery when the drain is happening and will read 0 when you get the right circuit isolated. Remember to only pull 1 fuse then check the meter. This will help in finding the problem. Hope this is some help.I have a 1989 Ford Bronco with a 302 in it. I've been having issues with my battery draining and it is a brand new battery. My negative battery cable coming off the battery is highly corroded I think that may be the issue. But I found this cable running from underwear the battery sits all the way to the block of the engine right behind the starter. If anybody knows what this wire is and what it does if it is the cause of my battery drain please let me know
Similar threads
- Replies
- 2
- Views
- 212