Need help setting correct voltage, fuel level, oil pressure and coolant temp

Disclaimer: Links on this page pointing to Amazon, eBay and other sites may include affiliate code. If you click them and make a purchase, we may earn a small commission.

jeff_macon

New member
Joined
Sep 24, 2005
Messages
8
Reaction score
4
I removed my instrument cluster to reattach a needle that fell off the oil pressure gauge and the backing that has the readings on it came off on 2 of the other gauges so I decided to remove the needles and reglue all of the backing plates. As a result of removing the needles the gauges aren't showing the proper reading. They max out when i turn the ignition on and start the truck. Is there any documentation on how to calibrate the gauges to read properly? Or could someone lead me in the right direction? Holding the reset button while turning on the ignition isn't doing it, that method is to calibrate the speedo. Thanks in advance
 

miesk5

96 Bronco 5.0
Staff member
Moderator
Joined
Oct 18, 2005
Messages
9,078
Reaction score
1,035
Location
Floating in the Pacific
Yo Jeff,
if you have a 95;
Fuel Gauge;
Testing & Connector Pin-Outs in 92-96 Bronco; Sender Range: Full = 160 Ohms; Empty = 16 Ohms; "... gauge that pegs past full indicates an open circuit (broken wire; unplugged connector; corroded terminal; burned sender) on the Y/W wire. gauge that pegs past empty indicates a short to ground (pinched to the frame, body, or dash supports) on the Y/W wire, OR a sunk float. gauge anywhere in between that doesn't move indicates an open circuit (blown fuse; corroded terminal) on the power (battery) side of the gauge OR a bad instrument cluster ground at C251 pin 9. The terminals of C251 (& C250) are known to corrode & lose contact. Polish both the connector pins AND the film circuit pads with brown paper or a pink eraser. The larger version of C441(WPT454) was used until 93. The level sender can usually be disassembled & repaired by bending the wiper arm inside the plastic housing to apply slightly more force..."

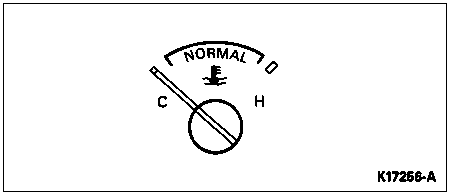
Coolant Temperature Gauge

Check gauge calibration as follows:

  • Using a Rotunda Instrument Gauge System Tester 014-R1063 or equivalent, with the key in the OFF position, disconnect wiring connector at the sender and connect tester to wiring connector.
  • Set the tester to 74 ohms.
  • Turn the key to RUN, and wait 60 seconds. The gauge should indicate on the COLD graduation.
  • Set the tester to 9.7 ohms and wait 60 seconds. The gauge should indicate on the HOT graduation.


k17256a.gif

  • If engine coolant temperature gauge tests within calibration, replace engine coolant temperature sender.
  • If engine coolant temperature gauge still tests out of calibration, replace coolant temperature gauge.

Oil Pressure Sender

Check gauge operation as follows:

  • With the key in RUN and the engine off, disconnect wiring connector at the switch. The gauge should indicate on the LOW graduation or below.
  • Connect the wiring connector to the engine block ground. The gauge should indicate just slightly above mid-scale.
  • If the oil pressure gauge tests within calibration, replace oil pressure switch.
  • If the gauge still tests out of calibration, replace oil pressure gauge.

Battery Voltage Gauge

Test the battery voltage gauge as follows:

  • Turn the key to RUN, turn the headlamps on, and set the heater blower/fan on high with the engine (6007) stopped. The gauge pointer should move toward the lower portion of the normal band (the white marked area).
  • If no movement of needle is observed, check the fuse and the battery-to-circuit breaker and circuit breaker-to-cluster wire connections.
  • If connections are tight and wire continuity is good, remove the instrument cluster (10849) from the vehicle.
  • Check for flex circuit continuity and confirm flex circuit-to-clip and clip-to-gauge contact.
  • If all connections are good, replace the instrument cluster.
 

Tiha

Well-known member
Staff member
Moderator
Joined
Jul 22, 2020
Messages
1,085
Reaction score
1,111
Location
Midwest
Yeah you kinda gotta take note of where they were. Then reinstall them with the engine running at the same temp.

Miesk has the proper process, but you might want to check around for a used cluster. Might be just as easy.

Fuel gauge and temp gauge are really the only two I would spend time getting right.

Or did you pull the speedo and tach as well?
 
OP
OP
J

jeff_macon

New member
Joined
Sep 24, 2005
Messages
8
Reaction score
4
Yeah you kinda gotta take note of where they were. Then reinstall them with the engine running at the same temp.

Miesk has the proper process, but you might want to check around for a used cluster. Might be just as easy.

Fuel gauge and temp gauge are really the only two I would spend time getting right.

Or did you pull the speedo and tach as well?
I pulled all needles off to reglue the back plates on all the gauges. When putting them back on i placed the needles on pointing at the lowest indication but I forgot to mention that before I started this ***** up there was nothing at all wrong with the gauges or their readings. Only that one of the needles fell off and 2 of the back plates was loose.
 
OP
OP
J

jeff_macon

New member
Joined
Sep 24, 2005
Messages
8
Reaction score
4
Yo Jeff,
if you have a 95;
Fuel Gauge;
Testing & Connector Pin-Outs in 92-96 Bronco; Sender Range: Full = 160 Ohms; Empty = 16 Ohms; "... gauge that pegs past full indicates an open circuit (broken wire; unplugged connector; corroded terminal; burned sender) on the Y/W wire. gauge that pegs past empty indicates a short to ground (pinched to the frame, body, or dash supports) on the Y/W wire, OR a sunk float. gauge anywhere in between that doesn't move indicates an open circuit (blown fuse; corroded terminal) on the power (battery) side of the gauge OR a bad instrument cluster ground at C251 pin 9. The terminals of C251 (& C250) are known to corrode & lose contact. Polish both the connector pins AND the film circuit pads with brown paper or a pink eraser. The larger version of C441(WPT454) was used until 93. The level sender can usually be disassembled & repaired by bending the wiper arm inside the plastic housing to apply slightly more force..."

Coolant Temperature Gauge

Check gauge calibration as follows:

  • Using a Rotunda Instrument Gauge System Tester 014-R1063 or equivalent, with the key in the OFF position, disconnect wiring connector at the sender and connect tester to wiring connector.
  • Set the tester to 74 ohms.
  • Turn the key to RUN, and wait 60 seconds. The gauge should indicate on the COLD graduation.
  • Set the tester to 9.7 ohms and wait 60 seconds. The gauge should indicate on the HOT graduation.


View attachment 27971

  • If engine coolant temperature gauge tests within calibration, replace engine coolant temperature sender.
  • If engine coolant temperature gauge still tests out of calibration, replace coolant temperature gauge.

Oil Pressure Sender

Check gauge operation as follows:

  • With the key in RUN and the engine off, disconnect wiring connector at the switch. The gauge should indicate on the LOW graduation or below.
  • Connect the wiring connector to the engine block ground. The gauge should indicate just slightly above mid-scale.
  • If the oil pressure gauge tests within calibration, replace oil pressure switch.
  • If the gauge still tests out of calibration, replace oil pressure gauge.

Battery Voltage Gauge

Test the battery voltage gauge as follows:

  • Turn the key to RUN, turn the headlamps on, and set the heater blower/fan on high with the engine (6007) stopped. The gauge pointer should move toward the lower portion of the normal band (the white marked area).
  • If no movement of needle is observed, check the fuse and the battery-to-circuit breaker and circuit breaker-to-cluster wire connections.
  • If connections are tight and wire continuity is good, remove the instrument cluster (10849) from the vehicle.
  • Check for flex circuit continuity and confirm flex circuit-to-clip and clip-to-gauge contact.
  • If all connections are good, replace the instrument cluster.
Thanks Miesk, i'll get to work on it tomorrow cuz it's a little late in the day and the humidity has gone up in my part of GA
 
OP
OP
J

jeff_macon

New member
Joined
Sep 24, 2005
Messages
8
Reaction score
4
actually, after looking at the price for the tool that miesk mentioned, i might have to hit the junk yard for a replacement cluster
 

johnnyreb

Well-known member
Joined
Feb 23, 2021
Messages
2,511
Reaction score
1,096
Location
West Virginia
I pulled all needles off to reglue the back plates on all the gauges. When putting them back on i placed the needles on pointing at the lowest indication but I forgot to mention that before I started this ***** up there was nothing at all wrong with the gauges or their readings. Only that one of the needles fell off and 2 of the back plates was loose.
Like Mike said--could be a unplugged wire. Double check all of your wires. It has happened to us.
 

chrlsful

Active member
Joined
Oct 13, 2009
Messages
432
Reaction score
218
Location
S. Amherst, MA 01002-1827
need some ele theory here (I don't got any) but the age suggests grounds. As posted by our experts above the IVR (a regulator on back of MY '70 EB) cluster went & produced the same results.
I gota guy in Utah who re-duz thwhole cluster, MAY advise U if interested ina lill DIY. 1st thing I'd do is go @ it w/a test light (continuity). Last, also as above - the ohms need to match unit'n guage or I'd just say "Replace the guages."
 

Members online

No members online now.

Forum statistics

Threads
22,621
Messages
136,702
Members
25,282
Latest member
79' Buckin Bronco
Top