Like a squirrel whistling on a ice cube

Disclaimer: Links on this page pointing to Amazon, eBay and other sites may include affiliate code. If you click them and make a purchase, we may earn a small commission.

ablediver

Member
Joined
Aug 23, 2021
Messages
85
Reaction score
73
Location
North Florida

Low Output A/C​

Bronco Nation: I've got a 90' XLT with OEM A/C . It has a 5.0L with AOD. The evaporator went and was dealer replaced. The A/C barely ran cool. Brought it back, they determined it to be a leaking O-ring. It still didn't blow cold, just cool. Now, it runs cool, not cold, and mostly after running a while . Not comfortable enough even for North Florida. Appreciate any input on this.

Ablediver out
 

Tiha

Well-known member
Staff member
Moderator
Joined
Jul 22, 2020
Messages
1,085
Reaction score
1,111
Location
Midwest
Being 1990, is it R12 or has it been converted to R134?

As you have figured out, AC systems can be tough to diagnose.

A proper charge on any ac system is when the inlet and outlet of the evaporator are the same temperature.

So first off check that. Just grab it with your hand. After the orifice tube, and compare it to where it comes out of the firewall.

If the inlet is colder than the outlet it is low on freon.

If the outlet is colder than the inlet it is over charged.

After that it is really helpful to know the high and low side pressures with a set of gauges.

But before we get there, couple other things you can do.

With the ac system running, move your hand across the AC condenser. Careful it should be really hot. If it is not hot all the way across the condenser, or even worse if you find a spot where it is cold. then it has a blockage and needs replaced.

While you are feeling it, can you feel the engine pulling air across the condenser?

You can also take a garden hose and run water over the condenser with the ac system on. If it starts to cool better, vent temps go down. Then you have an efficiency problem in the condenser, or fan/fan clutch problem not moving enough air.

After that I am not sure where to go without a set of gauges. High side pressure will tell us if maybe a weak compressor or partially plugged orifice tube.
 

miesk5

96 Bronco 5.0
Staff member
Moderator
Joined
Oct 18, 2005
Messages
9,078
Reaction score
1,035
Location
Floating in the Pacific
Yo ablediver,
As Tiha advises.
&
 

Attachments

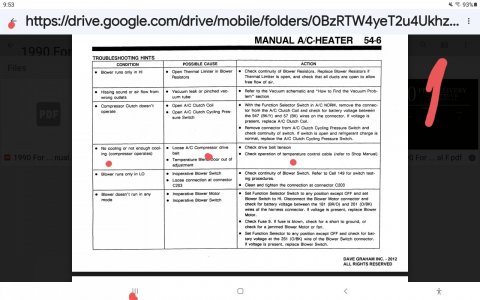
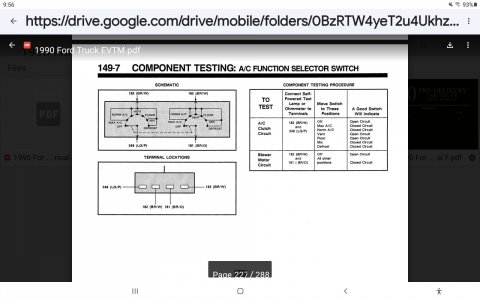
  • Screenshot_20230718-095358_Drive.jpg
    Screenshot_20230718-095358_Drive.jpg
    220.9 KB · Views: 2
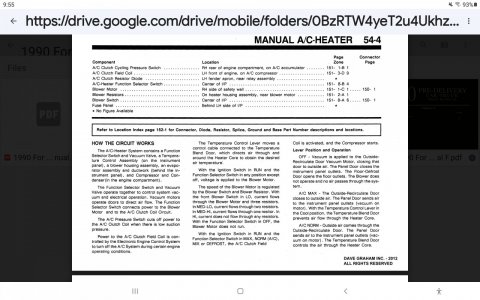
  • Screenshot_20230718-095527_Drive.jpg
    Screenshot_20230718-095527_Drive.jpg
    270.8 KB · Views: 2
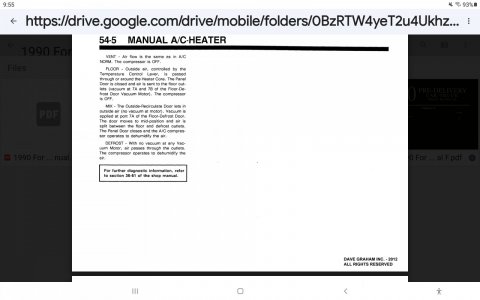
  • Screenshot_20230718-095531_Drive.jpg
    Screenshot_20230718-095531_Drive.jpg
    122.4 KB · Views: 2
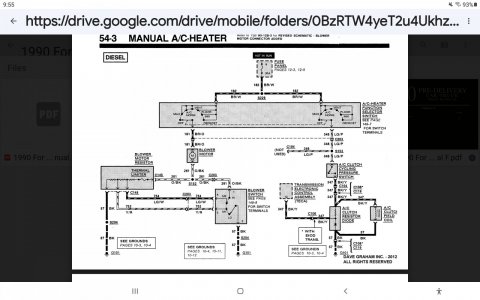
  • Screenshot_20230718-095520_Drive.jpg
    Screenshot_20230718-095520_Drive.jpg
    195.4 KB · Views: 2
  • Screenshot_20230718-095648_Drive.jpg
    Screenshot_20230718-095648_Drive.jpg
    166.8 KB · Views: 1

L\Bronco

Well-known member
Joined
Feb 28, 2022
Messages
800
Reaction score
852
Location
A.B. Canada
Tiha and miesk5 have given some great direction! The only thing I'd add is to verify that the line goes from warm to cold right at the orifice tube.
It will be in the smaller line between the condenser and the evaporator. If its cold before the tube it indicates a restriction in the condenser or the line from the condenser to the orifice. Basically feel around while the A/c is running. it should change from cold to hot at the compressor and hot to cold at the orifice when it is correct.
As Tiha said, if the cold to hot change happens at the evaporator, it indicates low charge.
Is it cold at the beginning then gradually gets worse? Or all the time?
Let us know and I'm sure we can help you work this out.
Cheers
 

Motech

Well-known member
Joined
Jun 21, 2021
Messages
494
Reaction score
585
Location
Santa Cruz, CA:
I'll add my 4 cents.

If it's an R12 system converted to R134, they will never blow as cold as the old R12, especially in hot and HUMID climates.

R134 also operates best a lower pressures. Example: R12 will blow coldest around 32-34 psi on the low side. and the system risks icing up if pressure drops too low. So Ford, like all others who do not use an expansion valve, incorporates a low-pressure cycling switch calibrated to turn off the AC compressor clutch when low side drops below 28-29 psi. With a healthy system, at idle you would hear your AC compressor shutting off for maybe 5 second intervals every 15-30 seconds while maintaining a nippy 38* F output temp inside your cab.

With R134 though, that's not low enough. It operates most effectively at around 26-28 low side psi, so just as it starts to cool down some, that darned switch kicks it off like some cruel edging, and you end up with more frequent clutch cycling and a balmy 58* outlet temp.

Lucky for us--and not all techs are aware of this, even seasoned ones, and you'll not find this in Ford service data back in R12 days--but Ford's cycling switches are adjustable!

This switch lives on the accumulator, or receiver dryer at about 10:00 in the photo here.
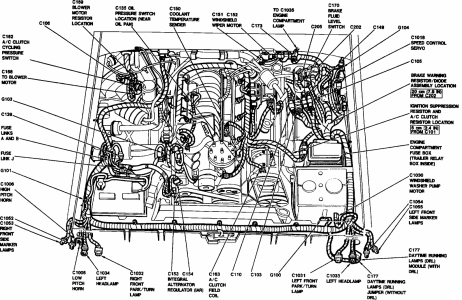
1690366736028.png

Ford did issue a recalibrated cycling switch right around your vintage for switch calibrations that drifted downward, causing overheated evaporators and chemical metallic odors in the cab. They recommended either adjusting your existing switch a quarter-turn in to increase the cycling pressure and allow more frequent cycling, or replace with the updated unit.

You're going to want to go the opposite direction of curse. Ideally, having a pressure gauge attached to the low pressure side is best, wherein you would adjust until your compressor is cycled off around 24-26 psi. However, it's not totally necessary, and a quarter turn counter-clockwise should do the trick.

You'll know you've gone too far if your compressor no longer cycles off and the pipe coming off your accumulator start to freeze. Simply rotate the adjuster in just a smidge back at a time until you find that happy place of no icing and your cycling ratio of about 5 second intervals off for every 15-30 seconds on.

Here's a shot of that switch looking into where the connector attaches:
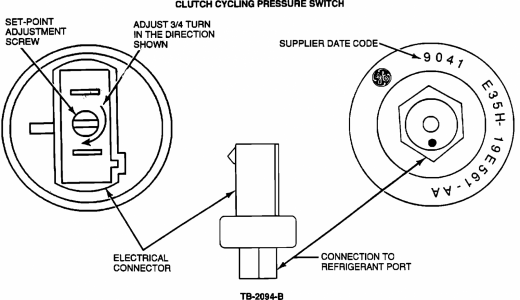
1690367666474.png

You can twist them off by hand if you can't get a screwdriver in there. They are spun onto a shroeder valve, so you'll lose no refrigerant.

If it still is not cool enough, and you are confident there is the proper amount of refrigerant in there...

Wait, that's an item too. Your system capacity is 44 oz of R12, but R134 operates on less refrigerant, and hopefully this shop is well versed. (I have no doubt in Fla) Just in case though, look at your invoice. At 75-85% less R134 required, you should have been billed for 33 to 37 oz max, or 2.1 to 2.5 lbs. If they billed you for any higher than 37 oz, or 2.75 to 3 lbs, that's too much, and it won't get cool.

Anyway, where was I? Oh yes...
If it still is not cool enough, and you are confident there is the proper amount of refrigerant in there, there are a few TSBs covering this issue beyond my cycling switch novel up there. I've pasted the bodies of a couple of them in my next post. (this one is too big to post, oops)
 
Last edited:

Motech

Well-known member
Joined
Jun 21, 2021
Messages
494
Reaction score
585
Location
Santa Cruz, CA:
This one involves a new-for-91 blend door system on Bronco and F-Series for 91 model year only, trucks built after 04/91. It's an easy one, no parts if you're lucky, and you're a hero if you nail it:

++++++++++++++++++++++++++++++++++++++++++

A/C - LACK OF HEATING/COOLING PERFORMANCE
91ford25

Article No.
91-19-10

09/18/91


^ CLIMATE CONTROL - LACK OF HEATING OR COOLING PERFORMANCE - NEW TEMPERATURE DOOR CABLE ADJUSTMENT PROCEDURE - VEHICLES BUILT FROM APRIL, 1991

^ CLIMATE CONTROL - NEW TEMPERATURE DOOR CABLE - REMOVAL, INSTALLATION AND ADJUSTMENT PROCEDURES - VEHICLES BUILT FROM APRIL, 1991


LIGHT TRUCK: 1991 BRONCO, F SUPER DUTY, F-150-350 SERIES, F-47


ISSUE: A lack of heating or cooling performance may occur because the new design temperature door is not properly adjusted. The new design allows the cable to be preadjusted before installation at the assembly plant.

ACTION: If service is required, refer to the following removal, installation and adjustment procedures.


REMOVAL

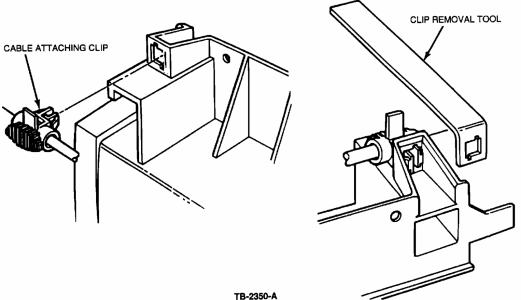
The adjustment clip is attached to a molded-in bracket located in the upper left hand area of the heater core cover. The clip is retained by two tabs. Special service tool (D91T-18532-A, Heater-A/C Temperature Cable Clip Remover) or equivalent is required to depress the locking tabs to allow removal from the attaching bracket.

1. Release the glove box to gain access to the adjustment clip.


1690370250158.png


2. Position the removal tool (D91T-18532-A) over the bracket and clip as shown in Figure 1.

3. Align the opening in the removal tool with the retaining tabs, which project through the bracket, and pull back firmly. This will depress the locking tabs but will not disengage the clip from the bracket.

4. While maintaining the pull on the tool, pull the clip away from the bracket with the other hand.

5. Examine the adjustment clip for damage during removal. If one or both tabs are broken or no longer spread away from the body of the clip, replace the clip (F1TZ-14A163-D).

If the entire cable must be removed from the vehicle, proceed as follows:


6. Disengage the cable wire from the temperature door crank.

7. Disengage the cable connector and wire from the control assembly.

INSTALLATION

1. Attach the cable to the control head and the wire coil to the temperature door crank arm.

2. Align the adjustment clip with the opening in the molded-in bracket as shown in Figure 1.

3. Push the clip firmly into place.

a. Ensure that both tabs retain the clip to the bracket. An audible click should be heard on engagement.

b. Pull firmly on the clip to verify proper retention of the clip.

ADJUSTMENT

If the temperature door cable requires adjustment, proceed as follows:

1. Release the glove box to gain access to the adjustment clip.


1690370271543.png


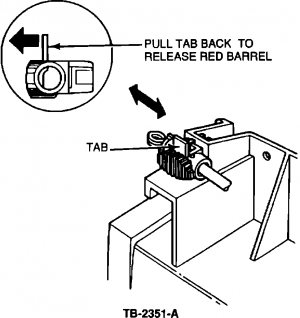
2. Pull back on the white lever of the adjustment clip, Figure 2.

3. With the tab held back...

a. Move the barrel that travels through the clip in the direction required to obtain proper door seating.

b. Move the barrel one notch and confirm that the door seats in each direction of travel.

c. If necessary, move the barrel one additional notch and check door seating at both ends of travel.


CAUTION: DO NOT MOVE THE BARREL MORE THAN TWO NOTCHES FROM THE CENTER POSITION IN EITHER DIRECTION BECAUSE THIS MAY RESULT IN BARREL DETACHMENT FROM THE CLIP DURING LATER OPERATION OF THE TEMPERATURE LEVER.

4. If more than two notches of travel are required, replace the cable (E7TZ-18552-A).


1690370287431.png

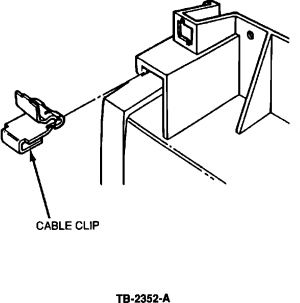
5. Install a cable adjustment clip (N802154-S100) as shown in Figure 3.

6. Install the cable in the new adjustment clip to obtain proper door travel.


PART NUMBER PART NAME CLASS

F1TZ-14A163-D Clip C
E7TZ-18552-A Cable C
N802154-S100 Clip (Pkg. of 9) BS

OTHER APPLICABLE ARTICLES: NONE
WARRANTY STATUS: Eligible Under Basic Warranty
Coverage
OPERATION DESCRIPTION TIME
911910A Replace - Temperature 0.4 Hr.
Door Cable - F-Series / Bronco


++++++++++++++++++++++++++++++++++++++++++

And finally, one more, then I'm going back to bed before the sun rises.

Another TSB on precisely this condition too, applicable only to 87-91 Bronco and F-Series. It's a pretty cool find of an otherwise very difficult problem to diagnose.

Here is that text. (sorry, no pics):

91ford25

Article No.
91-20-12

10/02/91


^ AIR CONDITIONING - LACK OF COOLING - OIL STAINS AROUND A/C COMPRESSOR HIGH PRESSURE RELIEF VALVE - TRUCKS WITH GASOLINE ENGINES

^ AIR CONDITIONING - VENTING OF REFRIGERANT THROUGH THE A/C COMPRESSOR HIGH PRESSURE RELIEF VALVE - TRUCKS WITH GASOLINE ENGINES


LIGHT TRUCK: 1987-91 BRONCO, F-150-350 SERIES
1988-91 F SUPER DUTY, F-47


This TSB article is being republished in its entirety to correct the Dealer Coding, Basic Part Number.

ISSUE: There may be a loss of A/C refrigerant through the A/C compressor high relief valve during idle and stop-and-go traffic conditions. Eventually, there may be a lack of cooling and oil stains may appear around the A/C compressor high pressure relief valve.

The excessive discharge pressure is caused by the recirculation of higher temperature engine compartment air passing through the condenser during idle and stop-and-go traffic conditions. Normally, cooler ambient air passes through the condenser. Since the refrigerant in the condenser cannot be sufficiently cooled by this high temperature air, excessive head pressures are created causing refrigerant to be vented through the high pressure relief valve.

ACTION: Replace the radiator lower air shield, located between the lower radiator support and the front bumper, with a new radiator lower air deflector (F1TZ-8327-B). This new air deflector is larger than the old air shield and will minimize the amount of hot air recirculation through the condenser. Refer to the 1991 Bronco, Econoline, F-Series, F-Super Duty Truck Shop Manual, Section 01-08, for service details.


NOTE: TO REPLACE THE DEFLECTOR ON OLDER VEHICLES, IT WILL BE NECESSARY TO DRILL HOLES, FOLLOWING THE HOLE PATTERN IN THE NEW DEFLECTOR, BEFORE IT CAN BE ATTACHED.

PART NUMBER PART NAME CLASS

F1TZ-8327-B Radiator Lower Air Deflector C

OTHER APPLICABLE ARTICLES: None
SUPERSEDES: 91-14-13
WARRANTY STATUS: Eligible Under Basic Warranty
Coverage
OPERATION DESCRIPTION TIME

912012A Install New Air Deflector 0.4 Hr.

++++++++++++++++++++++++++++++++++++++++++

Good luck finding that part though.

OK, I'm done with you. Goodnight.
 
Last edited:
OP
OP
A

ablediver

Member
Joined
Aug 23, 2021
Messages
85
Reaction score
73
Location
North Florida
Motech,

Thank you sir ! The first statement in your post describes the situation : "If it's an R12 system converted to R134, they will never blow as cold as the old R12, especially in hot and HUMID climates." This has been true. The 90 Bronc' came from the Northeast and had been converted to R-134 there in the late 90's. It was never was really cool and I had chalked it up to no insulation in the rear roof. It had developed the leak in the evaporator over a period of time. Most likely, the o-rings dried up when the vehicle was stored in the garage here (FL) over the last 15 years. Over episodic use, I just added R-134, and lived with it. Only once, did all of the R-134 leak out and I had it serviced . Then, there was cold air output.

Fast forward to last night (07/25/2023), I checked the inlet, and it was cold. I added less than 6 oz. of R-134 and the cold air output increased. We'll see how that goes. I'm not the most proficient wrench. What we have here locally, are dealer techs that aren't experienced in the older vehicles like my 90 and 96. You're absolutely right. The 90's HVAC is possibly beyond their skill set. BTW--my 96 is from AZ and you can hang beef in there on the hottest days. I really appreciate your input, you're an experienced hand at this. If you want, stay tuned and I'll update you as this moves forward. Thanks again.

Ablediver out
 

Motech

Well-known member
Joined
Jun 21, 2021
Messages
494
Reaction score
585
Location
Santa Cruz, CA:
Hey then' if you're savvy enough to add refrigerant, and if you have a gauge, set up your pressures with that switch adjustment. Ideally, you'll want it to kick off around 24-26 psi, and your high side should not exceed around 150 psi at idle. Get that dialed and I'll bet you'll be rolling in relative comfort.
 

Members online

No members online now.

Forum statistics

Threads
22,621
Messages
136,701
Members
25,282
Latest member
79' Buckin Bronco
Top