one bronco with two VINs?

Disclaimer: Links on this page pointing to Amazon, eBay and other sites may include affiliate code. If you click them and make a purchase, we may earn a small commission.

diymirage

New member
Joined
Jun 1, 2017
Messages
80
Reaction score
0
Hi guys 

this is my first post here 

im considering buying a 87 bronco as a plowvehicle/back up family hauler 

i found one i like AND can afford but the seller told me it has 2 VINs

supposedly it had gotten a new GREEN title in 2012 (here in MI, green is standard for a car title, orange is for rebuild cars and red is for scrap-never-to-be-used-on-the-road-again cars)

i havent gotten any details yet (plan to go check it out at 5 today) 

does anyone have any idea why it would have 2 different VINs though? 

and is there anything else i should look for ? 


miesk5

96 Bronco 5.0
Staff member
Moderator
Joined
Oct 18, 2005
Messages
9,071
Reaction score
1,019
Location
Floating in the Pacific
Yo diymirage,

Welcome!

History, 78-96 Bronco; Ford Truckin' Magazine; 1997 winter issue Source: by Trent R;
87-91, In 1987, the body and drivetrain of the fullsize Bronco changed, as it was still based on the F-Series. The new aero body style reflected a larger redesign of many Ford vehicles for the new model year.
The body was restyled and featured a more aerodynamic look and Euro-style headlamps."

Two electric pumps are used on 87-89 Fuel Injected Engines; a low pressure boost pump mounted in the fuel tank and a high pressure pump mounted on the vehicle frame. The low pressure pump is used to provide pressurized fuel to the inlet of the high pressure pump and helps prevent noise and heating problems. The externally mounted high pressure pump is capable of supplying 15.9 gallons of fuel an hour. System pressure is controlled by a pressure regulator mounted on the engine.

90-96 Broncos employ a single, high pressure pump which is part of the modular, In-Tank Reservoir (ITR) assembly. 

87 to Early 88 were built for some dumb reason with ****** Style (Top Hat) Hubs that are different than those in other Broncos; "...This was another of Ford's better ideas. For 87 and early 88 Ford used a one-piece locking hub assembly. This hub simply sits between the wheel and brake rotor and is held in place by the wheel studs. This type of hub is very easy to remove (simply remove the wheel), but it is different from all other Broncos and therefore parts and replacement hubs are expensive and hard to find. To convert your 87-88 Bronco to the "standard" hubs you'll need to swap all the parts from the spindle out from a Bronco or F-150. It may even be possible to take these parts from any vehicle with a Dana 44 front axle and the same wheel bolt pattern as the Bronco (5 on 5.5"). If you are considering this swap it would be a good time to consider the 8 lug axle swap you've always wanted" by Matt K 
 

C6 auto trans in 78-89 Bronco (from memory, it was installed in 5.8s in later years while 5.0 & 4.9 got the AOD
...

Best Vehicle Identification Number (VIN) Decoder; for 81-86 & 87-96 Bronco & Ford Trucks 

Source: by lmctruck.com

1987 was another big year for Bronco upgrades. The body was restyled and featured a more aerodynamic look and Euro-style headlamps. The transfer case was swapped for the smoother-shifting Borg Warner 1356 with 2.69:1 low range and a 4.10:1 gear option was added. An optional Touch Drive electric shift for the transfer case was available for Broncos equipped with the 302 MPI motor and AOD transmission. The standard motor was still the 300 cid I-6-cylinder. However the straight six now came with MPI fuel injection. This increased the horsepower of the six cylinder from 125 at 3,200rpm to 145 at 1,800rpm. The torque was increased from 150 foot pounds at 3,400rpm to 265 at 2,000rpm. The 351 cid H.O. motor was still offered as an option. 1987 also was the year the rear anti-lock brakes were standardized and a new MPH/KPH speedometer was introduced.

 
Last edited by a moderator:

miesk5

96 Bronco 5.0
Staff member
Moderator
Joined
Oct 18, 2005
Messages
9,071
Reaction score
1,019
Location
Floating in the Pacific
Yo,

Check VIN for Model Year & Engine Type (for example; 5.0, 5.8, 4.9 or 351W CID 5.8 4 BBL Carb, etc.) .
Ask for maintenance records. If no maint records are avail; check and replace if needed all filters and fluids.

Order a CarFax. Although not all accident info is provided other important info is providee @ https://www.carfax.com
While you take a test drive, have someone stay behind or follow and check for leak puddles, exhaust smoke, tire shimmy, etc. 
dash_cam offers very good advice on having an independent inspection done at sellers location! If you cant inspect it yourself, post Location in the noobie section and ask members for their help or seek out an ASE certified shop in area to inspect it for you.

Besides the usual visual, driveability and leak checks, look for: 
- oil pan rust - our's formed spots @ 62k miles - sand it down and prime/paint it w/Rust Bullet Automotive) & high temp. paint - too time-consuming replacement for such a basic thing as not having better gauge and paint by Ford
- radiator plastic side seam leaks, esp. during engine cool-down period/overnight - our's leaked @ 50k miles & again just recently - look for leaks after engine has cooled down, esp overnight
- auto tranny -  look for good shifts and see the maintenance records;  look for leaks around pan from (front) Pump seal. Observe color and odor of the fluid. It should be red, not brown or black. Odor may indicate overheating condition, clutch disc or band failure. Use an absorbent white facial tissue and wipe the fluid level indicator. Examine the stain for evidence of solid particles and for engine coolant signs (gum or varnish on fluid level indicator). 
If particles are present in the fluid or there is evidence of engine coolant or water, the transmission pan must be removed for further inspection.
- engine rear main/timing chain cover seals, etc.
- rust in inner rear fender lips, bottom of B pillars and bottom of tailgate (fender lips are rusting due to Ford's flawed spot weld process on the inner (tub) and 1/4 panel that lets moisture & debris in the seam) - A Bronco may need extensive & $$$ patch or full panel replacements at a body shop, but some diy.
check tg drains for clogs/rust..check weather seals, esp the outer ws on glass 
- radius arm bushing deterioration (I coated em w/pure silicone, from day 1) but replaced at 80k miles w/Daystar polyurethane bushings 
- cracked exhaust manifold/Y, etc. 
- roof/gutter area cracks (mostly appl. to earlier years)
- emissions air check valve & cat. converter (AIR) tubes tend to rust early; as does the AIR tube; buy locally or from pciinc.com 
- radiator core supports, lower, it rusts mainly on passenger side, PIA to replace
- body mount deterioration and frame rust
-transfer case operation - electric push button motor/connector is a prob. area; usually a broken travel stop and/or the motor connector is fouled, etc.

Also the Check Engine Light (CEL) comes on when the electronic engine control system is not working properly. The check engine warning indicator comes on briefly when the ignition switch lock cylinder is turned to ON, and should turn off when the engine starts. If the check engine warning indicator does not come on when the ignition switch lock cylinder is turned to ON or if it comes on while the vehicle is moving, the system is malfunctioning
If the CEL does not light up at all when starting it; then suspect that bulb is burnt-out or loose, socket was damaged by PO or shop, etc. or someone removed it. 
Is CEL ON when starting or while driving?

For pre 96 with EFI do a SELF TEST for diagnostic trouble codes (DTC)s by my pal BroncoJoe

The anti-lock brake electronic control module monitors the electromechanical components of the system. Malfunction of the anti-lock brake system will cause the Anti-lock brake electronic control module to shut off or inhibit the system. However, normal power assisted braking remains. Malfunctions are indicated by the amber ABS warning light inside the vehicle. 

miesk5 NOTE: "1987 was the year the rear anti-lock brakes (RABS) were standardized on Broncos; "...Rear-wheel ABS is another type of ABS available on some light trucks. It works in a similar fashion to four-wheel ABS, but monitors and operates only the rear wheels, especially important with light trucks, which often carry heavy loads supported primarily by the rear suspension and wheels..."

Suggest you buy the official FORD Powertrain Controls and Emission Diagnosis (PCED), Electrical and Vacuum Troubleshooting Manual (EVTM) on DVD.. be sure your pc, etc will be able to read the DVD, or buy a paper version. 

Cash is King.
As craigslist advises, "Do not extend payment to anyone you have not met in person.
Beware offers involving shipping - deal with locals you can meet in person.
Never wire funds (e.g. Western Union) - anyone who asks you to is a scammer.
Don't accept cashier/certified checks or money orders - banks cash fakes, then hold you responsible.
Transactions are between users only, no third party provides a "guarantee".
Never give out financial info (bank account, social security, paypal account, etc).

A summary of questions to ask the seller;
"* Do you have all the maintenance records?
* Do you have the title in hand and is there a lien on the Bronco?
* How do I get the title?
* Has the vehicle been in any accidents?
* Do you have all the maintenance records?
* How much tread is left on the tires?
* Are there any scratches or dents on the vehicle?
* Did this car belong to a smoker?
* Was this car used by pet owners?
* Can I receive close-up pictures of a specific area (miesk5 note, such as on 1/4 panels, tailgate, etc)?
* Are there any document or preparation fees?"
Courtesy of ebay

good luck!


miesk5

96 Bronco 5.0
Staff member
Moderator
Joined
Oct 18, 2005
Messages
9,071
Reaction score
1,019
Location
Floating in the Pacific
Titling and registering - buying a vehicle from an individualIndividualHeader_215946_7.gif

Once you have found the vehicle you want to buy, you will need to properly title, register, and plate it. It is best if you and the seller go together to a Secretary of State office to complete the title transfer. If not, then before leaving with the vehicle make sure: 

  • The seller gives you the title. Making changes on a title, such as crossing out a name, invalidates it. Copies are also not acceptable. The seller must complete the seller's portion of the title assignment, including the odometer disclosure statement, and sign it.
  • There is no outstanding loan against the vehicle. A title cannot be transferred until the vehicle loan is fully paid. A representative from the bank or financial institution that administered the loan must either have signed the title or provided the owner with a lien termination statement.
  • The odometer reading entered by the seller and vehicle identification number (VIN) on the title match the vehicle's odometer reading and VIN.
You do not need a license plate to drive a newly purchased vehicle directly home within Michigan within three days of purchase. Carry the assigned title and proof of insurance with you. Never use a plate from another vehicle as a substitute.

If you do not complete the title transfer with the seller at a Secretary of State office, you have 15 days from the date of sale to transfer the title into your name to avoid a $15 late fee. 6% use tax (on the greater of the fair market value or the amount paid) and the $15 title transfer fee will be due.  To transfer the vehicle title into your name at a Secretary of State office:

  • Bring the assigned vehicle title.
  • If more than one person is listed on the title as the new owners, all must appear to sign the title application. If an owner cannot appear, they may appoint an agent to sign the application on their behalf by completing an Appointment of Agent form.NOTE: An owner completing an Appointment of Agent form must provide a photocopy of their valid drivers license or state ID card to the person they appoint as their agent. This photocopy will be required at the Secretary of State office.

[*]All owners must bring identification.
[*]You may transfer a license plate from a vehicle you already own to your new one. If you need to buy a plate, several attractive options are offered. Disability and personalized plates are also available.
[*]Proof of Michigan no-fault insurance. You must have Michigan no-fault insurance to register a vehicle in Michigan. Out-of-state policies are not accepted. (Motorcycles must also be insured, but do not require no-fault insurance.)
The Secretary of State's office will issue you registration, license plate and tab. Place your tab on your plate as shown on the form that comes with it. Put your plate immediately on your vehicle.

From http://www.michigan.gov/sos/0,4670,7-127-1585_1587_1670_47674-175972--,00.html

No mention of 2 titles
 
Last edited by a moderator:
OP
OP
diymirage

diymirage

New member
Joined
Jun 1, 2017
Messages
80
Reaction score
0
thanks guys 

it looks like it was rebuild once, and thats where the second VIN came in 

there are a few issues with the 351W, most notably puddling of oil on the top of the timing cover 

it has been rebuild with aluminum heads, eddy RPM airgap and a bigger cam...i am hoping it is as simply as resealing the airgap, but what are the chances it is actually the timing cover leaking? 

or the distributor shaft? 

(sorry, im kinda new to this ford thing) 


miesk5

96 Bronco 5.0
Staff member
Moderator
Joined
Oct 18, 2005
Messages
9,071
Reaction score
1,019
Location
Floating in the Pacific
Yo,

My Bronco chat friend Kevin once wrote, "Check the timing cover gasket I chased mine for over a year or so. It's notorious for producing these exact symptoms and from the exact same area. Do you have a little oil on top of the timingcover itself between the water pump and it? These gaskets dissolve and are hard to track down. Everything looks clean other than a tiny drip here or there but usually when the truck is turned off for any length of time a small to large puddle appears."

Clean area, and before area dries, sprinkle baby powder around, let it settle.  Turn engine on, and looks for leak trail(s).

O ring at disdistributor base can leak.  O-ring should fit tightly onto housing free of cuts. 

A Ford mecmechanic would do this Fluorescent Oil Additive Method:

"Clean engine with a suitable solvent to remove all traces of oil. 
Drain engine oil crankcase and refill with recommended oil, premixed with Fluorescent Oil Additive 112-R0015 or equivalent. Use 29.6ml (1 fluid ounce) of fluorescent additive. If oil is not premixed, fluorescent additive must be added to crankcase first.
Run engine for 15 minutes. Stop engine and inspect all seal and gasket areas for leaks using Rotunda Oil Leak Detector Lamp 112-R0021 (part of 112-R0030 Kit) or equivalent. A clear bright yellow or orange area will identify leak. For extremely small leaks, several hours may be required for the leak to appear.
If necessary, pressurize main oil gallery system to locate leaks due to improperly sealed, loose or cocked plugs. If flywheel bolts leak oil, look for sealer on threads. "

Pressure Method (hardly used due to possible seal/gasket damage that can cause More oil leaks; As an alternative testing procedure, the crankcase can be pressurized to locate oil leaks. The following materials are required to fabricate the tool to be used. 
Air supply and air hose
Air pressure gauge that registers pressure in increments of one psi. 
Air line shutoff valve
Appropriate fittings to attach above parts to oil fill, PCV grommet holes and rocker arm cover tube. 
Appropriate plugs to seal any openings leading to crankcase. 
A solution of liquid detergent and water to be applied with a suitable applicator such as a squirt bottle or brush. 
Fabricate the air supply hose to include the air line shutoff valve and the appropriate adapter to permit the air to enter the engine through the rocker arm cover tube. Fabricate the air pressure gauge to a suitable adapter for installation on the engine at the oil fill opening.

Testing Procedure 
CAUTION: Use extreme caution when pressurizing crankcase. Applying air pressure above specified pressure risks damage to seals, gaskets and core plugs. Under no circumstances should pressure be allowed to exceed 27 kPa (4 psi). 
Open air supply valve until pressure gauge maintains 20 kPa (3 psi). 
Inspect sealed and/or gasketed areas for leaks by applying Snoop Pressure Check or a solution of liquid detergent and water over areas for formation of bubbles, which indicates leakage. 
Testing Procedure 
CAUTION: Use extreme caution when pressurizing crankcase. Applying air pressure above specified pressure risks damage to seals, gaskets and core plugs. Under no circumstances should pressure be allowed to exceed 27 kPa (4 psi). 

Open air supply valve until pressure gauge maintains 20 kPa (3 psi). 
Inspect sealed and/or gasketed areas for leaks by applying Snoop Pressure Check or a solution of liquid detergent and water over areas for formation of bubbles, which indicates leakage. 

Possible Leakage Points
Examine the following areas for oil leakage. 
Underhood 
Rocker cover gaskets 
Intake manifold gaskets/end seals 
Cylinder head gaskets 
Oil filter 
Distributor O-ring 
Oil level indicator (dipstick) tube connection 
Oil pressure sending unit 
Cup plugs and/or pipe plugs at end of oil passages 

Under Engine, With Vehicle on Hoist 
Oil pan gasket 
Oil pan front and rear end seals 
Crankshaft front seal 
Crankshaft rear seal
With Transmission and Flywheel Removed 

Crankshaft rear seal 
Air leakage in area around a crankshaft rear oil seal does not necessarily indicate a rear sealleak. However, if no other cause can be found for oil leakage, it can be assumed that rear seal is the cause of the oil leakage. 

Rear main bearing cap parting line. 
Rear main bearing cap and seals. 
Flywheel mounting bolt holes. 
Rear cup plugs and/or pipe plugs at the end of oil passages. 
Oil leaks at crimped seams in sheet metal parts and cracks in cast or stamped parts can be detected when pressurizing the crankcase. 

NOTE: Light foaming equally around rocker arm cover bolts and crankshaft seals is not detrimental and no corrections are required in such cases. 
Service all leaks as required.

 
OP
OP
diymirage

diymirage

New member
Joined
Jun 1, 2017
Messages
80
Reaction score
0
thanks Mieks 

i was told the engine was rebuild last winter, so i dont think the timing cover gasket dissolved, though i may very well have cracked 

this is an oil leak that occurs when the engine is running, and is NOT big enough i can see it with the engine idling 

but i can clean it, go for a drive, and find oil there again 

the intake is sealed in a very interesting way, it has black sealant running under the china wall, but grey sealant in the corners 

im thinking they may have put it together with the black, then tried to fix it with the grey later? 


miesk5

96 Bronco 5.0
Staff member
Moderator
Joined
Oct 18, 2005
Messages
9,071
Reaction score
1,019
Location
Floating in the Pacific
Yo,

Yes, could have attempted to seal the leak or is it as cited by Ford for small blocks?;

  1. Clean and inspect the mounting faces of the lower intake manifold and cylinder block surfaces. Refer to Section 03-00.
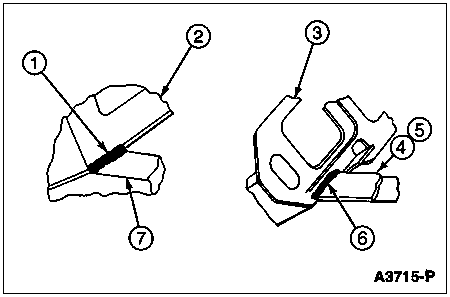
  1. Apply 1.6mm (1/16-inch) bead of Silicone Rubber F4AZ-19562-B sealer or equivalent meeting Ford specification WSE-M4G323-A1 to the end seals (junction).

    a3715p.gif

    Item Part Number Description 1 — Sealer (4 Joints) 2 6049 Cylinder Head 3 9439 Intake Manifold Gasket 4 9A424 Intake Manifold Seal (LH) 5 9A425 Intake Manifold Seal (RH) 6 — Sealer (4 Seal Ends) 7 6010 Cylinder Block
  1. NOTE: This sealer sets up within 15 minutes after application. To ensure effective sealing, assembly should proceed promptly.

    NOTE: The gaskets must be interlocked with the seal tabs.

    Install end seals on the cylinder block (6010) and new gaskets on the cylinder heads (6049).Install two locator pins into opposite corners.
  2. Install two locator pins into opposite corners
  3. Carefully lower intake manifold assembly into position.
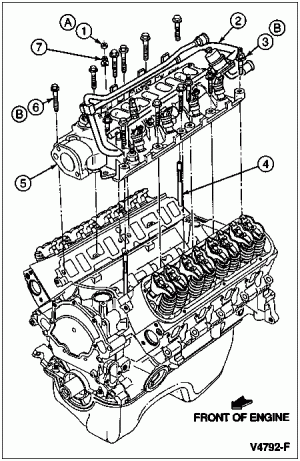
  4. Lower Intake Manifold, 5.8L

    v4792f.gif

    Item Part Number Description 1 — Nut (Part of 9K461) 2 9F792 Fuel Injection Supply Manifold 3 391445 Stud 4 — Locating Pin (4 Places)
    (Part of 9K461) 5 9424 Intake Manifold (Lower) 6 391443 Bolt 7 — Clip (Part of 9K461) A — Tighten to 11-13 Nm
    (8-10 Lb-Ft) B — Tighten to 31-34 Nm
    (23-25 Lb-Ft)
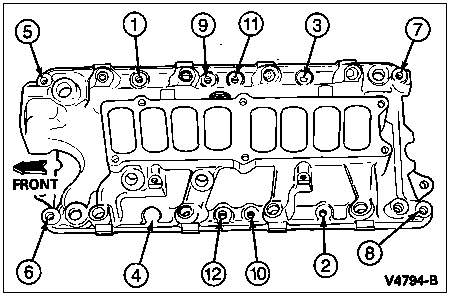
  5. Install intake manifold bolts and studs. Tighten all bolts and studs using the sequence shown in two steps as follows:

    Step 1. Tighten all to 7-14 Nm (5-10 lb-ft).

    Step 2. Tighten all to 31-34 Nm (23-25 lb-ft).

    Tightening Sequence

    v4794b.gif


Members online

No members online now.

Forum statistics

Threads
22,520
Messages
135,968
Members
25,122
Latest member
Rickyb571
Top