86 Bronco Tune Up

Disclaimer: Links on this page pointing to Amazon, eBay and other sites may include affiliate code. If you click them and make a purchase, we may earn a small commission.

M1llionb

Member
Joined
Sep 7, 2015
Messages
88
Reaction score
8
Location
Houston, TX
Can someone please give me wiring instructions for a 86 XLT Bronco 5.0. 

I would like to conduct a tune up. Also, can I get any idea for best tune up kit?

Thank you


nelbur

New member
Joined
Oct 30, 2010
Messages
132
Reaction score
0
The words "tune up" had meaning back when the ignition used breaker points.   Now with electronic ignitions and spark plugs that can go 50K miles plus, "tune up" has little meaning.


miesk5

96 Bronco 5.0
Staff member
Moderator
Joined
Oct 18, 2005
Messages
9,071
Reaction score
1,019
Location
Floating in the Pacific
Yo M1llionb,

Is you 86 5.0 Carbureted or EFI?

I prefer Motorcraft ignition, and sensor parts via Amazon or Rockauto.

Do you need the spark plug wiring diagram?

My tune up;

Check the air filter, especially more often if the vehicle is operated under severe dusty conditions and replace or clean it as necessary.

Check the PCV valve according to the Preventive Maintenance Schedule to see if it is free and not gummed up, stuck or blocked. To check the valve, remove it from the engine and work the valve by sticking a screwdriver in the crankcase side of the valve. It should move. It is possible to clean the PCV valve by soaking it in a solvent and blowing it out with compressed air. This can restore the valve to some level of operating order. This should be used only as an emergency measure. Otherwise the valve should be replaced. It may be atop oil filler cap.

Replace Fuel filter.

Visually inspect the spark plug cables for burns, cuts, or breaks in the insulation. Check the spark plug boots and the ******* on the distributor cap and coil. Replace any damaged wiring. If no physical damage is obvious, the wires can be checked with an ohmmeter for excessive resistance.

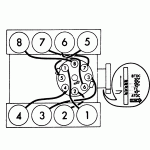
86 5.0 Firing order: 1-5-4-2-6-3-7-8 Distributor rotation: Counterclockwise & plug wire routing

 
Last edited by a moderator:

miesk5

96 Bronco 5.0
Staff member
Moderator
Joined
Oct 18, 2005
Messages
9,071
Reaction score
1,019
Location
Floating in the Pacific
Yo,

OK.

86 5.0 Firing order: 1-5-4-2-6-3-7-8 Distributor rotation: Counterclockwise, plug wire routing diagram attachment is below.

Plug Gap is .042 to .046"

Timing is 10 degrees BTDC

Forget about the idle specs, they were for carbed 5.0 engines

...

How to Set the timing on an EFI Ford by Ryan M @ http://web.archive.org/web/20120815125016/http://oldfuelinjection.com/?p=71

miesk5 note, beware of fan, belts, pulleys and hot engine and hoses.

....

Spark Plug Firing End Analysis @ http://www.aa1car.com/library/spark_plug_fouling.htm

85762007.gif


miesk5

96 Bronco 5.0
Staff member
Moderator
Joined
Oct 18, 2005
Messages
9,071
Reaction score
1,019
Location
Floating in the Pacific
Yo,

I believe this pic shows it at "Passenger side rear of valve cover" as Fred described. My Tablet refuses to cooperate with the program this morning.

Removing PCV valve from the rocker cover...

85761041.gif

 
OP
OP
M1llionb

M1llionb

Member
Joined
Sep 7, 2015
Messages
88
Reaction score
8
Location
Houston, TX
Yo,

I believe this pic shows it at "Passenger side rear of valve cover" as Fred described. My Tablet refuses to cooperate with the program this morning.

Removing PCV valve from the rocker cover...
So, this weekend, I changed the spark plugs and the wires to my truck. I've noticed that the truck turns off while I'm driving or sometimes it also turns off when I have it running on Park. What exactly, could this be? I was thinking maybe a coil issue.... But I'm not sure....


miesk5

96 Bronco 5.0
Staff member
Moderator
Joined
Oct 18, 2005
Messages
9,071
Reaction score
1,019
Location
Floating in the Pacific
Yo,

Check Spark Plug Wire Routing  @ http://www.supermotors.net/clubs/superford/registry/5180/32495-2

[SIZE=21.8179px]by Tank92[/SIZE]

Any codes?

Try a Self Test for Diagnostic Trouble Codes (DTC)s by my pal, BroncoJoe19

Looking for ICM related codes.

Pull ICM and have it tested at least 3 times.  If they won't test more than once, find an automotive electric shop.

☆typical no codes suspects:

Vacuum leak, see my leak diagnosis link in post #20.
Air filter, is it relatively clean?
Air inlet atop radiator support to filter box and to throttle body; look for obstruction; damaged tubing
Fuel quality; Oxidized fuel often turns darker over time and may even smell sour. You can check stored gasoline by pouring some into a clear glass container and comparing it side-by-side with known fresh gasoline. If your old sample looks noticeably darker than the fresh gas, you have strong evidence the gas has gone bad.
Electrical connectors; inspect at coil, ICM, PCM, etc. especially those with broken locking tabs.

http://troubleshootmyvehicle.com/ford/4.9L-5.0L-5.8L/how-to-test-the-ignition-coil-1

To check to IAC, try unplugging the IAC motor. If the idle drops, its usually due to an input signal to the computer which results in the computer raising the idle speed. If this is the case, look at all of the computer inputs to make sure everything is up to par. If the engine RPM does not drop when the IAC motor is disconnected, then either the IAC motor is not functioning properly, or, there is a vacuum leak in the engine. Stop the engine, remove the IAC motor and block off the passages. Restart the engine to see if there is any change in engine RPM. An idle speed higher than base idle specs indicates a vacuum leak. If the engine RPM is at base idle specs, then the IAC motor is bad. Resistance specs are 7-13 ohms. A good resistance reading does not necessarily mean that the IAC motor is good. Occasionally, an IAC motor will become weak, and will actually bypass too much air, causing a high idle condition even though everything else is operating properly..." 

Next, remove the IAC and inspect it. Check for a good gasket and the pintle for excessive carbon deposits. If necessary, clean the pintle with carburator cleaner spray.

Next, check the resistance of the IAC. With the electrical connector disconnected, check resistance between the two IAC terminals, which should be between 7 and 13 ohms.

If you are out of range on any of these tests, replace the IAC. Remember that the IAC valve itself is an electrical component which could


Members online

No members online now.

Forum statistics

Threads
22,520
Messages
135,977
Members
25,124
Latest member
Fryman22
Top