RevPops '90 5.0 Litre

Disclaimer: Links on this page pointing to Amazon, eBay and other sites may include affiliate code. If you click them and make a purchase, we may earn a small commission.

matthewwp56

New member
Joined
Aug 19, 2014
Messages
22
Reaction score
0
Hi Guys,

  Been wrenching on my Bronco for weeks, replaced everything in the fuel system (pump, filter, relay) but the computer (thats next).

Main problem; weak pressure at rail.

It runs fine, if I pour gas into the air filter.

Really stumped, retired disabled minister age 57. Poor in Detroit, need help.

Thanks guys.

Matt Pittaway Phone number  ***-***-xxxx  "PM ME" (personal message)

xxxx xxxxxx St, Detroit 48228

www.HisHouseMedia.com  

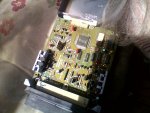
90 bronco ecc.JPG

 
Last edited by a moderator:

miesk5

96 Bronco 5.0
Staff member
Moderator
Joined
Oct 18, 2005
Messages
9,071
Reaction score
1,019
Location
Floating in the Pacific
Rev. Matt,

Is the Check Engine Light (CEL) on while driving or at idle?

the Check Engine Light (CEL) comes on when the electronic engine control system is not working properly. The check engine warning indicator comes on briefly when the ignition switch lock cylinder is turned to ON, and should turn off when the engine starts. If the check engine warning indicator does not come on when the ignition switch lock cylinder is turned to ON or if it comes on while the vehicle is moving, the system is malfunctioning

If the CEL does not light up at all when starting it; then suspect that bulb is burnt-out or loose, socket was damaged by PO or shop, etc. or someone removed it, which does happen, unfortunately.

============

Fuel Pressure with Engine running Should be 28—45 PSI

Fuel Pressure with Engine off Should be 35—45 PSI

FP Gauge may need calibration, if possible and/or a ambient & Under hood temperatures affects accuracy

See FUEL PRESSURE TEST

http://www.thedieselstop.com/faq/9497faq/maint/vra/vra09002.htm

This is by Ford for a 96, but is applicable to your 90 except for any OBD II references

For test @ Diagnostic Link Connector see http://www.supermotors.net/registry/media/283459

========

Try a Self Test for Diagnostic Trouble Codes (DTC)s by my pal, BroncoJoe19

http://broncozone.com/topic/14269-co...&mode=threaded

A helper is good to assist in reading Codees best is to take a cell fone vid and replay it.

Some basics;

Visual Check

1.Inspect the air cleaner and inlet ducting.

2.Check all engine vacuum hoses for damage, leaks, cracks, blockage, proper routing, etc.

3.Check EEC system wiring harness for proper connections, bent or broken pins, corrosion, loose wires, proper routing, etc.

4.Check the Powertrain Control Module (PCM), sensors and actuators for physical damage. I see tPS, etc was replaced...

5.Check the engine coolant for proper level and mixture.

6.Check the transmission fluid level and quality. See E4OD Fluid Condition Check Below)

7.Make all necessary repairs before continuing

8. Check headlights

The engine temperature must be greater than 50° F for the Key On Engine Off (KOEO) Self-Test and greater than 180° F for the Key On Engine Running (KOER) Self-Test.

Run it around to heat the engine up and shift thru all gears including Reverse.

Make sure A/C is off and transmission is in Park (automatic); or in Neutral for a Manual & release clutch.

Turn off all accessories; radio, lights, A/C, heater, blower, fans, etc. (close driver's door)

Then turn off engine and wait 10 seconds.

Do KOEO test First

Post Code(s) here according to:

KOEO

&

KOER

The Self-Test is divided into three specialized tests: Key On Engine Off Self-Test, Engine Running Self-Test, and Continuous Self-Test. The Self-Test is not a conclusive test by itself, but is used as a part of the functional Quick-Test diagnostic procedure. The PCM stores the Self-Test program in permanent memory. When activated, Self-Test checks the EEC system by testing memory integrity and processing capability, and verifies that various sensors and actuators are connected and operating properly.

The Key On Engine Off and Engine Running Self-Tests are functional tests which only detect faults present at the time of the Self-Test. Continuous Self-Test is performed during normal vehicle operation and stores any fault information in Keep Alive Memory (KAM) for retrieval at a later time.

Key On Engine Off Self-Test

At this time, a test of the EEC system is conducted with power applied and engine at rest.

To detect errors during Key On Engine Off Self-Test, the fault must be present at the time of testing.

Continuous Memory DTCs are issued as a result of information stored during Continuous Self-Test, while the vehicle was in normal operation. These DTCs are displayed only during Key On Engine Off Self-Test and after the separator pulse. Intermittent faults that have not occurred in the last 80 warm-up cycles (40 cycles on some applications) are erased from Continuous Memory and will not produce a Continuous Memory DTC.Note: The separator pulse and Continuous Memory DTCs follow Key On Engine Off DTCs ONLY.

Engine Running Self-Test

At this time, a test of the EEC system is conducted with the engine running. The sensors are checked under actual operating conditions and at normal operating temperatures. The actuators are exercised and checked for expected results.

 
OP
OP
matthewwp56

matthewwp56

New member
Joined
Aug 19, 2014
Messages
22
Reaction score
0
Awesome info thanks. I spent the last 2 months on boards trying all the tests and have not found the problem.

the CEL and oil indicator light up when you turn on the key. There is no fuel pressure.

I hear the fuel pump click but not whine.

There are no codes; I try the "pull codes" wire thing per manual per boards and get nada nothing zip nyet nilch zero blank silence.

I got a new ECC at the junkyard does the same thing; runs fine if you pour gas into the intake, then stops dead.

Could both ECC's be bad? How do I test the ECC using the test plug/pinout inside the cab on the ECC?

 I am an electrician so I know how to test resistance etc.

 
Did a series of fuel system tests on the boards; power to red and yellow wires to fuel pump relay.
seemed to indicate EEC but not detailed enough for my situation i guess.

I need a serious detailed fuel pump / relay / ecc test procedure to trasck this down. I am trying to stay in college need to get to class ASAP.

Thanks again all!     revpops    6256 penrod st  detroit   48228

"rainbo hospitality to all who wonder by" 

720 - two seven Oh - 0154

www.hishousemedia.com


miesk5

96 Bronco 5.0
Staff member
Moderator
Joined
Oct 18, 2005
Messages
9,071
Reaction score
1,019
Location
Floating in the Pacific
yo REV,

a Scan Tool Won’t Initiate Self-Test Due to Poor Grounds, Corroded Wiring, etc

poor-ground.jpg

and;

No Codes?

http://web.archive.org/web/20130628054258/http://oldfuelinjection.com/index.php?p=44

The famous �No Code� situation that people describe usually ends up being user error. Not that I blame anyone for not getting codes, but the Ford computer outlasts everything else on a vehicle from bumper to bumper. So PLEASE read how to perform a Self-Test and getting Trouble-Codes before tearing the vehicle apart. Replacing computers more than once on a vehicle is not an acceptable repair, other problems exist in that vehicle. Most �No Code� situations are caused by wiring problems. I have created a list of things to check. Hopefully you can get this sorted out with out burning up computers or beating your head against a wall.

•Check Battery voltage, must be above 10.5 volts.

•Replace battery if not.

•Check battery connections, corrosion, ground faults, and wiring.

• Fix all wiring.

•Check alternator output, must be between 13.5 and 14.5 volts.

•Replace Alternator if not.

•Any recent voltage irregularities from electrical charging system can cause failures.

•Replace alternator and any damaged circuits, wiring, and components.

•Check fusible links on Starter Solenoid if equipped.

•Check fuses and surge protection diode in under hood Power Distribution Box.

•Replace any fuses, diodes, and links if needed.

•Check EEC relay, must show battery voltage when engaged.

•Replace relay and damaged wiring if not.

•Make sure pin 30 on the computer is hooked up correctly.

•Manual transmission computers need to sense SIG-RTN on pin 30 when in neutral.

•Automatic transmission computers need to sense Ground on pin 30 when in neutral.

•Electronicly controled automatic computers need an operational Manual Lever Position Sensor (MLPS)

•Check aftermarket devices like alarm system connected to engine or computer components.

•Restore engine and computer system to original configuration.

•Check aftermarket computer chips and other plug in controls.

•Any chips or controls that impede basic engine and computer function need to be removed.

•Restore computer and harness to original configuration.

•Disconnect computer and inspect for damaged or pushed out pins, corrosion, loose wires.

•Replace computer if visually damaged, repair any damaged pins in harness.

•Visually inspect the ENTIRE engine and computer wiring harness and connections for corrosion, ground faults, shorts, physical damage, and general condition.

•FIX ANY & ALL PROBLEMS!

•Check Self-Test Input circuit on Pin 48 at computer harness for shorts to ground.

•Replace faulty wiring.

•Remove check engine light bulb and check Self-Test Output circuit for shorts to ground.

•Replace faulty wiring.

•Check Engine Light for damage.

•Replace faulty light bulb.

•Measure resistance between battery negative post and pins 20, 40, and 60 at the computer harness.

•Resistance must be less than 5.0 ohms.

•Replace faulty wiring between computer and battery if not.

•Turn key to ON with engine OFF and computer removed. Measure voltage on pins 1, 37, and 57. Must be above 10.5 volts and within 1.0 volt of each other.

•Replace faulty wiring between computer and battery if not.

•Turn key ON with engine OFF and computer reinstalled. Measure voltage between Pin 26 and 46 (voltage reference and signal return) must be between 4.0-6.0 volts.

•Replace faulty wiring and sensors.

•Measure resistance between Pin 46 and Pins 40 and 60 at the computer harness, must be less than 5.0 ohms.

•If all the wiring and sensors check out, Replace the computer.

to help with some test;

EEC IV Connector Pin Diagram

by Fireguy50 (Ryan M) http://web.archive.org/web/20131229163930/http://oldfuelinjection.com/images/eec04.gif

EEC Connector Pin Outs LEGEND, Bronco & Ford Truck & Van: 4.9, 460, 5.0, 5.8; by Ryan M (Fireguy50) at

http://web.archive.org/web/20131029020805/http://oldfuelinjection.com/truckpinouts.html
 
Last edited by a moderator:
OP
OP
matthewwp56

matthewwp56

New member
Joined
Aug 19, 2014
Messages
22
Reaction score
0
I'm autistic head banging is part of the territory.

I will methodically try everything on the list and get back with you.

Thanks again and dittos to all who serve in the military.

RevPops   West Detroit 48228

HisHouseMedia.com

 
OP
OP
matthewwp56

matthewwp56

New member
Joined
Aug 19, 2014
Messages
22
Reaction score
0
Gave up and hired a local guy I was referred to literally a block from my house. He loves broncos. 

He put a tester on the crap and found out in about an hour that the EEC was not communicating with the relay right. He hot wired it. It runs great but has a  hard time idling down. Yes he put a fuse in the hotwire circuit. Exactly what he did is between him and his vodka flask...its detroit it runs im happy.

Now next question; can I make a hub socket tool to get to that 4 notch thing inside to replace the front U joints? Why not use a piece of 2" pipe and notch it with a metal saw. machine out the edge leaving 4 nubs right? Does anyone carry these hub sockets... any chains like Napa?

Peace from Detroit. Pops aka Matt Pittaway

HisHouseMedia.com


miesk5

96 Bronco 5.0
Staff member
Moderator
Joined
Oct 18, 2005
Messages
9,071
Reaction score
1,019
Location
Floating in the Pacific
yo REV,

good for your mechanic!

The locking hub socket may be available @ local parts stores for a refundable deposit; similar to Auto Zone's Loan-a-Tool program.

They also sell the sockets.

Wheel Bearing Locknut Socket Bushing Fabrication for 80-96 MANUAL HUBS; "...This spanner socket will start to slip off of the locking nut once you pass 100 ft lbs or so of torque. I even had someone else handling the torque wrench while I used both hands to hold the socket onto the nut. The torque action kept causing the socket to slip off and created lots of frustration for me. I needed a bushing of sorts to keep the socket square on the locking nut..I bought this circle cutter at HF for $5. Here it is chucked into the drill. The packaging has no listed specifications of the tool so I can not verify maximum recommended RPM. Just make sure that the cutters are spaced as close as possible to exact to minimize eccentric movement. You can get good cutting action at about 500 RPM.

You can use wood to make the bushing but I would avoid plywood because the little splinters could get up in the hub and cause problems. I chose to use this cutting board made of nylon like plastic.

Cut your outer dimension first (inside diameter of hub).

http://www.supermotors.net/getfile/7...llsize/008.jpg

Then cut your inner dimension (outside diameter of spanner socket). The cheap little circle cutter produced a cool littler chamfer (about 45°) on the outside of the bushing which made it fit really, really nice in the hub. The inside cut was more or less straight because I had to hold it in a vise. I got it right on the first try and had to cut only one bushing..." read more

Source: by Rough Rider (roughrider) at http://www.supermotors.net/registry/18644/68331

Wheel Bearing Locknut Torque Settings for 80-96 MANUAL HUBS, NOT Factory Auto Hubs; Ford Pickups and Bronco; "...Using a lockout spanner (Ford # T59T-1197-B or equivalent) and a torque wrench, tighten the inner bearing adjusting nut to 50 foot pounds while rotating the wheel back and forth and seating the bearing. Back off the adjusting nut approximately 45 degrees. Assemble the lock washer by turning the inner lockout to align the pin with the nearest hole in the lock washer. To lock it, install the outer lock nut and tighten it to 150 foot pounds. Grab the top of the tire with one hand and the bottom of the tire with the other. Move the tire in and out on the spindle. End play should be less than .006 – inch.).." Thanks to 90beater (Topher, Chris)!!!!

Source: by miesk5 at Ford Bronco Zone Forums

90 Wheel bearing lock nut Socket.jpg

Wheel bearing lock nut Socket

$17.21

Ask for a discount

http://www.jbtoolsales.com/CTA-Tools-4160-4WD-Lock-Nut-Wrench-4-Prong/

Please send us a message. Most messages will receive a response within 24 hours. At this point, our customer service is done through email only. If you would like to do an order over the phone please email us and we will provide you with the phone order number.

JB Tool Sales Incorporated

PO Box 51721

Livonia, MI 48150

[email protected]

--

$20.62

http://www.amazon.com/CTA-4160-Bearing-Locknut-Socket/dp/B00LSGDEP8

Some info on removing Auto Locking Hubs in a 90 Bronco;

5 ***** to Warn® & Bearing Replacement w/ Bearing Locknut Torque Settings in a 90;

Source: by 90beater (Topher, Chris) http://bronco.tophersworld.com/writeup_hubs.htm

U Joint Inspection; "...Bound-up outer axle u-joints can cause weird steering non-returnability, pulling, noises, etc. A suggested idea is to reach up and turn the drive axle 90 degrees at the outer u-joint, look for rust bleeding out of the u-joint caps, feel for looseness..."

Source: by miesk5 at Ford Bronco Zone Forums

=====

Section 05-03A: Axle, Front Drive, Dana Models 44 and 50

1996 F-150, F-250 4x4 and Bronco Workshop Manual

REMOVAL AND INSTALLATION

Slip-Yoke, RH, and Stub Shaft Assembly, Carrier, Carrier Oil Seal and Bearing

http://www.diesel-dave.com/vehic/manual/stj/stj53a09.htm

 
OP
OP
matthewwp56

matthewwp56

New member
Joined
Aug 19, 2014
Messages
22
Reaction score
0
thanks again rescue rangers. 

So my neighbor in detroit is a bronco nut mecgqanic he had the 4 post castle socket.

The keeper / pin / wedgie thingy behind that is broken off at the half way point/ all i can do it look at it sadly.

Ima get an ez out and try to drill and **** it i guess is all i can do.

almost ready for winter! also got a new battery and starter motor and solenoid per my hood autozone guy's recommendation.

have a safe holloweenie, revpops

new number - ***-***-XXXX

www.hishousemedia.com

 
Last edited by a moderator:
OP
OP
matthewwp56

matthewwp56

New member
Joined
Aug 19, 2014
Messages
22
Reaction score
0
Thanks again guys.

Been riding my mini bike to college 8 miles x Detroit... cold...but fun!

I got the 4x hub off fine.

I got the big castle socket from local mechanic; he was not sure how to get the rotor off.

There is a large disk shaped washer( ?) with little holes all around the edge that has a slot (like for a "keeper" or key of some kind.)

there is a ear tab in the slot (so it wont turn not a threaded nut) and it wont budge.

This is a DANA 44 IFS right? Anyway do I just WD-40 and beat it off or do I pull apart all the steering nuckles etc?

I saw a video where a guy just pulled the fron right axle out and fixed the u-joint without removing steering crap...is mine the wrong one for that EZ fix?

thanks again, revpops hishousemedia.com

 
OP
OP
matthewwp56

matthewwp56

New member
Joined
Aug 19, 2014
Messages
22
Reaction score
0
I guess its time to pound off the rotor. i cant find any more bolts...must be rust?

 
OP
OP
matthewwp56

matthewwp56

New member
Joined
Aug 19, 2014
Messages
22
Reaction score
0
I put a log under the socket wrench to get the inner nut out with the 4 prong castle socket 2" plus size socket.

Miesk quoted a guy who said "...Assemble the lock washer by turning the inner lockout to align the pin with the nearest hole in the lock washer..." now this completely makes no sense.

I have removed the circlip, the retaining ring, all the hub pieces, now I see a washer? behind the big 4 hole "castle" nut is a round object same size 2" plus and it has like 1/8" holes spaced evenly around it at maybe 1/4" intervals (not there now). It is stuck. It has an ear sticking into a groove in the axle. I thought before it was a sheared off tapered sunk key, no it is part of the holey ring.

So now I just beat off the rotors right? that sounded funny.

No I mean get a couple 3" bolts and pry off the rotor; its only rust left right? or is there some little bolt in the back?

There is one like 1/2 inch bolt with a lock nut on the back of the wheel hub rotor thingy set about 1/2" out but it is WELDED with a small bead...***? I'll get a pic.


miesk5

96 Bronco 5.0
Staff member
Moderator
Joined
Oct 18, 2005
Messages
9,071
Reaction score
1,019
Location
Floating in the Pacific
yo REV,

Auto Hub Removal in a 90 by http://bronco.tophersworld.com/writeup_hubs.htm

Ignore the" Assemble the lock washer by turning the inner lockout to align the pin with the nearest hole in the lock washer"

Rotor And Axle w/U Joint Replacement in a 90 (edited version; part of Jeff's Ball Joint R&R) Jeff show how to remove the Spindle (behind the big 4 hole "castle" nut is a round object same size 2" plus and it has like 1/8" holes spaced evenly around it at maybe 1/4" intervals (not there now). It is stuck) with a slide hammer. CN PROB BORROW IT t PARTS STORE W/REFUNDABLE DEPOSIT.

Source: by Iolaus (Jeff J) at http://fullsizebronco.com/forum/showthread.php?t=141208

 
Last edited by a moderator:
OP
OP
matthewwp56

matthewwp56

New member
Joined
Aug 19, 2014
Messages
22
Reaction score
0
yo REV,

Auto Hub Removal in a 90 by http://bronco.tophersworld.com/writeup_hubs.htm

Ignore the" Assemble the lock washer by turning the inner lockout to align the pin with the nearest hole in the lock washer"

Rotor And Axle w/U Joint Replacement in a 90 (edited version; part of Jeff's Ball Joint R&R) Jeff show how to remove the Spindle (behind the big 4 hole "castle" nut is a round object same size 2" plus and it has like 1/8" holes spaced evenly around it at maybe 1/4" intervals (not there now). It is stuck) with a slide hammer. CN PROB BORROW IT t PARTS STORE W/REFUNDABLE DEPOSIT.

Source: by Iolaus (Jeff J) at http://fullsizebronco.com/forum/showthread.php?t=141208
Awesome yah. Im an idiot as usual the mechanic before he left me the last time saaid "pic out the washer and there is another nut behind it like the first 4 hole nut the "castle" socket goes into. I wasted 3 days trying to find out how to unstuck the rusty rotor. Anyway its off not I am looking at the 6- 9/16 nuts... removed them from the studs. Looking at what to do next.

I paid some guys to replace the water pump because the heater didnt work. $400 later it still did not work and I can feel no flwo when it is idling. Should I feel flow in the upper radiator hose at idle if i pinch it in my hand? I think these guys charged me $400 for nothing. 

peace revpops              hishousemedia.com

 
OP
OP
matthewwp56

matthewwp56

New member
Joined
Aug 19, 2014
Messages
22
Reaction score
0
Also my ball joints are good I'm replacing the front right Universal joint.


Seabronc

New member
Joined
May 22, 2004
Messages
7,315
Reaction score
35
Location
North of NYC
Awesome yah. Im an idiot as usual the mechanic before he left me the last time saaid "pic out the washer and there is another nut behind it like the first 4 hole nut the "castle" socket goes into. I wasted 3 days trying to find out how to unstuck the rusty rotor. Anyway its off not I am looking at the 6- 9/16 nuts... removed them from the studs. Looking at what to do next.

I paid some guys to replace the water pump because the heater didnt work. $400 later it still did not work and I can feel no flwo when it is idling. Should I feel flow in the upper radiator hose at idle if i pinch it in my hand? I think these guys charged me $400 for nothing. 

peace revpops              hishousemedia.com
Hit the studs with a hammer, and to prevent destroying the threads put a nut on the stud.

Sounds like your heater core is plugged or air locked.  Try removing the return hose and running the engine.  If it is air locked that will blow the air out the hose.  Have someone handy to turn the engine off as soon as the coolant comes out the end.  If nothing comes out it is probably clogged.

If it is clogged, try reversing the hoses and run the engine to blow out the crud (with the return hose disconnected) then hook up the return hose.  After that get a can of engine flush and follow the procedure on the can.  You can leave the hoses reversed, it won't matter and it will give time to clean more crud out of the core.  If neither of those procedures work you will need a new core.

:)>-

 
Last edited by a moderator:
OP
OP
matthewwp56

matthewwp56

New member
Joined
Aug 19, 2014
Messages
22
Reaction score
0
yo,

Forgot to add;

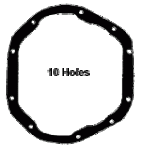
You prob. have the Dana Model 44 ID (Twin Traction Beam (TTB); 78-79 Broncos have the Straight Axle Version of the 44)

attachicon.gif
dana44 10 bolts.gif

10 bolts on the cover

http://www.differentials.com/technical-help/differential-identification
I looked at the ID page my rear end is a Ford 8.8" differential.

I have not found any ID on the passenger side I got the 4x4 hub and rotor off, took the 6 nuts off but nothing esle will budge. I cannot find anything that looks exactly like my front wheels. All the diagrams I've been given links to are of something different.

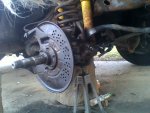
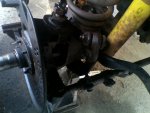
On my front passenger side I removed all the hub keepers, the big castel nut, the giant washer with 1/8" holes, the other giant castle nut, there is nothing left but it is not coming off. I'll attache a photo. i used a torch and a couple big hammers no luck; don't want to break it really need to have my truck runniomng I am riding a mini bike 8 miles to school and back at night froze in the Michigan rain last night, thanks.

 
OP
OP
matthewwp56

matthewwp56

New member
Joined
Aug 19, 2014
Messages
22
Reaction score
0
Snapshot_20141105.JPGSnapshot_20141105_1.JPGPics attached. I tried hitting 6 inner studs on nuts with hammer before, no avail. I will continue beating until further notice.

ITMT attached pics of front wheel stub in case mine is some other beast...the mechanic I bought it from may have modified it he did modify other stuff for sure.


Members online

No members online now.

Latest posts

Forum statistics

Threads
22,516
Messages
135,945
Members
25,117
Latest member
danno
Top