Brakes

Disclaimer: Links on this page pointing to Amazon, eBay and other sites may include affiliate code. If you click them and make a purchase, we may earn a small commission.

Grizz

New member
Joined
Jul 24, 2014
Messages
34
Reaction score
0
Location
Sacramento California
I have done brakes for a various other vehicles.  Never 4x4. 

My question is, do I really need that special tool to remove the spindle nuts?  I have a stock setup, auto hubs and really warped out rotors.  What other helpful or handy tools are suggested.  From the book looks liks some snap rings are in there and a "C" clip. 


Bully Bob

TOP GUN
Moderator
Joined
May 23, 2004
Messages
3,844
Reaction score
12
Location
Boulder City, Nevada (Las Vegas area)
In many cases the rotor seperates fr. the hub.  In this case there's no need to remove thr hub.

However, if you're interested in servicing the hubs at the same time, then it's possible to tap the nuts loose with a hammer & screwdriver.  The tool does make things easier.


Seabronc

New member
Joined
May 22, 2004
Messages
7,315
Reaction score
35
Location
North of NYC
If you remove that nut, you must put it back on with the correct torque.  So I would sugest investing in the correct tool.

Good luck,

:)>-


miesk5

96 Bronco 5.0
Staff member
Moderator
Joined
Oct 18, 2005
Messages
9,071
Reaction score
1,019
Location
Floating in the Pacific
yo Grizz,

You'll have to separate the ABS Tone Ring from Rotor;

b4.jpg

"...80-96 rotor replacement requires removing the hub assembly & driving out the lug studs. On 93-96 Broncos only, the tone ring must be removed..."

"Rotor Installation

b49.jpg
1. Set the rotor onto the back of the hub.
2. Drive the lug studs through both.
3. If applicable (93-96 Bronco only), install the tone ring.
4. Drop the packed inner wheel bearing into its race in the back of the hub, & apply a ring of grease to its visible surface.
5. Install the appropriate inner wheel seal.
6. Flip the assembly & apply a heavy ring of grease to the area between the bearing races in the hub.
7. Slip the hub onto the spindle, keeping as much grease as possible inside.
8. Fill as much of the hub as possible with grease, up to the outer wheel bearing race.
9. Slip the packed outer bearing onto the spindle, centering the hub around it so it goes in all the way.
10. Leaving any excess grease in place, install the wheel bearing adjusting nut(s) according to the appropriate procedure.
11. Fill the area between the nut(s) & hub wall with grease, NOT to extend outboard of the nuts.
12. Install any necessary hardware & the hub locks..."  By Steve

More info @ http://www.supermotors.net/registry/2742/12739#content

&

 
How to press rotors without taking them to a machine shop; see the supermotors link below for more pic
by Sackman
http://www.supermotors.net/registry/19344/74348
This write up shows you how to press your rotors on your Bronco's and F150's 4x4's.

So you got a rotor you need to replace, and you don't want to spend the money for a rotor with a new hub. The difference in price is a lot. I pay $29.99 for a new rotor, then press off my hub from the old, and press on to the new. With the hub already on, your paying nearly $100 a piece for them.

You got to start with the old rotor fully off the truck (I'm sure there's a write up to show you how to get to this point).

First step is to knock out the studs. I'm using a 4lb hammer. Might be a little overkill, but not much effort is needed
rotor is equipped with a tone ring
once the studs are loose, they will then rest on the tone ring
going around the studs and tapping them will a little bit of force and you'll pop the tone ring right off
Next step is to remove the hub from the old rotor (it wont be attached no more) and use the old rotor for a base to do the set up.
I put the hub into the old rotor upside down
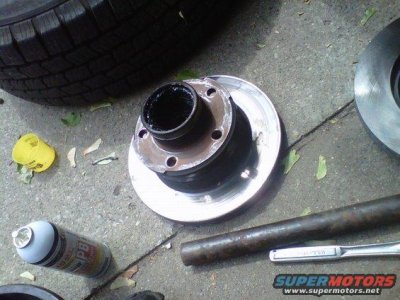
hub-upsidedown-in-old-rotor.jpg    

Then I take the new rotor and lay it onto the hub
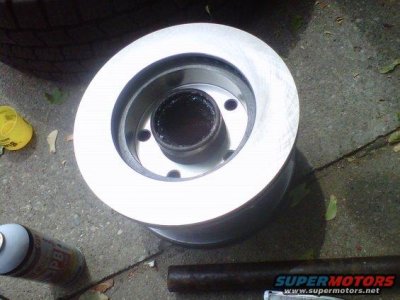
rotor-resting-on-hub.jpg    

Next step is to place the studs back into the holes and take a punch and drive them in just enough to hold the rotor onto the hub. Then I flip the rotor and lay it onto the old rotor. Now, the raised part of the old rotor fits inside the new rotor and will keep the good surface away from being damaged while pressing the studs back in the rest of the way.

Next you'll need an open lug nut. It can not be a capped lug nut. Tighten it up to pull the stud a little bit through.This will get the stud up enough to have enough threads to grab.

Now, You'll need to come up with a way to pull the studs all the way through so the shoulders are fully through. Using just the lugnut will not allow the shoulders to penetrate all the way through. This is what I use......

1 1/4" socket, 3/4" drive opening to allow the stud to go all the way through the socket. This socket is perfect to do this job.
place the socket onto the stud that already part way through
put the open lug nut inside the socket onto the studI use my impact socket on the lug nut to pull the stud through
 
You want the shoulder of the stud to be all the way through like this
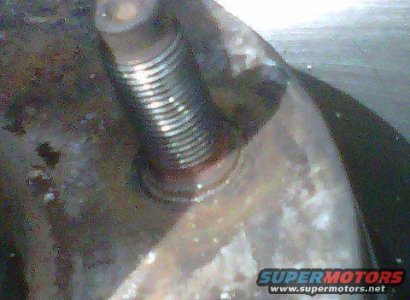
shoulder-up.jpg     Here's what the stud should look like from the backside if fully seated
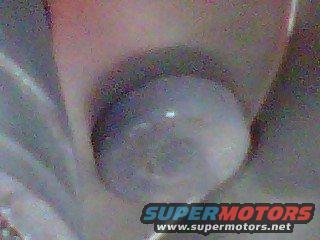
stud-in-flush.jpg     Now they are ready to reinstall. The machine shop around my house will charge you $30 a rotor to do this simple procedure."

I hope this helps those of you that want to try this yourself. It really isn't all that hard to do and will save you a bit of money too.

Here's what it'll look like if you need to keep pressing it through
stud-not-in.jpg     Once they are all nice and tight, it's time to reinstall the tone ring if you have ABS. Just tap it on being careful not to use too much force.


If it looks like this, keep pressing it through as its not fully seated.."  see pic
 
========================
 
b37.jpg
"Wheel bearing adjusting nut (2.5-inch rounded hex) for 3-***** auto hub locks only. This nut requires so little torque to install that it can usually be removed with a screwdriver by hand. But the locking clip that slips into the inner grooves in the threads MUST be removed first.

This is the INBOARD surface of the nut, which faces the wheel bearing. .."  by Steve
--
Also
 
 
"Spindle Differences '80-96spindles8396.jpg

In addition to the ~'92 loss of a spindle stud (leaving 5) and the addition of 2 notches in the spindle ****** (Bronco only) for the 4WABS sensor used on '93-96 Broncos only, the spindle was also redesigned in ~'95 to match the revised 2-piece inner wheel seal. F150 spindle flanges were never notched or drilled for the 4WABS sensor, but are otherwise identical to the corresponding Bronco's.."
=====
 
 
I know that Ford changed the 3 ***** Auto Hubs in mid year 95 and all 96 Broncos, so ensure the repair manual you have shows correct torque and parts diagram for your 94.


miesk5

96 Bronco 5.0
Staff member
Moderator
Joined
Oct 18, 2005
Messages
9,071
Reaction score
1,019
Location
Floating in the Pacific
yo,

The best source for replacing rotors and hubs/ wheel bearing service, etc. is a Ford Workshop Manual; avail on e bay, etc.

or by ALLDATA DIY (they show Ford procedures, diagrams, torques, etc.)

12 Months 26.95 Read Plan Details  Additional Vehicles can be added for $16.95 each (One Year Access), or $29.95 each (Five Years Access) after initial purchase.  5 Years 44.95 Read Plan Details Five Years Access for $44.95 first vehicle, $29.95 for each thereafter. Highest Value!
Questions? Please email [email protected]
Our local Library has All Data for free, but it is in-library use only.

I checked Chilton On-Line and  Auto Repair Reference Center on-line, but Chilton was so Wrong and ARRC did not show the 94 auto hub R&R

Dana 44 Parts Break-Out Diagrams w/ Auto & Manual Locking Hubs & BoM; 6 MB PDF; see page 121 Source: by www2.dana.com  

        http://www2.dana.com/pdf/X510-9.pdf

Model 44 Exploded View Diagram on page 122 showing auto & manual  hub locks

 See Bills of Material Location (backside of the 44) as shown in diagram on Page 122

VALIDATE Bills of Material Number

Such as 610443 for correct PN for 94 Bronco with  3.54 gear ratio

Ford Model 44 /216 IFS Front Axles Variable Parts Listing Kits & Parts - Use With All Applications

Description & Item Number (Refer to Bills of Material)  PAGE 135
610408 610411 610414 610443 610444

My C&P is messed up; here it is
1 Slinger Shim – Inner Pinion Bearing 5 ————— 2 KIT – Inner Pinion Bearing 6 706015X 706015X 706015X 706015X 706015X 3 Baffle – Pinion Bearing 7 32349 32349 32349 32349 32349 4 Gear – Differential (std) 24 40194 40194 40194 40194 40194 5 Thrustwasher – Differential Gear (std) 27 40196 40196 40196 40196 40196 6 Slinger 33 36364 — — — — 7 Oil Seal 34 38128 50492 50492 50492 50492 8 Spacer – Wheel Bearing Spindle 35 38106 — — — — 9 Bolt – Hex 44 36326-1 44630-1 44630-1 44630-1 44630-1 10 Nut 45 500381-3 — — — — 11 Stop ***** 46 31026-1 — — — — 12 Seal – Needle Bearing 48 36361 45651 45651 45651 45651 13 Spindle 50 41928 44610 44706 44610 44706 14 KIT – Spindle Seal & Bearing - 706971X 707316X 707316X 707316X 707316X 15 KIT – Spindle (33, 34, 35, 48, 49, 50) - 707178X — 707373X — 707373X 16 Spindle  Assembly (inc 48, 49, 50) - 73182X 74811X 74812X 74811X 74812X 17 Lock Nut (qty 10) 51 35704 36805 36805 36805 36805 18 Oil Seal 52 40709 40709 40709 40709 40709 19 KIT – Inner Wheel Bearing 53 706110X 706110X 706110X 706110X 706110X 20 Nut & Pin Assembly 56 ————— 21 Lock Nut 57 ————— 22 Spindle Nut 58 ————— 23 Axle Shaft Retainer 59 ————— 24 Snap Ring 60 ————— 25 Snap Ring 61 620147 620147 620147 620147 620147 26 Snap Ring 62 620430 620430 620430 620430 620430 27 ***** – Socket Head (Hub Lok) 64 45886 45886 45886 45886 45886 28 KIT – Unit Bearing & Seal - 706948X 706948X 706948X 706948X 706948X 29 Oil Seal 71 40773 40773 40773 40773 40773 30 Bearing 72 566121 566121 566121 566121 566121 31 Retainer – Oil Seal N.I. ————— 32 Retainer – Bearing Ring N.I. ————— 33 Wheel Bearing Retainer Assembly 84 43167 43167 43167 43167 43167 34 PKG – Washer N.I. —————
(See next page for additional bills of material)


OP
OP
G

Grizz

New member
Joined
Jul 24, 2014
Messages
34
Reaction score
0
Location
Sacramento California
Thanks for the info everybody.  The curious thing about what all have said is that I should have a two piece rotor and hub assembly.  in my case it is a one piece assembly.  The replacment rotor/hub ass. come with the ABS ring installed.  I would rather have the two piece since the rotor replacment is a lot cheaper and easier to deal with.  i have considered switching over but funding has really prevented that.  The spindle with the ABS built into it alone is 200 a piece.  So that being said I am going with a a repair and replace on my brake system.


Members online

No members online now.

Latest posts

Forum statistics

Threads
22,516
Messages
135,945
Members
25,118
Latest member
msgsnprtom
Top