yo,
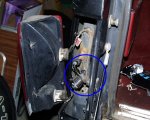
try pushing on tg where Latch Safety switch is located; at top, to right of brake/turn/back-up lamps assy

the striker/and/or its bushing(s) may be worn or need adjustment; hinge(s) @ bottom of tg could be off a bit as well.
================
Troubleshooting Synopsis; "...The tail gate circuit is pretty easy to resolve with a meter. Attached is a diagram of the circuit. Note that there are two fuses which you may have already found out.
One powers the dash switch which is powered only when the key is in RUN or ACC.
The other powers the tail gate switch and that line is hot at all times.
If the motor is definitely good, (which can be verified by using a set of jumper leads directly to the motor connector). Once it is verified that the motor works then the common problems are: 1. The Latch Safety switch in the left side latch, This is often a problem when the tail gate fails from both switches.(you can pull the connector and jumper it out, which many people leave permanently jumpers out).
The problem can be as easy as the latch needs adjustment. So if the jumper makes it work then either leave it jumped, adjust the latching stud for a tighter fit, or replace the latch switch if testing indicates it is bad. The function of the switch is to make sure the tail gate is latched before putting the window up. I like it bypassed because it makes it easy to get the window out of the way when working inside the tail gate. I think I'm smart enough to put the window back down before closing the tail gate. The only suggestion if leaving it jumped is to support the window if it is in the up position with the tail gate down. Else it could be broken by someone leaning on it.
2. The ground return for the tail gate switch uses the same two lines the dash switch does, (the grounding point is under the dash. The dash switch changes the function of the two leads running to the tail gate window motor by grounding one and putting 12V on the other. The tail gate switch uses the two leads for the ground connection, (it requires the dash switch to be in the neutral position in order to work). Depending on the year of the truck there are 2 or 3 connectors involved that often get corroded, sometimes to the point that the wires break off the connector. In your truck, there is on connector behind the left tail light, the next common failing connector is the one on the left side of the rear frame crossover member, (it is gray, if you can still see the color, and just under and behind the bumper). So to make it short, if you can operate the motor with a set of jumper leads and the window goes up and down that way, then the problem is a connection or the Latch Safety Switch. If you can't get the tail gate open to work on it, crawl in the back and remove the tail gate panel and find the motor leads attached along the bottom edge of the opening. Disconnect them and use a long set of leads or another battery in the back with you to test the motor. Once the window is down you can open the gate to make it more comfortable to work on the problem. In the diagram you will see a black with white striped wire that goes to the tail gate key switch, you should have 12V there at all times. To get at it, you will need the window in the up position. The other two leads, (with the dash switch in the center position) should indicate that they are grounded when doing a continuity check of them). You can also check the entire path from dash switch to the tail gate key switch by using a meter and probing the wires the purple with light green stripe and the dark green with light green stripe. Have someone (with the key in RUN or ACC) moving the Dash switch from UP to Down while you check those leads for 12V. If you don't get 12V then the problem is in a connector between the two switches or a broken wire (a broken wire would most likely be where they transition between the body and tail gate due to constant flexing). The procedure would be; 12V missing on one of the wires, move back to the connector behind the tail light (missing there), move to the connector on the cross member (missing there) move back to the connectors in front, until you find where you have 12V on the line you are probing. Once you find 12V the problem is between the last point probed and where you find 12V..." MIESK5 Note, For the motor test; try using a cordless power tool's 12v battery with jumpers
Source: by Seabronc (Rosie, Fred W) at Ford Bronco Zone Forums

